Mapping Dynamics 365 Marketing Form Submissions to Custom Tables with Power Automate
Marketing forms in Dynamics 365 can be easily used to create/update contact and/or lead records, but what if you are using fields that don’t map to the contact or lead? Maybe its a custom table you want to update, or its transient data that is specific to an event registration that you wouldn’t want to store in the contacts data.
The documented way is to build a classic workflow, using some Dynamics Marketing specific workflow actions and is hard coded to a specific form ID. You get all the clunky limitations/quirks of classic workflows, and even Microsoft themselves recommend you use Power Automate rather than these flow (there is no need for this to be real time, so by my logic that means it should be a cloud flow).
I’m not sure how helpful this reference would be to create a cloud flow to process form submissions, so I spent a day scratching my head and fighting with flows to work it out myself instead. In this example I am capturing data for a referral which creates a record in a custom table to begin a business process flow journey of user intimated tasks. It’s time to jump off that low code cliff my friends - hold on tight!
Where do form submissions live?
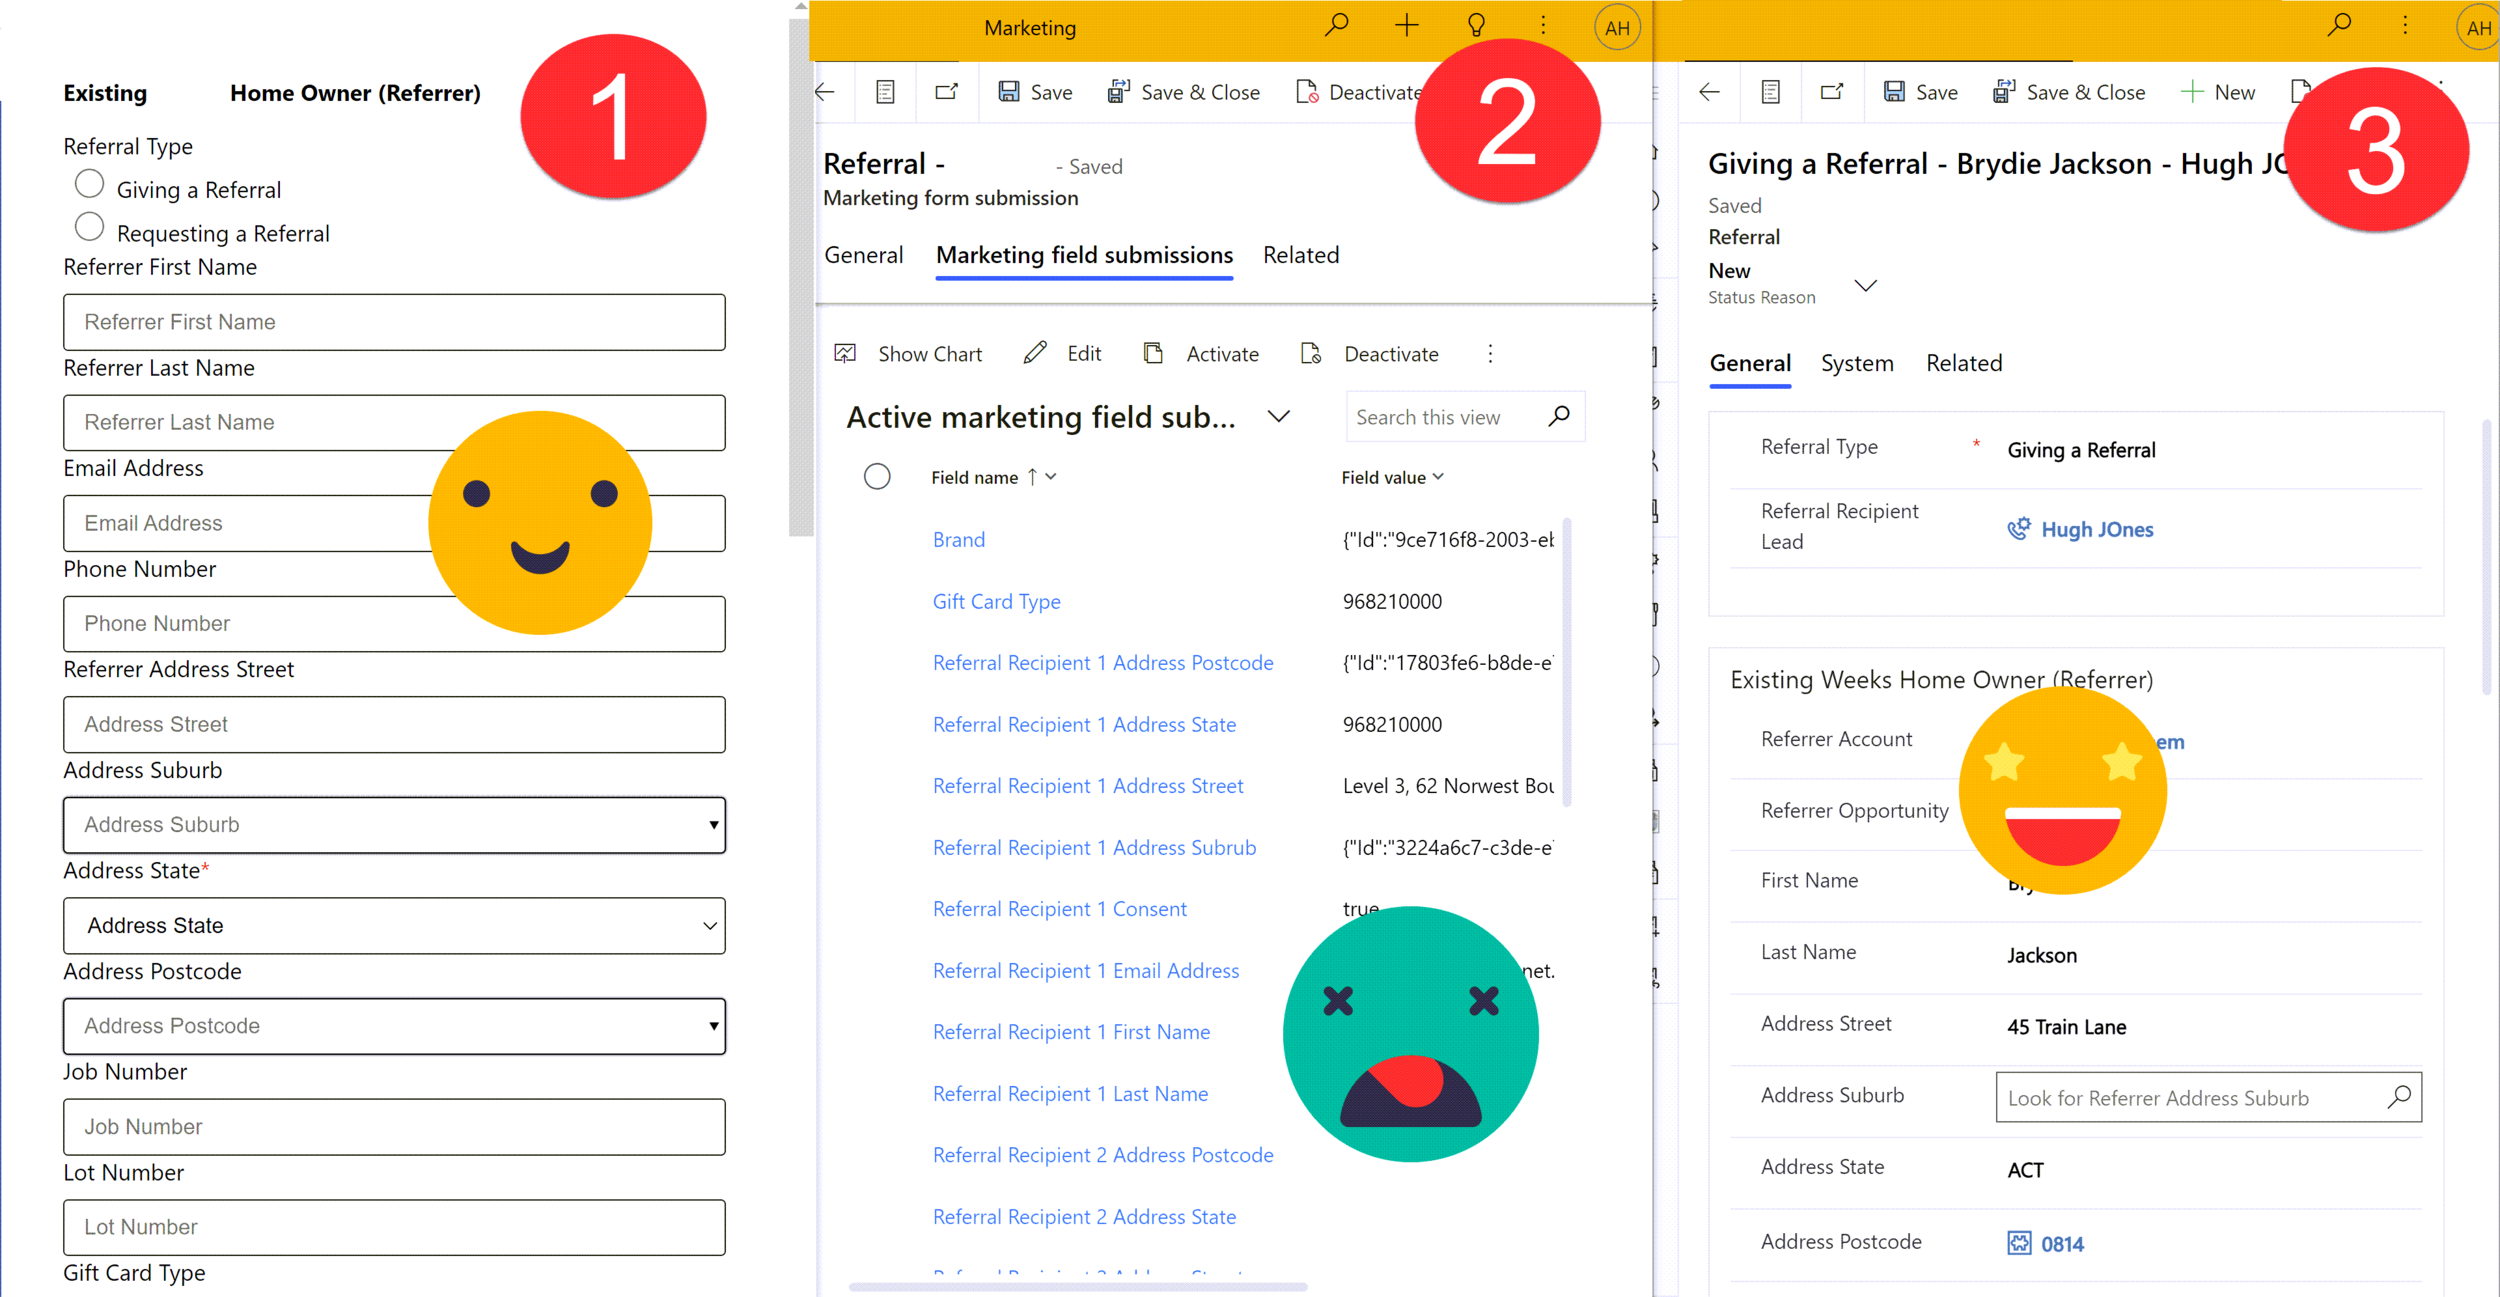
A record is created in dataverse each time a form is completed. On the ‘Marketing form submission’ table there is a field called ‘Submitted Values’ which seems to contain a string of all the values submitted in key value pairs - lovely that looks helpful. Actually it’s not for two reasons
Its just a very clever form component control that is visualising them in the string - when you actually look at this ‘Submitted Values’ column its completely blank!
You can’t read all the responses anyway - Lookups come back with multiple properties (id and LogicalName) in JSON format and choice responses come back with their value e.g. 192350003 rather than label ‘Success’
So we need to use a combination of the ‘Marketing form submission’ record, its related ‘Marketing field submissions’ and the ‘Marketing form field’ meta data to get the complete and human readable form response data.


Get the form submission
Using the Dataverse trigger ‘When a row is added, modified or deleted‘ we can get the flow to run when the form is submitted and ready to process
I have filtered here to specific form by name but this could easily be updated to consider other forms either by name or GUID or any other defining attribute. I have also filtered by status to ensure I only pick up successful (192350002) or finished (192350003) submissions.
((msdyncrm_formname eq 'Referral - WEEKS') and (statuscode eq 192350003 or statuscode eq 192350002))

Get the field submissions
Using the Dataverse action ‘List rows‘ we can first filter to get only the submission related to the current response and also to expand to get some important information about the marketing fields which we will use later on.
Filter -> (_msdyncrm_formsubmissionid_value eq '@{triggerOutputs()?['body/msdyncrm_marketingformsubmissionid']}')

Expand Query -> msdyncrm_marketingformfieldid($select=msdyncrm_lookup_target,msdyncrm_marketingformfieldtype)
Create your own ‘Submitted Values’ string
So we want to turn the individual field submissions into JSON as a single item which can then have each attribute mapped to our custom table. Although we are technically creating an array, create a String variable and set the initial value to [{.

Handle responses
We want to loop through each ‘Marketing field submission’, but how we process them into our submission string looks a little different from the lookup responses than it does for others. Lets split them up with a Condition action that uses an attribute from our expand query and also the value of the submission. Field type 11 = lookup. Somewhere along the way a For Each loop will be created for you - that’s ok our friend flow is being helpful.

Parse & Append lookup responses
For the ‘If yes"‘ side of the condition the lookup needs a little extra handling to digest. Using a Parse JSON action we will split out the attributes held in the ‘Field value’ column.

{
    "type": "object",
    "properties": {
        "Id": {
            "type": "string"
        },
        "LogicalName": {
            "type": "string"
        }
    }
}
Add an ‘Append to string’ action, then using the name of the field the response is from and the '‘Id’ parsed in the JSON. We can add this key value pair to our response string. We will pick up the table logical name later when we map to our custom table.


Append string & yes/no responses
For the ‘If no’ side of your condition we will deal with anything that isn’t a lookup. No need to parse these ones, just need to append the your string variable using using the field name & value from each ‘Marketing field submission’.

Close the string variable
Finally just outside of your condition but inside the ‘For Each’ loop and our final ‘Append to string’ action that will be used to close out the string variable with }] to complete the JSON formatting.

Parse the Submitted Values
Now we can trick Power Automate into thinking out ‘ResponseString’ variable is JSON not a string. Temporarily add a ‘Compose’ action which contains your ‘ResponseString’ variable and run your flow. Copy the output from this compose action - you need it for this step. Add a ‘Parse JSON’ action where the input is the ‘ResponseString’ variable, generate the schema by providing the compose output you just copied as a sample.

Map the form & field submissions to your custom table
Even though there is only one submission, if we start mapping directly from JSON outputs (our array) to custom table our friend flow will try to loop which is not necessary or helpful in this case. To avoid the unwanted loop you can use first(), which basically just gets the value from the first i.e. the only item in our array. Hopefully the image beloe will help you to understand which bits of the code snippet to update and with what values ‘SubmittedValues’ is just the name of my previous action and ‘Referral Recipient 1 Address Street’ is the name of the marketing field. You can use that compose snippet again here to identify all the fields names.

Mapping strings
Here we just need to use the first() statement and the name of the string field we want to map.
first(outputs('SubmittedValues')?['body'])?['Referral Recipient 1 Address Street']
Mapping choice/option sets
We need to convert the choice output from a string to a number int() so that dataverse recognises it as a valid input to set the choice value but we also handle scenarios where the choice column is left blank as int() will fail on blank values causing the rest of your record creation to fail.
if(empty(first(outputs('SubmittedValues')?['body'])?['Gift Card Type']), null, int(first(outputs('SubmittedValues')?['body'])?['Gift Card Type']))
Mapping lookups
Setting lookup values in dataverse is tricky, especially if you cannot guarantee the value will be provided. The snippet below ensures the plural table name and ID e.g. mytablename(123myguid456) are only passed when the ID is not blank.
if(empty(first(outputs('SubmittedValues')?['body'])?['Referral Recipient 1 Address Subrub']), null,
concat('mjh_building_suburbs(',first(outputs('SubmittedValues')?['body'])?['Referral Recipient 1 Address Subrub'],')'))

And finally…!
Low code? no
Business user friendly? no
Works beautifully? hell yes!
It’s a shame all this is needed to simply process form submissions but by moving it into flow it opens up many more doors in terms of generation submission reports, notiffications and sophisticated record manipulation that cannot be achieved through Dynamics Marketing and Classic Workflows.

Questions & comments always welcome - well done if you made it this far! Here is a picture of the full flow end to end if that’s what floats your boat 😉
