Converting Dataverse Choice(s), (Multi-select) Option Sets, or Picklists in Power Automate
I’ve written about my struggles with Option Set Choice fields columns before both on converting words into their choice integer equivalent or converting’s integer values for choices into the human readable ‘Label’ value. But things are rarely perfect the first time around, I learnt a few things since then, and I have been collaborating with some seriously smart developers too. In the past I have ignored the pesky Choices column type (Multi Select Option Set) too but not anymore! This post will show you how you can use Dataverse Custom Actions to work with all variations of choice/choices conversions.

Child Flow versus Custom Action
If you are working with automation in Dataverse you will want these magic conversion methods to be easily reusable between flows. We can do this by using either a Child Flow or Custom Action. A custom action for converting Dataverse Choice(s)? Yes! A smart guy called Guido Preite has created two very magical Dataverse custom actions that can be use in your flows to wrangle with all your Choice metadata related problems.
Both have their pros and cons but the results are the same either way.
Child Flows
Good: can be triggered from any flow in the same environment, you have full control over the configuration, and they are deployed with all your other customisations in a single swoop
Less Good: you have to build and maintain it yourself, performance wise probably a little slower, you need to create a HTTP with Azure AD connection and it must be run as a specific account rather than calling user context
Custom Action
Good: can be triggered from any flow in the same environment, prebuilt ready to go using the same Dataverse connection reference as the rest of your flows, runs in context of the flow calling user, it handles failures gracefully (without extra flow configuration steps) and more simplified inputs required to get the result
Less Good: less customisable/configurable, requires installation of an additional solution, single choice only and it makes you feel really dumb for creating an entire flow to achieve the same thing a custom action can do in a quarter of the time
This post will focus on the custom action side of things. Check out my previous posts linked above for some child flow inspiration or watch this space for future posts.
EDIT: And if you want to do it yourself with a one-stop show child flow in power automate check this out Dataverse Choice & Choices Conversion in Power Automate.

For reference, our model Choice as follows:

Custom Action Choice Conversion
You will first need to download and install the Metadata Custom APIs Managed Solution. Then within the flow you want to convert choice(s) in add a ‘Perform an unbound action’ Dataverse action. Search for the actions ‘GetChoiceInfoFromValue’ and ‘GetChoiceInfoFromLabel’ (depending on which way round you are trying to convert).
Convert Integers into Words - Single

Perform an unbound action - GetChoiceInfoFromLabel
Of course, your inputs are more likely to be dynamic as part of your flow for the ColumnName/TableName/Label but in the name of clear demonstration here you go.
LabelCaseSensitive - When set to no, the action will look for a match regardless of upper/lower case in the ‘Label’, set it to Yes if you want to adhere to upper/lower case nature of the inputs
LanguageCode - if you have multiple languages at play in your system, you will also need to include the language code, check out the full list of language codes for details!
ColumnName - the logical name of the column where the choice data lives
TableName - the singular table logical name e.g. contact or opportunity
Label - the word or words that you want to convert into its relevant integer
Results
Lots of helpful outputs here but the important ones are ‘ChoiceFound’ which tells you if a match to the provided if it was found, and a ChoiceValue which is the integer equivalent from the data you provided. Magic!

Convert Words into Integers - Single

Perform an unbound action - GetChoiceInfoFromValue
Of course, your inputs are more likely to be dynamic as part of your flow for the ColumnName/TableName/Valuebut in the name of clear demonstration here you go.
LanguageCode - if you have multiple languages at play in your system, you will also need to include the language code, check out the full list of language codes for details!
ColumnName - the logical name of the column where the choice data lives
TableName - the singular table logical name e.g. contact or opportunity
Value - the integer than you want to turn into words
Results
Same as above - magic!

What about Multi Select Option Set Choices?
Enter our model Choices column!

The custom actions remain the same but we just need to do some light flow gymnastics to extract the multiple results.
Convert Multiple
Converting words into integers really depends on what your words are being separated by, in this example my separator is ‘; ‘ but this could be anything at all!

Something to append to
As we need to process each value one by one, first we need a string variable that we can append to.
TradeRegions - Inititalize variable
Name TradeRegions
Type String
Loop through each value
Using split() allows us to create an array of items to loop through, nothing that my separator in this case is ‘; ‘ and the input values are hard coded. You would replace ‘Africa; Asia; North America’ with your dynamics input, and your separator with what is relevant for your data like this -> split(<Data_Recieved>,'<Seperator>')
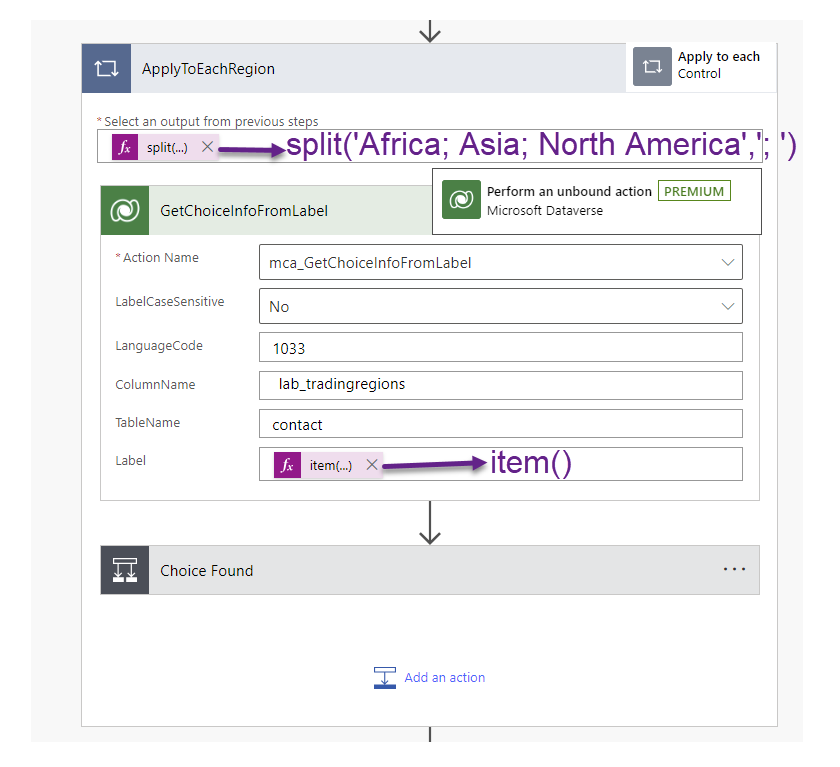
ApplyToEachRegion - Apply to each
Select an output from previous step split('Africa; Asia; North America','; ')
Inside the apply to each loop, we use the same unbound action as before ‘GetChoiceInfoFromLabel’, replace the Label inputs with the current item of the loop and change the column name to the your choices column.
GetChoiceInfoFromLabel - Perform an unbound action
Label item()
If found, append
First, check to see if the match was found, and is so appending the value to the string.
Choice Found - Condition
outputs('GetChoiceInfoFromLabel')?['body/ChoiceFound']
is equal to
true
If Yes
AppendTradeRegions - Append to string variable
Name TradeRegions
Value outputs('GetChoiceInfoFromLabel')?['body/ChoiceValue'] (followed by a comma)


Remove trailing the comma
Finally to tidy up we need to remove the trailing comma of the string to ensure Dataverse can accept the inputs as a way to set the value.
TradeRegionsRemoveTrailingComma - Compose
Inputs if(empty(variables('TradeRegions')),null,substring(variables('TradeRegions'),0,sub(length(variables('TradeRegions')),1)))


What about Integer to words?
Choices in Dataverse are stored as comma separated numbers so if you want to convert those into works, your separator is just comma. The rest of the above process is very similar except you use the inverse reaction and the outcome is words!
So it’s not the most visually thrilling post, but this custom action thing is superbly powerful yet simple to use. Big thankyou to Guido Preite for creating and sharing his work with the community.