Export Marketing Form Submissions in Dynamics 365 Marketing
It may be 2023 but you still can’t beat exporting things into an excel spreadsheet sometimes. A frequent ask I get is for the ability to export marketing form submissions in Dynamics 365 Marketing. Sounds simple but if you have tried it, you will know its not as easy as it seems, even with excessive spreadsheet massaging post export - it’s not too good!
This blog will show you how we can use a custom page, custom button and some power automate magic to be able to export marketing form submissions into a lovely excel spreadsheet. It will also lay some nice ground to be able to export event registrations (including custom field responses) in my next post. I am basing this on outbound marketing forms with plans to re-engineer for real-time goodness in the future!
NOTE: Dynamics 365 Marketing is changing, outbound marketing will still be available but this is a clear message from Microsoft that real-time marketing is the future. Existing customers of outbound marketing do not need to panic, it’s not going away any time soon. But it’s time to start planning the move to real-time functionality and ensure you understand the license cost implications of moving to Dynamics 365 Customer Insights – Journeys.

Convert form submissions into JSON
To be able to create an excel spreadsheet of form submissions, we need to convert each form submission into JSON. Everything you need to do this can be found here (everything before ‘Map the form & field submissions to your custom table’), here (choices/option sets) and here (lookups).
The end result is to transform the form submission into JSON which is stored in a new hidden field on the marketing form submission (Summary JSON). Doing this when the form submission is created (aka when the form is submitted), it ensures all the point in time information is captured and its quicker when it comes to exporting many responses at once.
PS. I will get around to doing a detailed blog post on this and to support event registrations eventually


Create a Custom Page
We will use a custom page as the modal pop up, which will also call the flow that kicks off the flow which exports the form submissions. This custom page will be loaded from the Marketing Page form, and usd to gather/export all the submissions for that particular form. Create the custom page, then add a flow from within the custom page, skip the template and select ‘+ Create from blank’.

Create a form export flow
Before you go any further, delete the godforsaken PowerApps trigger, it’s evil and breaks all the damn time.

Replace it with the ‘Flow Button for mobile’ trigger, I like this guy and it is way more powerful than a mobile flow button. Give your flow a lovely name too while you are here please.


Add trigger inputs
These are the inputs that we will pass from the custom page, into the flow to kick off the export.
MktFormName - Text
MktFormID - Text

Initialize variables
We need to initialise (or ‘Initialize’) some variables to use later on.
FormResponsesVariable
Type: Array
HeaderString
Type: String
Alphabet
Type: String
Value: A,B,C,D,E,F,G,H,I,J,K,L,M,N,O,P,Q,R,S,T,U,V,W,X,Y,Z
Optional: Now is a good time to save an exit out of the squashed screen flow editor, reopen the flow from your solution in the full screen edit mode instead,.

Create the URL for the flow run
Why? This is your insurance policy. If something goes wrong we can use this later to pass back to the custom page to support error handling. We will use it later but generate it now before anything can possibly go wrong.
FlowRunURL
Inputs: https://make.powerautomate.com/environments/@{workflow()?['tags']['environmentName']}/flows/@{workflow()?['name']}/runs/@{workflow()?['run']['name']}
Create the content for a blank file
OK this is a bit hacky, but smart, really smart. More details on this blog post, but essentially you need to create a blank file in flow as a one off job, copy the outputs and paste it into a compose step here. We need this to be able to create a ‘Blank’ file using power automate, so that we can then populate it with our form submissions.
BlankFileContent - Compose
Inputs: see blog post above

Create a blank spreadsheet
To populate the spreadsheet we first need to create the file using the blank inputs from above. The name is just using the marketing form name (passed in from the custom page) and a randomly generated number to ensure that each file created has a unique name and SharePoint doesn’t cry.
CreateFileXLSX - SharePoint Create file
Site Address: your SharePoint site
Folder Path: your SharePoint Folder Path
File Name: @{triggerBody()['text']} @{rand(0,99999)}.xlsx
MktFormName
Content: @{outputs('BlankFileContent')}

Find the related Marketing Form Fields
The idea here is that we need to define what the headings of the spreadsheet are. We do this by finding all the ‘Marketing Form Fields’ attached to the marketing form to use as column names.
GetMktFormFields
Select columns: msdyncrm_marketingformfieldid,msdyncrm_name
Filter rows: (statecode eq 0) and (msdyncrm_marketingform_marketingformfield/any(o1:(o1/msdyncrm_marketingformid eq @{triggerBody()['text_1']})))

Define the column headers
Then we can append these form field names as a comma separate string on the ‘HeaderString’ variable. Note that here I use a replace the characters “ and : because they have a tendency to break JSON and I have also removed them when creating the JSON summary. We will use these generate values in the next step when we create the table inside the spreadsheet.
ForEachMktFormField - Apply to each
Select an output from previous steps: @{outputs('GetMktFormFields')?['body/value']}
AppendHeaderStringMktFormFields - Excel Add a row into a table
Name: HeaderString
Value: @{replace(items('ForEachMktFormField')?['msdyncrm_name'],':','')},
Define the inputs for the excel table creation
Using the outputs captured in the ‘HeaderString’ we can define the inputs for ‘Columns names’ and ‘Table range’ in the excel table creation step. For the column names we are just removing the trailing comma. For the table range we are turning the number of columns into its alphabetical counterpart i.e. A=1, B=2 etc.

ColumnNames - Compose (Remove the trailing comma from the comma separated string)
Inputs: @{substring(variables('HeaderString'),0,sub(length(variables('HeaderString')),1))}
NumberOfColumnsForAlphaArray - Compose (count how many columns there will be)
Inputs: @{add(length(split(outputs('ColumnNames'),',')),-1)}
TableRange - Compose (define the table range of the spreadsheet e.g. A1:G1)
Inputs: A1:@{split(variables('Alphabet'), ',')?[outputs('NumberOfColumnsForAlphaArray')]}1

Create a table in the excel file
Now to create a table in the blank excel file you created earlier, using the values we calculated above.
CreateTable - Excel Create Table
Location: your SharePoint location
Document Library: your SharePoint Document Library
File: @outputs('CreateFileXLSX')?['body/Path']
Table range: @{outputs('TableRange')}
Columns names: @{outputs('ColumnNames')}

Collect the form submissions
Using the Dataverse ‘List rows’ action we can collect up all the marketing form submission against the specific form which will need to be included in the export. Replace ‘your_summaryjson ‘ with the name of your field that stores the JSON summary.
GetMktFormSubmissions - Dataverse List rows
Table name: Marketing form submissions
Select columns: msdyncrm_marketingformsubmissionid,msdyncrm_registrationid_value,your_summaryjson
Filter rows: _msdyncrm_marketingformid_value eq @{triggerBody()['text_1']} and your_summaryjson ne null
Sort By: createdon desc
Respond with a file Link
At this point, the file exists and is being populated row by row. Ideally you would respond to the user with the file link only once it is complete but this may take some time if you have a lot of form submissions to export, and when you call a flow from the custom page, the default timeout is two minutes. So if you don’t respond within the two minutes the response cannot get back to your user on the custom page. Instead we will create a read only share link to pass back to the user, so they can access the file while its still being updated.
Happy path first. Assuming it all went well we can respond to the waiting custom page with the File Share Link. The flow run URL can be blank if everything went well. The result will be ‘Success’.

RespondSuccess - Respond to a PowerApp or flow
FileURL: @outputs('ShareLinkToFile')?['body/link/webUrl']
FlowRunURL: @null
Row Count: @length(outputs('GetMktFormSubmissions')?['body/value'])
Result: Success
Populate form submission into the Excel table
Now we can append each of the JSON form summaries into the excel table we created earlier.
AppendJSONResponses - Apply to Each
Select an output from previous steps: @{outputs('GetMktFormSubmissions')?['body/value']}
AddTableRowPerFormSubmission - Excel Add a row into a table
Location: your SharePoint location
Document Library: your SharePoint Document Library
File: @outputs('CreateFileXLSX')?['body/Path']
Table: @outputs('CreateTable')?['body/name']
Row: @{json(items('AppendJSONResponses')?[your_summaryjson'])}


Respond - Error Handling
If something goes wrong, we want to pass something useful back to the user, this is where we use the ‘FlowRunURL’ compose step from the start. Add this and the below responses into a ‘Respond to a PowerApp or Flow’ action for the failure response.
Then add a ‘terminate’ step so that the flow is clearly marked as failed rather than false success.
RespondFail - Respond to a PowerApp or flow
FileURL: @null
FlowRunURL: @outputs('FlowRunURL')
RowCount: 0
Result: Error
End - Fail - Terminate
Status: Failed
Run only when something goes wrong
Now we can configure the failed response to only run if anything prior to it goes wrong by modifying the ‘Configure Run After’ settings as seen in the screenshot. It should only run if the previous step fails, is skipped or times out.


In case you got a bit lost, this birds eye view should help you find your way. Don’t worry too much about the parallel section, they can be in a single line as per instructions above.
Test your flow
Now is a good time to test out your flow before you get carried away with the fun custom page & button bits. Open the flow and provide test inputs to run it from the Flow details screen. You need to make sure the form submission JSON data has already been populated for this bit to work. You can run this flow and check the excel file comes out as expected using this testing method.

Launch the Custom Page as a Modal
The custom page is currently blank, but lets get the custom page loading in context of the Marketing Form record. This has been so wonderfully done already by Diana Birkelbach, skip on down to ‘Calling the Custom Page Dialog from the Ribbon (Commanding)’ in this blog. Youy want to create the button to show on the Main Form of the Marketing Form table

Button Visibility
Add the below condition to the Visible formula which will ensure the button only shows when the form is enabled to store form submissions, has at least one form submission captured and is of type ‘Landing Page’.
And(CountRows(Filter('Marketing form submissions','Source marketing form'.'Marketing form'=Self.Selected.Item.'Marketing form'))>0,Self.Selected.Item.Default,Self.Selected.Item.'Form type'=0)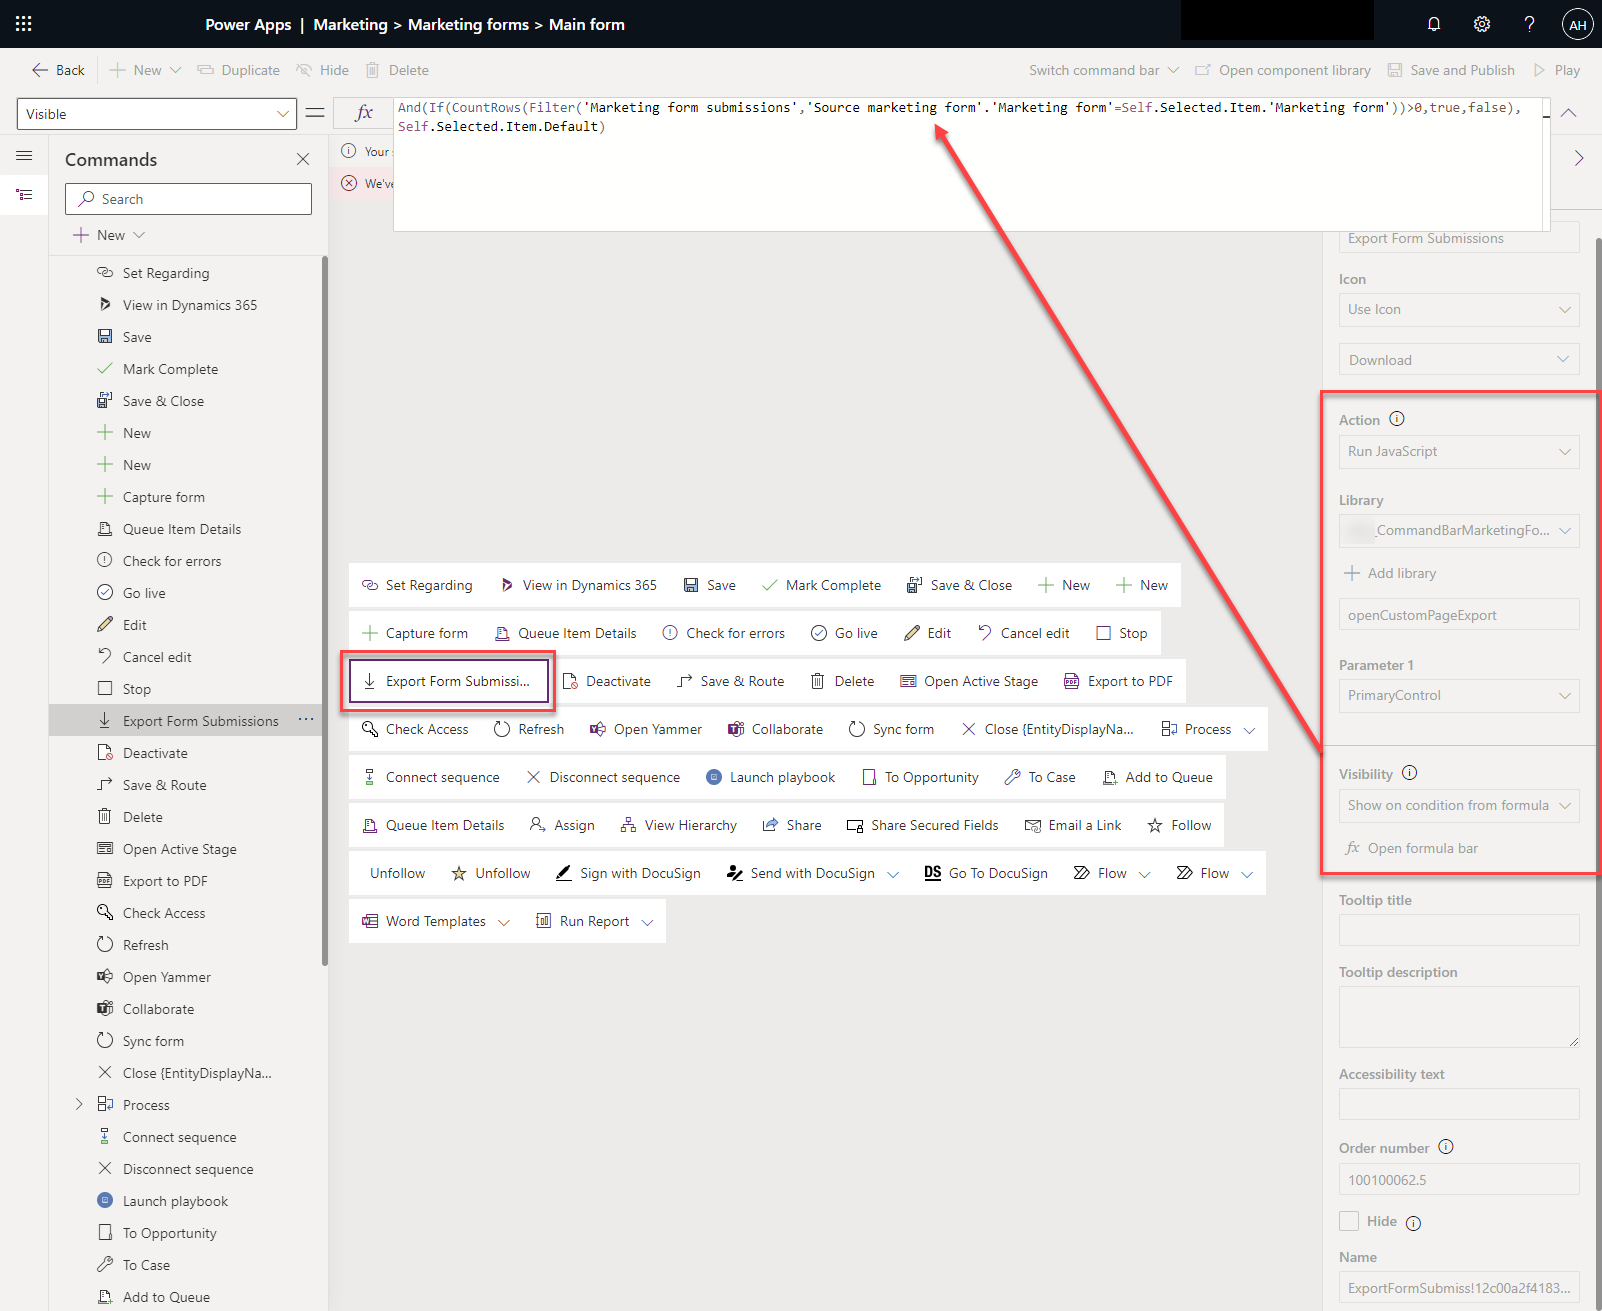
Design the Custom Page
Finally we need to design the custom page to call the flow that generates the spreadsheet and to return the file URL (or the error message.).
OnStart
The main purpose for this modal is to kick off the export, prpovide clear indication to the user that something is happening, and a place to return the download link to. We don’t need the user to input any data so we will kick off the flow run in the OnStart property of the App. We also set some variables (varFlowInProg & varFlowComplete) that we can use to control the show/hide of elements later on. By wrapping the Flow run call into a a Set() for varFlowResponse we can capture the response values and use them in subsequent steps.
//Flow in progress
Set(varFlowComplete,false); Set(varFlowInProg,true);

//Set variables for form context
Set(RecordId, Substitute(Substitute(Param("recordId"), "{", ""), "}",""));
Set(TableName, Param("entityName"));

//Set Marketing Form Values
Set(RecordName,LookUp('Marketing forms', 'Marketing form' = GUID(RecordId)).Name),

//run flow
Set(varFlowResponse,'CustomPageButton|ExportMarketingFormResponses'.Run(RecordName,RecordId));

//Complete
Set(varFlowInProg,false);Set(varFlowComplete,true);

In Progress
We need to give the user some feedback that something is happening and that they need to wait, we do this with a message and a loding gif group that shows only when varFlowInProg is true
InProgGroup - Group
Visible: varFlowInProg
InProgressLabel - Label
Text: “Preparing your file, please wait"
LoadingImage - Image
Image: YourImageName
I use loading.io to create appropriately branded loading images, you can use any static of gif based image here.


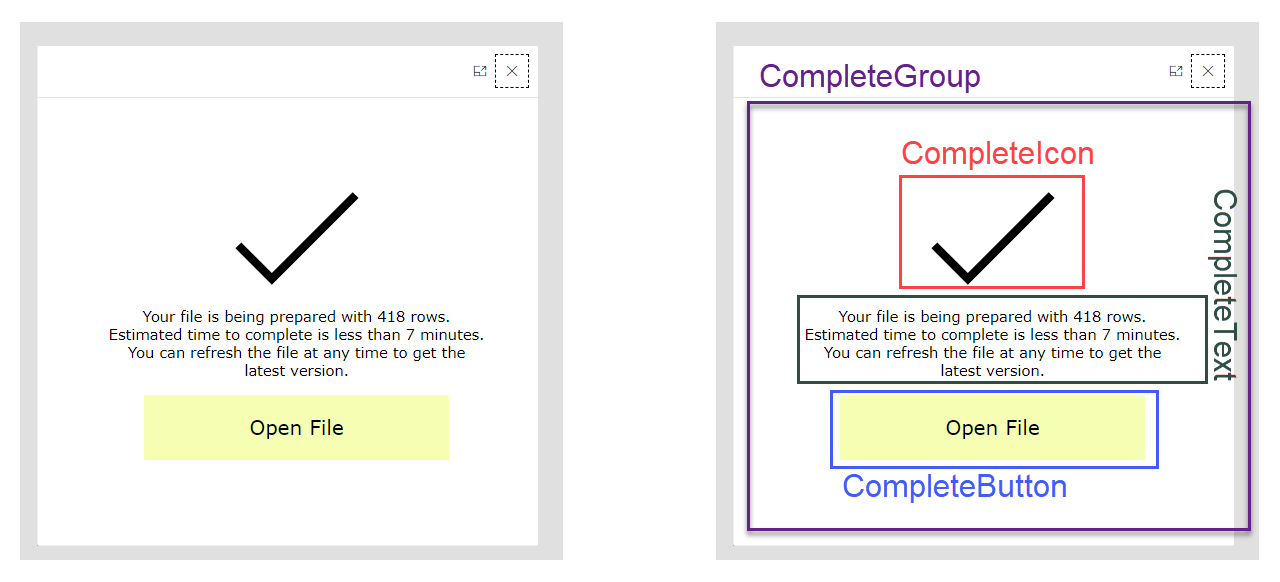
Complete
Once the flow is complete, we set varFlowComplete to true and varFlowInProg to false which will reveal the group for Complete, make sure everything has display mode edit for click-ability to launch the file.
I did some vague computations that each row takes 2 seconds to generate so based on this some more vague estimates on how long until the file will be ready.
CompleteGroup - Group
Visible: varFlowComplete
OnSelect: Launch(varFlowResponse.fileurl)
CompleteText - HTML Text
HtmlText: "<center> Your file is being prepared with "&Text(varFlowResponse.rowcount)&If(RoundUp((varFlowResponse.rowcount*2)/60,0)>1," rows"," row")&".<br/>Estimated time to complete is less than "&Text(RoundUp(varFlowResponse.rowcount/60,0))&If(RoundUp((varFlowResponse.rowcount*2)/60,0)>1," minutes"," minute")&".<br/>You can refresh the file at any time to get the latest version.</center>"
CompleteButton - Button
Text: “Open File”
CompleteIcon - Icon
Icon: Icon.Check

Error
Finally, in case something goes wrong, it’s nice to let them know and something useful to do as next steps (aka call for help!).
ErrorText
HtmlText: "Error: Something went wrong, copy and send this message to your adminstrator for troubleshooting " & varFlowResponse.flowrunurl
Visible: And(varFlowResponse.result<>"Success",varFlowComplete)
ErrorButton
OnSelect: Copy(ErrorText.HtmlText)
Visible: And(varFlowResponse.result<>"Success",varFlowComplete)

Runtime errors - Don’t Panic
If you close and reopen your custom page it might look a little scary/broken but don’t worry. As the flow runs ‘On Start’ in context of the form it can sometimes get a bit upset in studio edit mode. So long as the errors are ‘Runtime’ isues, don’t worry too much before testing from the modal screen with form context.

You can also slide in some hardcoded test variables by passing in a marketing for ID in the OnStart property so you can stay within the app maker studio to test, just dont forget to comment them out before you try testing in the model-driven app!

//Test variables msdyncrm_marketingform
Set(RecordId, "marketing-form-guid");
Set(TableName, "msdyncrm_marketingform");
SUMMARY GIF AGAIN E2E
If you made it this far then kudos. Bonus outcome - even if it fails, it still looks really neat!


Coming soon…
Creating the JSON summary for Marketing Form landing page and eevnt registration submissions - including custom registration responses! Then, how to export event registrations too.