Upload Documents from Model-driven apps or Dynamics 365 to SharePoint - with metadata!
One of my biggest disappointments in life has been the dataverse model-driven or customer engagement (Dynamics 365) app to SharePoint ‘integration’. I’m sure 15 years ago it was great, but the world has moved on from chucking documents into folders, which are stored in folders, within more folders and so on. A taste of the issues I come across, time and time again are:
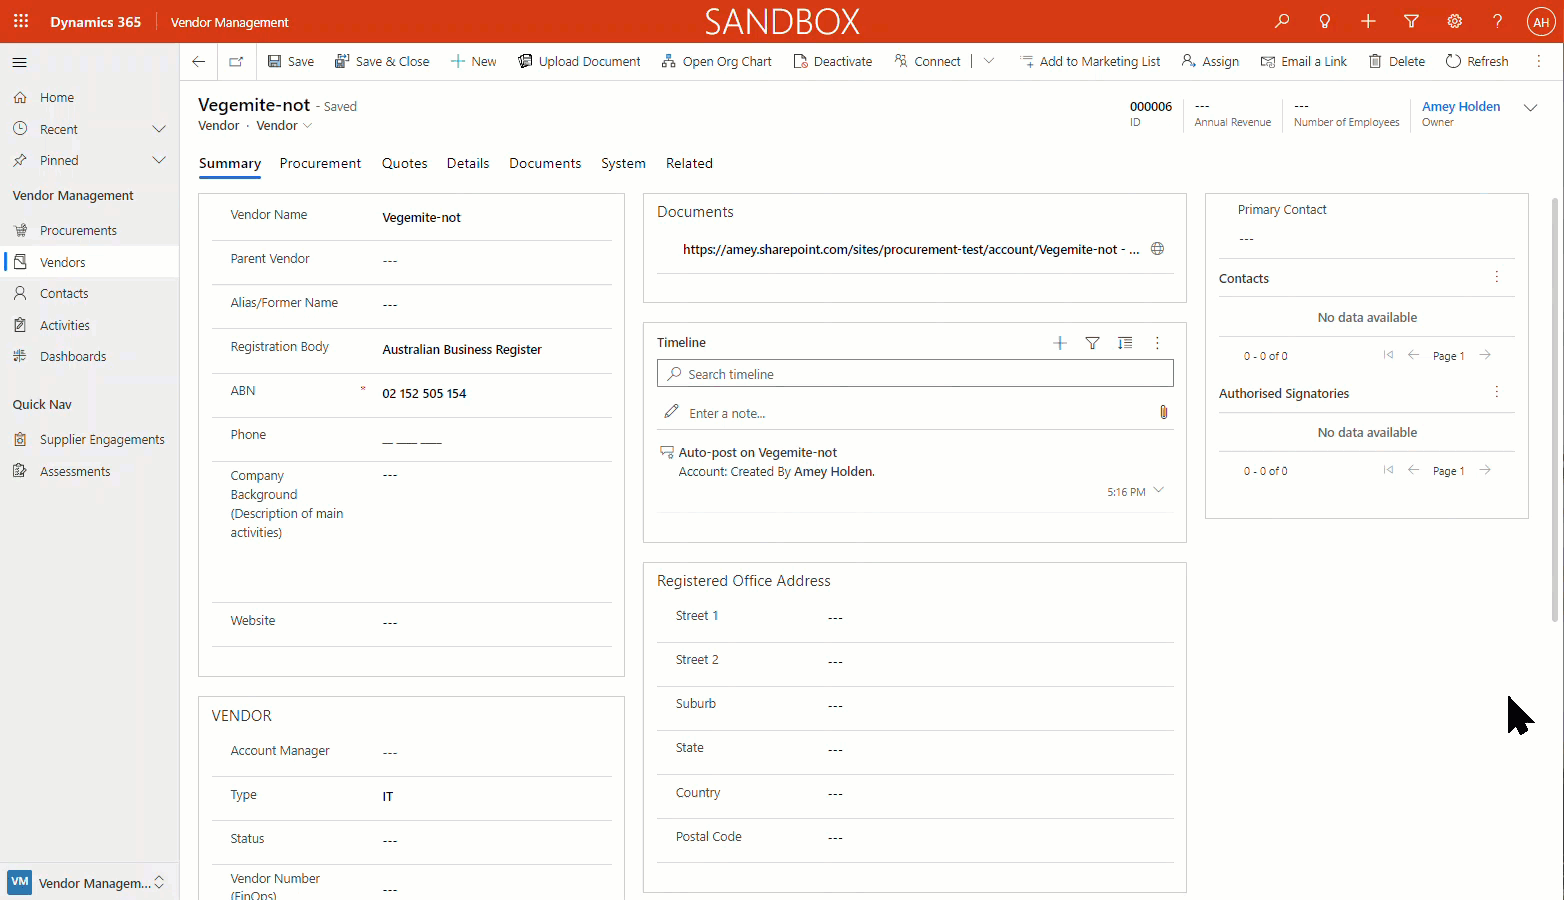
The user experience of browsing the documents from the model-driven app is cumbersome and confusing (metadata will save you ⭐).
There is no way to add any kind of information or metadata about the document except the record it relates to (by proxy of its location) and the name of the document (the reason you probably ended up reading this because the title so ambitiously promised a solution star ⭐)
There is no way to easily find out if/when documents were uploaded without delving into each SharePoint folder (also covered here star ⭐)
Navigating to the document folder from the record is confusing and clunky (future blog post 📌).
The folder names have a big ugly GUID attached and don’t update if you change the name of the record (future blog post 📌).
This magical solution is made possible with Custom Pages, Power Automate, Diana Birkelbach, Matthew Devaney, another blog that I cannot find anymore and my brain a little bit also. Being from a Dynamics 365/model-driven app focused world - Custom Pages both excite and terrify me, only relatively simple Canvas App wizardry skills are required here. It’s not quite a step by step blog for each part of the puzzle, but more an organised flow of how each blog helped me and how I mixed them together to create this beauty. *insert community power/power platform puns hurrah here*

Video demo -> https://youtu.be/BTG5MQ16cHw
P.S Yes I have clearly lived a very boring life if this is one of my biggest disappointments, but I’m going to own it. On with the show!
SharePoint - Define Metadata
I’m going to make the assumption that you have already set up the SharePoint integration, which has led you to this terrible point. So you already have the SharePoint site up and running. You need to add in the custom columns you want to map data to during the upload. These could be manually input by the user (Document Type & Description) or determined from the context which the document was uploaded (Procurement Name & Procurement ID).

Custom Page - Choose a File For Upload and Capture Metadata
From the model-driven app, we launch a custom page where we can upload the document. The user can input useful information about the document such as the type, any file name updates and also a detailed description (plus anything else you need!). I followed the wise words of this blog and he explains it beautifully. Also make sure you do the bit where it says “Make File Content a required input.“, or you can spend a day troubling yourself about why the document will not show up in your flow in the next step.

I added the following extras
Filename as an input
Which pre-populates with the files name and can be updated during the upload if needed:
First(AttachFile.Attachments).Name
A filtered lookup child records
Which are ssociated to the Parent. In this case one Vendor can have many procurements and the document may relate to a specific one. This could apply to a more ‘standard scenario where a customer can have one or many Opportunities, marking the file as specific to a certain opportunity could be very handy:
If(RegardingName="account",Filter(Procurements,Vendor.Account=GUID(RecordId)),Filter(Procurements,'Procurement ID'=GUID(RecordId)))
A preview of the child record
To show details behind the chosen lookup item with some key information that the user can verify during the upload process
"ID: "&ProcurementLookup.Selected.ID&Char(13)&Char(13)
&"Contract value inc. Tax: "&"$"&Text(ProcurementLookup.Selected.'Contract Value Inc Tax',"0.00")&Char(13)&Char(13)
&"Contract value exc. Tax: "&"$"&Text(ProcurementLookup.Selected.'Contract Value Exc Tax',"0.00")&Char(13)&Char(13)
&"Band: "&ProcurementLookup.Selected.Band&Char(13)&Char(13)
&"Business Owner: "&ProcurementLookup.Selected.'Business Owner'.'Full Name'&Char(13)&Char(13)
&"Brief: "&ProcurementLookup.Selected.Brief
Command Bar - Open Custom Page Modal with Record Context
Apart from the handy user entered data from above, we want to automatically link the Document to the context of where it was added from, so we can store it in the right place in SharePoint and make sure its easy to find again when you need it. Time for Amey ‘Anything But Code’ Holden to once again become a hypocrite. We are going to use a teeny tiny (yet magical) piece of JavaScript here to make the page open up in our model-driven app as a modal. I definitely didn’t write this piece of code, the pro-dev Diana Birkelbach did in her blog here, alongside a lovely step by step explanation of how to make it happen. Make sure you go to the section called “Calling the Custom Page Dialog from the Ribbon (Commanding)“ for the code snippet
Power Automate - Upload File to SharePoint with Metadata
Behind the ‘Upload’ button on your custom page is where the Power Automate magic happens. Setting the metadata part is covered wonderfully in Matt’s blog already, a few things I added here are below (with a more detailed future blog post 📌):

Locate the correct SharePoint folder based on the record context in which to upload the file
Using a list rows action for Document Location, filtering on the Regarding ID of the row you want the SharePoint folder for regardingobjectidvalue eq 'ROW_ID'
In my case the ‘Vendor’ but essentially, its the Account GUID
P.S There is a whole heap of blogs about SharePoint folder hunting/matching/magic by Linn Zaw Winn which helped me out here.

Appending the file extension (e.g. .docx) if the user removed it during their editing of the filename
Where text_5 is the full file name input by the user and last(split(triggerBody()['file']['name'], '.')) is the extension included in the original file which was uploaded. If they match no update, otherwise it will append the file extensions on to the given file name.
if(endsWith(triggerBody()['text_5'], last(split(triggerBody()['file']['name'], '.'))), triggerBody()['text_5'], concat(triggerBody()['text_5'], '.',
last(split(triggerBody()['file']['name'], '.'))))

Making the file name unique
Uploading a document into SharePoint when there is already a file in the folder with the same name will either fail or overwrite the existing document. Sometimes that’s useful, but here it is not. Using the SharePoint Action ‘Get files (properties only) you can search a specific folder for a matching file name. Switch the filter query to ‘Advanced Mode’ (the red square on the photo - click it!) then enter the query: FileLeafRef eq 'FILE_NAME_VARIABLE' where 'FILE_NAME_VARIABLE' is the outputs from the step above - the name you intend to give the file.
P.S in ‘Site Address’ I am using an environment variable to pass in the SharePoint Site address, so that when I deploy to another environment, all the flows can be easily repointed to the correct SharePoint site - handy!
Check if the search returned any results - if no result (i.e. empty is true) was found it means the filename is unique, no action needed.
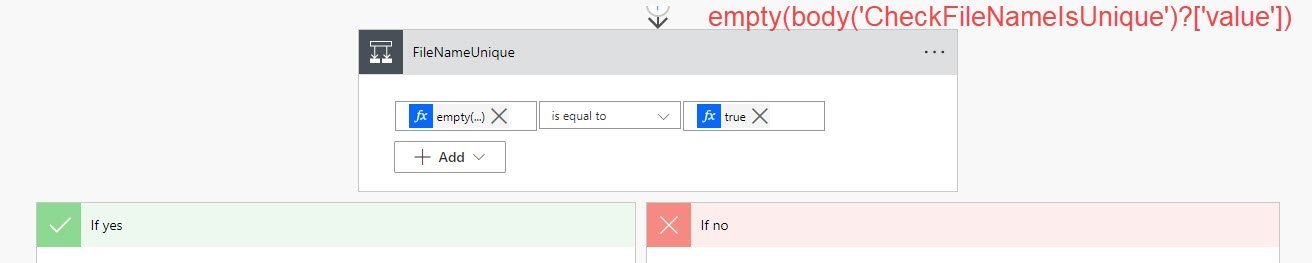
empty(body('CheckFileNameIsUnique')?['value'])If empty is false, then there is a file already existing in here with the same name as you intended to use. We fix this by appending a date/time stamp to the filename before the file extension. Here I use the ‘Find text position’ and ‘Substring’ actions but you could combine these into a single formula if preferred. Then append the fromatted date time string between the file name and the document extension e.g. my non uniquefilename 2022-03-30 1227.docx

last(split(variables('FileName'), '.'))

formatDateTime(convertTimeZone(utcNow(),'UTC','AUS Eastern Standard Time'),'dd-MM-yy HHmm')
Now you are ready to create the file and update the file properties with the metadata as per Matts’ blog.
Custom Page - Confirm the Upload
The final step of the flow above responds to the custom page, to let it know the document upload has been successful. As well as a confirmation message for the user, I added links to the document and the SharePoint folder so the user can quickly access/verify the document after upload without having to go check anywhere else.

The On Select property of the upload button looks like this:
Set(varUploadInProg,true);
Set(varFileUploadResponse,ProcurementUploadFileFromCustomPage.Run(
    {
         contentBytes: First(AttachFile.Attachments).Value,
         name: First(AttachFile.Attachments).Name
     },
RecordId,
If(IsBlank(ProcurementLookup.Selected.ID),"null",ProcurementLookup.Selected.ID),
If(IsBlank(ProcurementLookup.Selected.Procurement),"null",ProcurementLookup.Selected.Procurement),
DocumentTypeCombo.Selected.Value,
If(IsBlank(DescriptionInput.Value),"None",DescriptionInput.Value),
FileNameInput.Value,
RegardingName,
RecordId,
User().Email
 ).fileurl);
 Set(varUploadInProg,false); Set(varUploadComplete,true)
I only pass back the direct link to the SharePoint document, but they use the formula below to break it down so it links back to the folder also.
Open SharePoint Folder: Launch(Substitute( varFileUploadResponse, Last(Split(varFileUploadResponse,"/")).Result, "" ))
Open Document: Launch(varFileUploadResponse)
Exit: Navigate(RecordItem) or Back()

Exit Button - Navigate() vs Back()

In my first iteration of this, I used Back(), which exits the page nicely but it does not refresh the record. So the Document Activity created in the background (See next step) wasn’t showing straight away, a slightly disconcerting user experience.
Using Navigate() you need to pass in the record, fortunately this is one of the things Dianna shows how to set up on her blog post in the On Start property of the App, so your variable RecordItem should be ready to go. The form will refresh which is nice but also be aware the users will see the ‘Leave this page?’ warning which could be a little disconcerting to some.
Further reading on navigation to or from Custom Pages here.
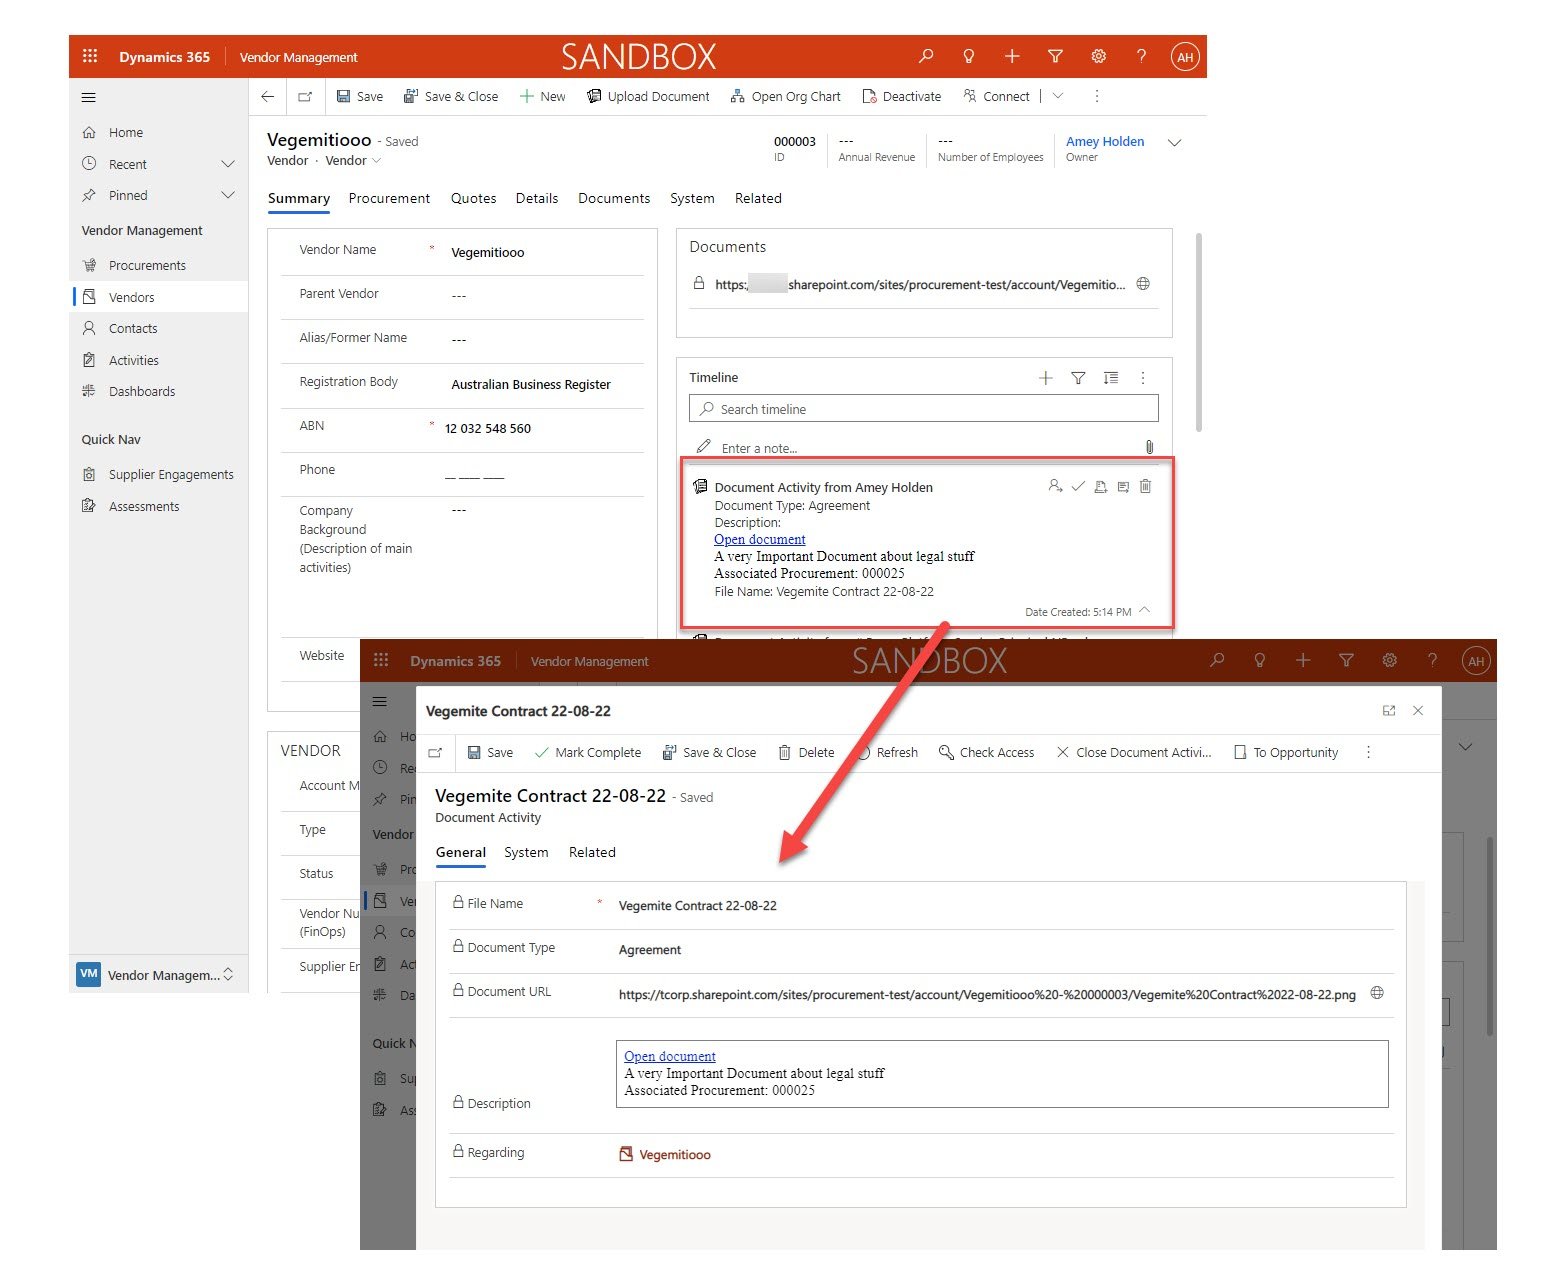
Model-driven App - Show the Document on the Activity Timeline
The final cherry on the cake of Document Uploading user experiences is here. Create a custom table called ‘Document Activity’ (make sure you customise the activity timeline to make it look pretty). Then, once the file upload above has completed, I trigger a child flow which creates a Document Activity row, regarding the correct row in Dataverse and include the link to the item in SharePoint here too.
Extend the functionality across multiple tables
I’m not going to go into detail here, but you will have seen that by getting the context when opening the modal, and passing this through the process, we can easily extend the solution to work across multiple tables for a consistent user experience for uploading documents no matter where they are in their model-driven app.
Isn’t she a beauty!
I reckon it is a little better than the standard SharePoint integration with model-driven apps. It leverages many corners of the Power Platform and it was a really practical useful way to dive into the world of Custom Pages. Questions, Comments and anything else always welcome. This isn’t as detailed as I usually go but I love being able to learn from fellow community contributors, mix it all together to make even bigger and better things.
Handy links
Upload Files To A SharePoint Document Library from Canvas App -> https://www.matthewdevaney.com/power-apps-easiest-way-to-upload-files-to-a-sharepoint-document-library/
Dialogs For Model-Driven Apps Using Custom Pages -> https://dianabirkelbach.wordpress.com/2021/07/29/how-to-make-dialogs-for-model-driven-apps-using-custom-pages/
Wrestling with SharePoint in model-driven apps -> https://linnzawwin.blogspot.com/search?q=sharepoint
Customise the activity timeline -> https://www.ameyholden.com/articles/customise-activity-timeline-control-model-driven-power-apps
Navigating to and from custom pages -> https://docs.microsoft.com/en-us/power-apps/maker/model-driven-apps/page-powerfx-in-model-app#navigating-from-a-custom-page