Gridlock: custom control views & sub-grids in model driven apps
Lets take a look at some more unified interface features that we can leverage using custom controls in our model-driven apps. This time were going to look at some things we can do with sub-grids and views. I have focused the steps in the post in the classic designer as its much more consistent behaviour for custom controls, some are available in the new design studio but for ease of demonstration I default to classic of this kind of thing (for now). This post is going to focus on custom controls which are available natively as there is already a wealth of functionality there and ‘out of the box first’ rules always apply. A future post will look to Power Apps Component Framework for some exploration off-the-grid.
Custom Controls
Editable grids
Nested grids
Reference panels
Remember with any view you can have it as one which the user selects themselves or navigate directly to it using via the sitemap - check step 2 & 3 here [1] to do that.
Editable Grids
So editable grids have been around for a good few years but in my experience they are not so widely used or known about. They are also a bit tricky to set up if you haven’t done it before, or if you forget about the pesky settings every time you try (this is me). You go to your view you want the editable grid on but you cant find it as an option, convince yourself its a feature not available in your tenant, try a million other tenants, still cant find it then finally read the Microsoft Docs [2] instructions (who does that!?) properly.

Key steps and features
This is where I always get caught out - you cannot control which individual views are editable, nor which ones default to editable. It is controlled at entity level for views and form level for subgrids. But until you enable editable grids on the entity you cannot add them on to your form subgrids.

Enable at entity level not view level
In the classic solution explorer, open the entity and select the tab ‘Custom’. Add control and select ‘Editable Grid’. Save and publish.Now all your views can be used as editable grids and you can use this entity as an editable subgrid to a form - hurrah! Now lets look at the settings and fine tuning options

Switch between grid types
If you don’t set the editable grid as default then when you load you view - things wont look any different. You can switch between the grid experiences using this button in the top navigation bar.

Set editable as default
Personally, if I have determined that editable grids are suitable for the customer, I would set the editable grid as default. Otherwise your users are very unlikely to ever find it. So back in the entity Controls tab - select the default radio buttons for Web & Tablet.

Filter lookups
Lookups can be controlled as to which view is used to display/search for available options - just like you can on a form! So for example here I have filtered the lookup to only show related people on the quiz team as an option for being the team leader. Plus allowing the users to disable his filter if they need to.

Grouping & Filtering
Both these features on an editable grid are enabled by default and I’m not sure why you would ever turn them off. Grouping allows you to group by any field on the view. While filtering applies to querying individual rows.

Make subgrids editable
Exactly the same settings as above but just applied to your subgrid on your form. You will see a template available to add which applies all the setting from your entity editable grid settings which you can then customise as required
Nested grid view & Hide nested grid column header settings are covered in the next section.
Remember: you can apply read only business rules to the editable grids, BUT you need to make sure you 1) set the business rule scope to ‘entity’ and 2) that all the fields included in the business rule are shown on the view. Lots more handy tips around these nuances in the Microsoft Docs too [2]
Nested Grids
This one is an absolute beauty and also for some reason - very well hidden and therefore very under used! Full credits to Dian Taylor for uncovering this one in her blog post from October last year [3]. There are so so so many use cases for this one it pains me that its so sneakily erm nested behind the facade of the editable grid. Like editable grids, nested grids can be used at either entity or subgrid level. A nested grid is an extension of an editable grid so make sure you are clued up on the section above first.

For this example each round has many Q & A (these are the questions and answers that power the quiz machine). Now we can see each round and its questions in one single place - magical! An of course you can use these on views and also on subgrids on your forms.
Reference Panels
I discovered this little gem a few years ago too with a candidly titled blog called “What the heck is a reference panel!?“ [4] by Alex Shelga. Its a magical way to get lots of subgrids on a single page with tabular navigation - super handy for core entities such as Account and Contact which have lots of related record sets.

Each entity is represented by an icon of your choice and the gird is delightfully responsive too!

Add to form
Reference panels can only be used on a form,. In the classic view open the form editor and hidden under the ‘Section’ is the magical ‘Reference Panel’.

Create icons
Each subgrid you want to show in the reference panel needs to have its own icon. You create this as a ‘Web Resource’. Use the image format SVG. Save & Publish
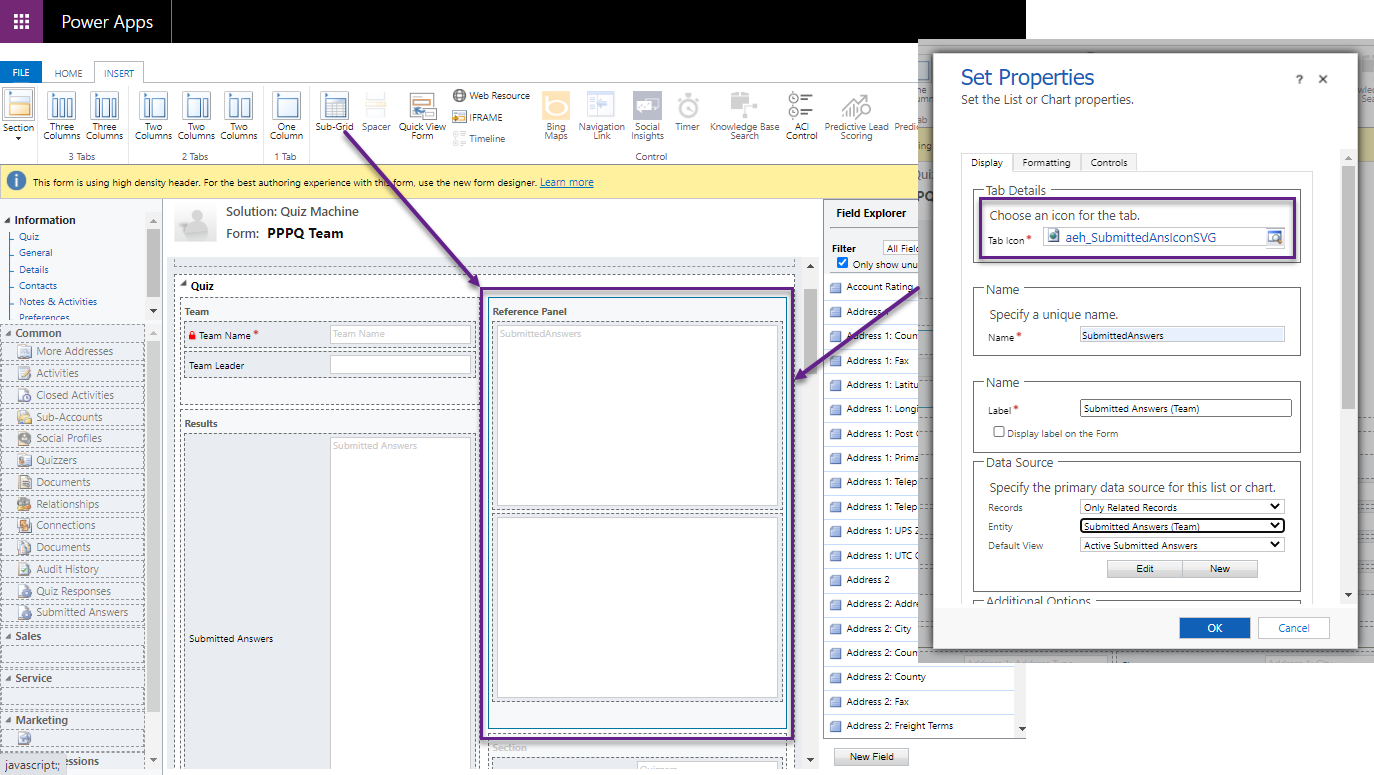
Add subgrids to the reference panel
You cannot drag existing subgrids into the panel. Select panel then click ‘Subgrid’ this will give you all the options plus the mandatory field for the icon you created earlier.

Bad news & good news
Bad News: only one reference panel per form
Good News: unlimited numbers of subgrids in the reference panel and you can even have the same entity again and again and again. (this doesn’t mean you should - but you can!)
So take inspiration from this wise lady on the left and fill ‘em up!
That wraps up the custom controls option for grids with model-driven apps. Next time we will look at what we can find in PCF gallery to take the grid magic to a whole new level. Do you know of any other hidden grid controls? I would love to know, let me know in the comments below!
[1] Navigate to view on sitemap navigation https://www.ameyholden.com/articles/activity-calendars-in-model-driven-apps
[2] Editable grids documentation https://docs.microsoft.com/en-us/dynamics365/customerengagement/on-premises/customize/make-grids-lists-editable-custom-control?WT.mc_id=BA-MVP-5003692
[3] Nested grids blog post by Dian Taylor https://d365goddess.com/nested-grids-in-dynamics-365/
[4] What the heck is a reference panel!? by Alex Shelga https://www.itaintboring.com/dynamics-crm/what-the-heck-is-a-reference-panel/