Social Post Approvals in Dynamics Marketing Option 1: Custom Button
In a world before you could call flows from Business Process Flows [1] it was a nice idea to be able to call a flow from a custom button in Dynamics (rather than having to hit the Flow selector button). So first things first:
Its been done before
I am not the first one to write about it [2]
I’m sure its not rocket science to a developer
But for me it was a world of pain [3], here I hope to rescue someone else in the future from suffering like I did with a step by step ABC guide to creating your first custom button which calls a flow.
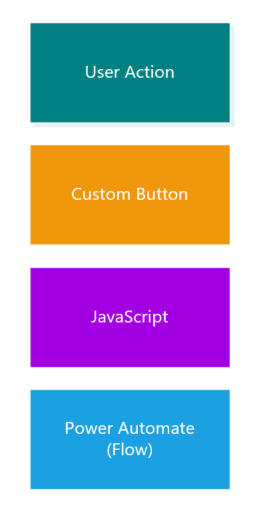
I tried to map out a ‘simple’ process flow for each of the steps/code so you can learn what it is actually doing and therefore tweak it to work for you. Colours indicate the system/area of configuration for each stage but that is totally accessible to anyone with colour vision restrictions so there are labels also. Full copy of the process flow can be found here -> Process Flow

Turns out its not so simple after all… lets break it down
In theory you could do all of this in JavaScript and Dynamics classic workflows but when enforcing the principles of ‘Anything but Code’ and ‘Flow First’ I decided to see how much of the heavy lifting could be done in Power Automate and use just the minimum JavaScript necessary.
Step 1: Start the Flow
This sounds a bit backwards but we need the HTTP POST URL from the Flow to be able to create the JavaScript which we will call from the button. So first lets create something to call. Create an automated Flow‘ with the ‘HTTP Request received’ trigger. For the request body JSON Schema we need to declare all the variables we are going to pass from the button click in Dynamics
{
"type": "object",
"properties": {
"CJGuid": {
"type": "string"
},
"StatusReason": {
"type": "string"
}
}
}
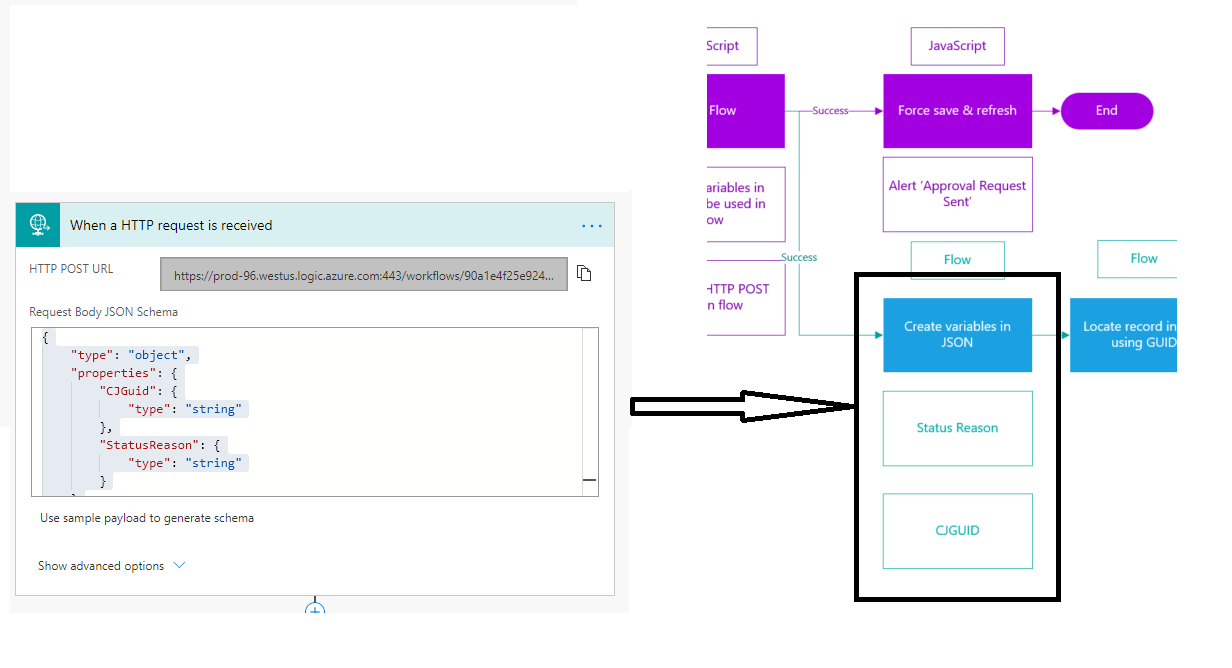
Locate the record using the filter query match ‘CJGuid’ variable from the HTTP Request with the record ID

msdyncrm_socialpostid eq 'CJGuid'
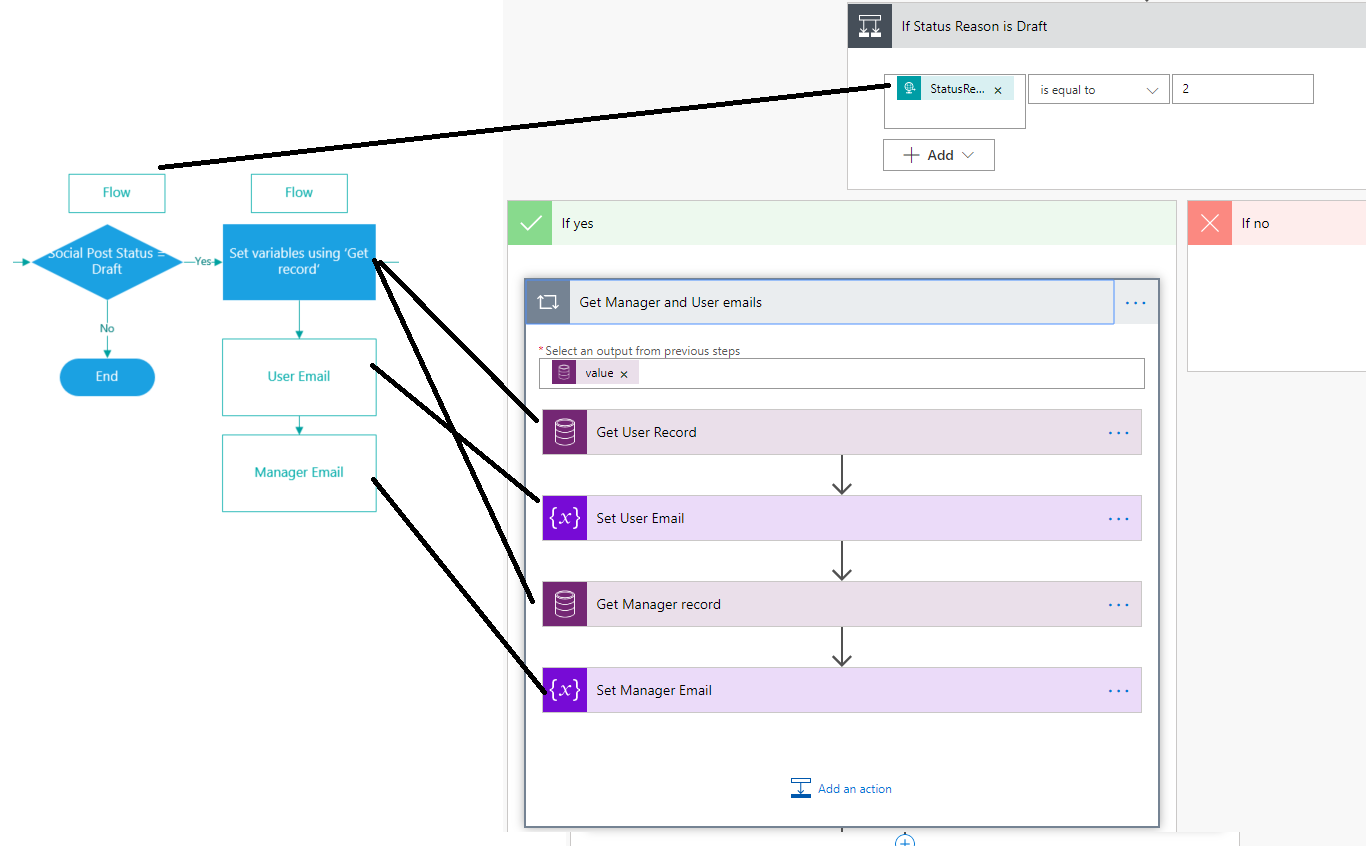
Because we call the flow using a HTTP Request its about as near real time as your flow will be, so we can use the flow to set the located record to ‘Approval Requested’ and quickly give the user feedback on the form that their request is in progress. Here we also initialise/set some variables to use in the approval request later so that we can easily capture data direct from the Social Post record without having lots of loops along the way.
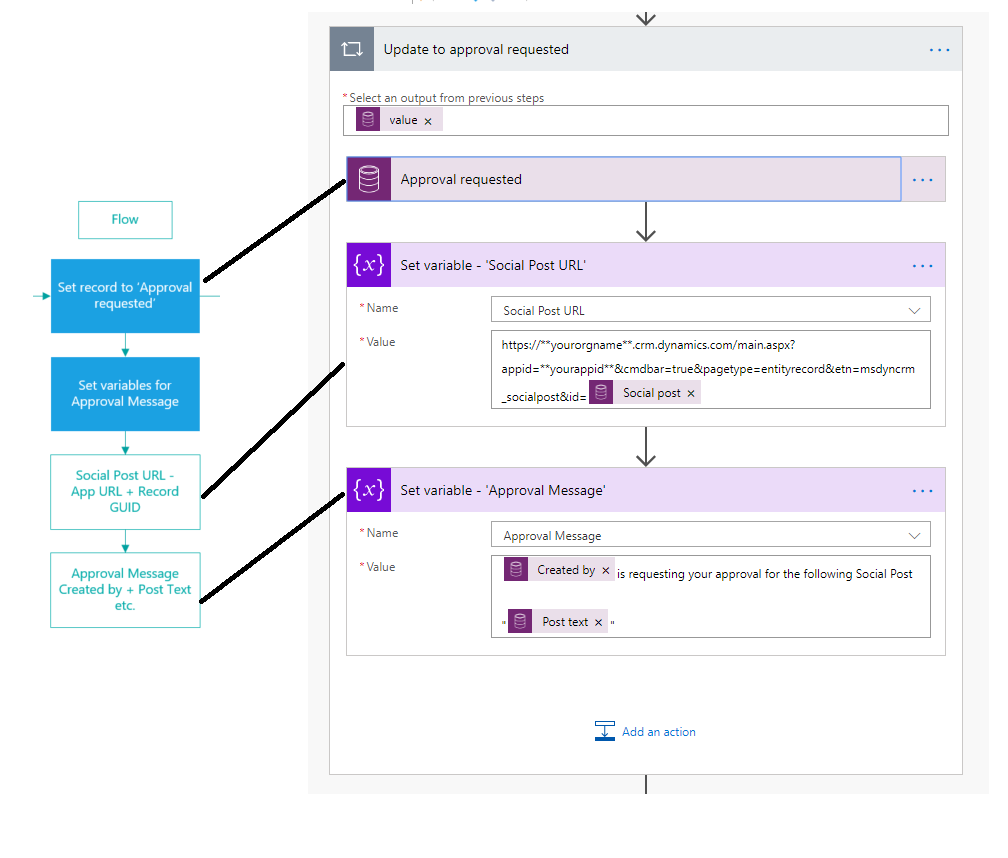
Open a social post record and copy the url -> replace the GUID after _socialpost&id= with the Social Post Unique Identifier in Flow.
That’s enough for now - onto the code!
Step 2: Create the JavaScript
Now we have enough of a skeleton in flow to write and test our JavaScript so lets break this down. First we initiate some variables, call the flow, and then parse the variables into JSON - now were talking flows language!


Make sure the variables you initiate here match to the Request Body JSON Schems in your flow.
The url: can be found in your HTTP POST URL flow step.
Now we tell the JavaScript what to do when the flow is successfully called. We are going to force a save which hopefully picks up the ‘almost instant’ status update from Flow, then refresh the page so the user can see the updated status - we will also pop up an alert to tell the user the request for approval has been sent.
![And that’s the end of the JavaScript - here is the full function for you to copy & paste to your hearts desirefunction approve(formContext){ var CJGuid = formContext.data.entity.getId(); CJGuid = CJGuid.replace(/[{}]/g,""); var StatusRea…](https://images.squarespace-cdn.com/content/v1/5e4a0c11fdd7901a2e364be8/1584232201151-5GTZD8GQD6TDEPCO1EA4/Save+refresh+Alert.png)
And that’s the end of the JavaScript - here is the full function for you to copy & paste to your hearts desire
function approve(formContext){
var CJGuid = formContext.data.entity.getId();
CJGuid = CJGuid.replace(/[{}]/g,"");
var StatusReason = formContext.getAttribute("statuscode").getValue();
parent.$.ajax({
type: "POST",
url: "https://prod-96.westus.logic.azure.com:443/workflows/xxxxxxxxxxxxxxxxxxxxxxxxxxxxxxxxxxxx
data: JSON.stringify({
"CJGuid" : CJGuid,
"StatusReason" : StatusReason
}),
success:
function () {
formContext.data.entity.save();
Xrm.Utility.openEntityForm(formContext.data.entity.getEntityName(),formContext.data.entity.getId());
alert("Approval request sent");
}
});
}
Note: you should probably have here some kind of non-success action but I started to loose the will to live and I was convinced all my developer friends (soon to be non-friends!) were getting sick of me asking stupid questions.
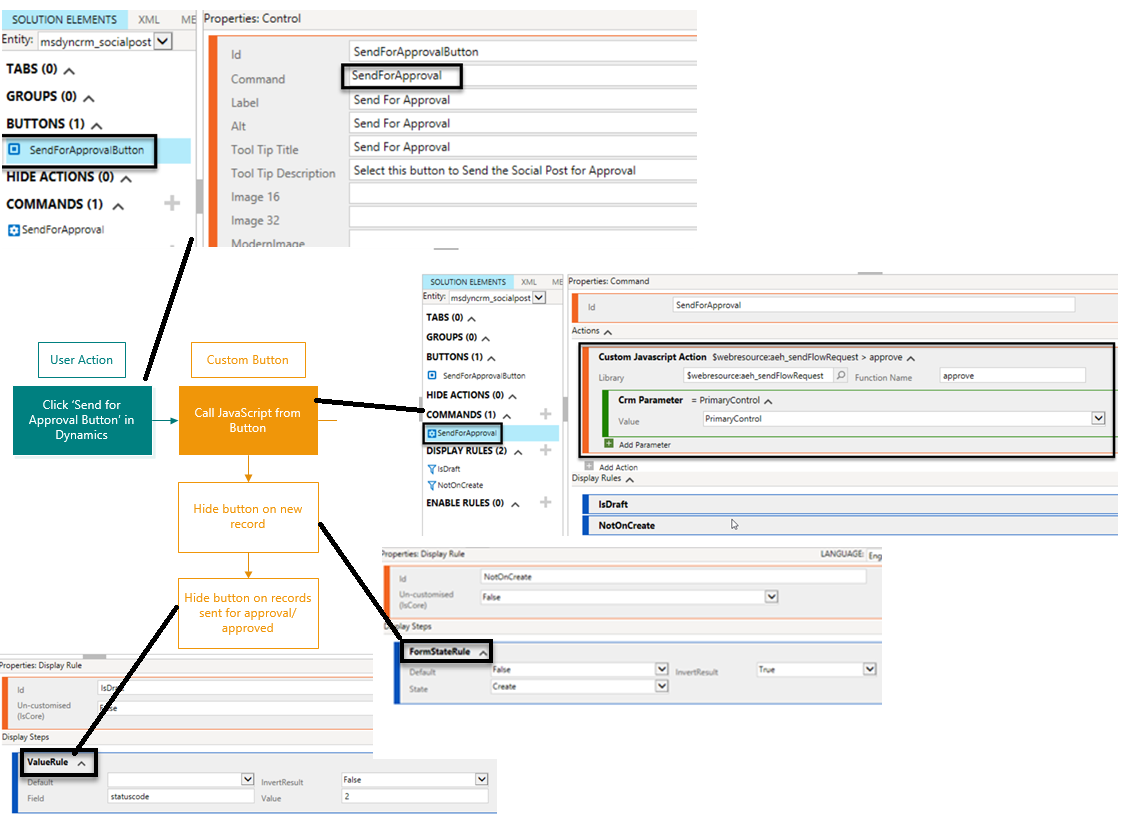
Step 3: Create a Button to call the JavaScript
So now to Ribbon Workbench in XRM Toolbox [4] to create a custom button - which is only shows when the record is in Draft (therefore requires approval) and calls the JavaScript function we just outlined above & sets the CRM Parameter Primary Control (why I have no idea but if you don’t - it doesn’t work!). Display rules control so that the button is only seen when the record is in ‘Draft’ status & not when it’s a new record.
Step 4: Finish the Flow
Now we have got all that nasty code bit out the way and its all working swimmingly its time to finish off the flow to start the approval and update the record accordingly based on the managers response. Firstly some more variables please. These are handy to reduce the amount of loops created in the flow as the approvals process accommodates for multiple responses (even if you are acting on only one response). We initialise the following ‘String’ variables
Manager Email – who to send the approval to
Approval ID – to cancel the approval after 5 days if no response
User Email – to email updates once approved/rejected
Response – from the approval to prevent the horrible ‘for each’ behaviour
Response Comments – from the approval to prevent the horrible ‘for each’ behaviour
A quick check to ensure the social post in indeed in draft status, then using ‘Get Records’ we set the User & Manager email addresses
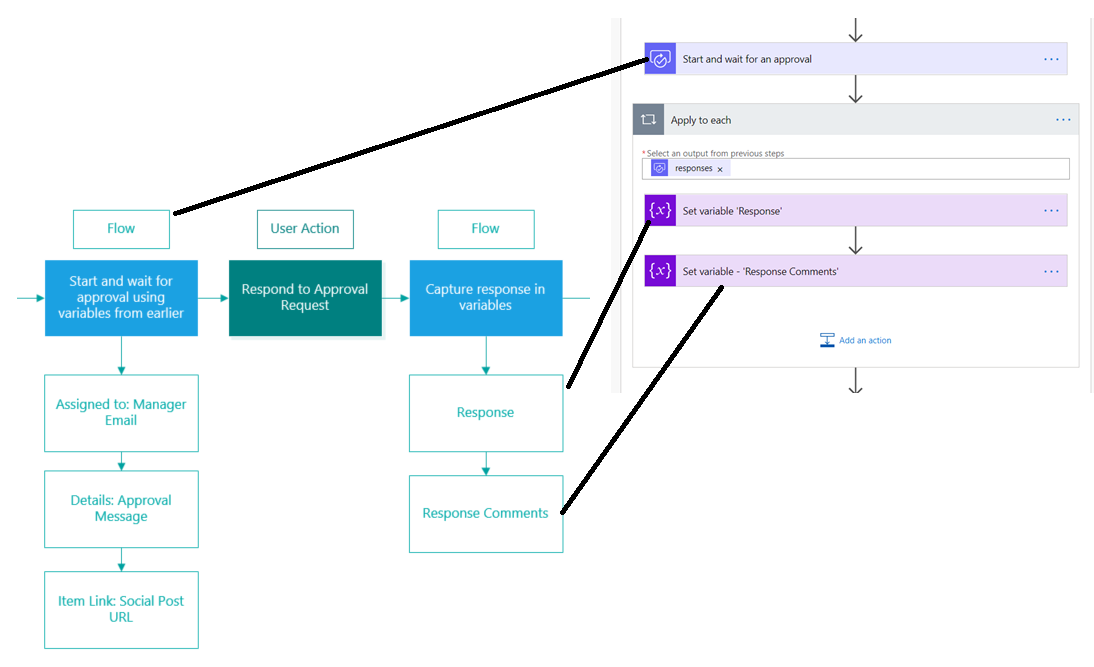
Next up we send the approval and capture the response - I’m going to skip the detail here because I’m sure most people don’t want to see another approval flow set up, but if you do please let me know! We are using the variables here to help reduce the number of loops created as the approval accommodates for multiple responses. It works fine without but you can end up in a bit of a pickle later down the line.
The last part of the flow is where we take the response and update the record accordingly - Approved or Rejected. Instead of more messy if conditions here I have used a ‘Switch’ statement instead which makes for a much cleaner and flowing flow.
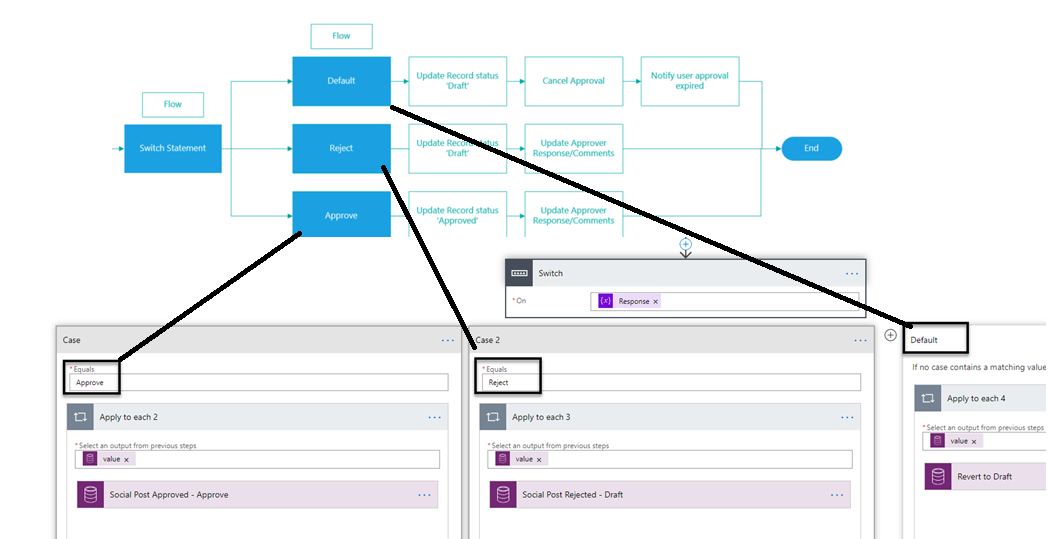
By having the ‘Default’ case in the switch we are able to handle if the flow run expires (the maximum duration of a flow run is 30 days) if it expires the flow will end but the orphan approvals will remain in the managers approvals inbox which isn’t exactly ideal. Here we use the Approval ID variable to find the Approval record and set the stage value to ‘Complete’ and the Status reason Value to ‘Canceled’.
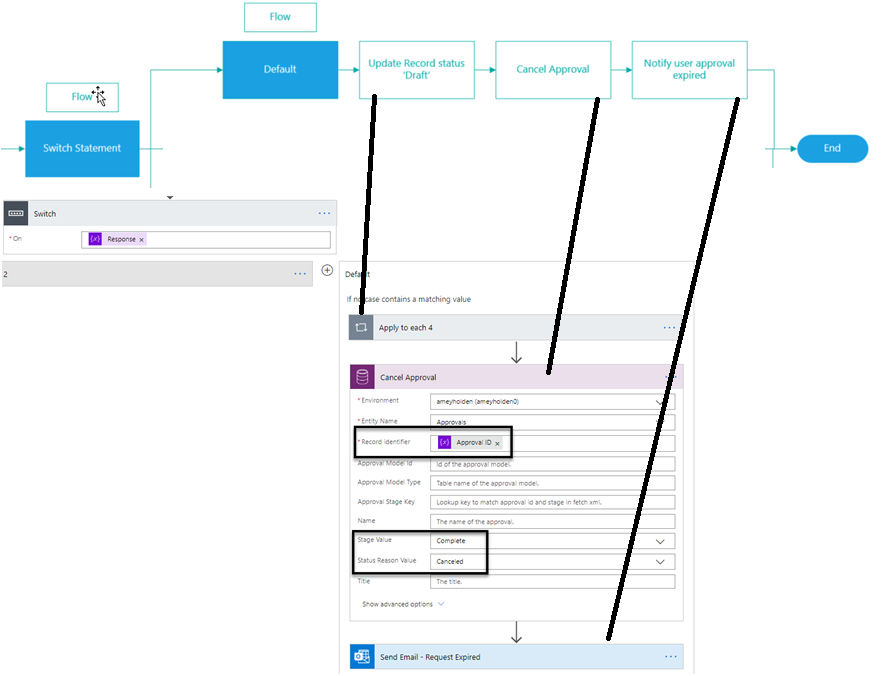
Finally we send an email to the user to let them know their request expired (in case they hadn’t noticed in 30 days…). It would be great to reduce the duration of this flow to maybe 2-3 days as this is more reflective of the scenario - I doubt many marketers will plan social posts that can wait longer than 30 days to be approved!
That is the most code heavy article/experience I have had in my life - I hope it doesn’t have to happen again in the near future. I look forward to triggering flows from business process flows coming out of public preview and I’m going back to my ABC life now - thanks for having me code crowd.
Disclaimer: calling flow from a custom button is a questionable/controversial endeavor because opening a flow up to HTTP triggers can in theory be called by any licensed user who knows the flow URL and the GUID of the record they want it running on.
[1] Call flows from Business Process Flows - https://docs.microsoft.com/en-us/business-applications-release-notes/april19/microsoft-flow/instant-steps-business-process-flows
[2] A good start on ‘how to’ but didn’t do anything near what I wanted - https://community.dynamics.com/crm/b/magnetismsolutionscrmblog/posts/how-to-trigger-a-microsoft-flow-from-a-custom-button-in-dynamics-365
[3] One of the struggles on this code filled journey - https://powerusers.microsoft.com/t5/Building-Flows/Calling-Flow-from-Custom-Button-in-DYnamics/td-p/458577
[4] Custom buttons - https://www.xrmtoolbox.com/plugins/RibbonWorkbench2016/