Include specific row (entity) references and all the data in Real-time marketing custom triggers
Custom triggers in Dynamics 365 Marketing (Customer Insights - Journeys) have been magical and amazing from day one. But they recently became 1000 times better with the ability to include ‘Entity references’. What’s a custom trigger and why would you want to use one? Take a look here
There are some official docs on how to create them and some information on how it all works. But don’t believe everything you read, because there will be no ‘snippets of code’ involved - just some flow based magic is all you need! I have previously blogged about ‘Create custom Dataverse triggers for Dynamics 365 Marketing - without a developer!’ which all still stands. But there is a new type of attribute you can include in the trigger which is super powerful, cool and awesome. But also a little bit more tricky to work with when it comes to ‘triggering the trigger’.
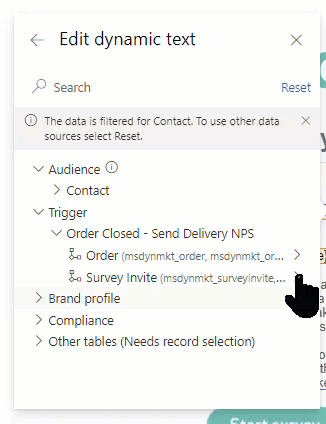
The new attribute type is called ‘Entity Reference’. A what? Yeah I know great name right? Especially since the term ‘Entity’ was abolished in 2020 and the fact it references a specific row, not an entire table entity creates the perfect recipe for confusion. In more practical terms an ‘Entity reference’ is a way of making an entire record and all its associated records (up to 5 levels ‘deep’) available through a single trigger attribute. It works exactly the same as the ‘Contact‘ or ‘Lead’ in a trigger works, but for any table/row you choose.
Scenario
When an customer receives their order you want to send them a survey to get customer feedback and measure their NPS (Net Promoter Score). Using a custom trigger to send personalises surveys is a very common use case I come across, but having to name then map each attribute one by one is painful, plus the need to change the attributes available in the trigger often occurs too. Now instead of naming every single attribute needed from the ‘Order’ and associated tables, you can just include a reference to the specific order row in Dataverse and make all the data available in the trigger journeys for branching and emails for conditional content and personalisation.
Including the Order entity reference in the trigger is one mapping value in the flow that allows the marketer to do things such as:
Send different details in the email based on the delivery country of the order
Sign off the email from the Account owner or the sales person who closed the opportunity
Delay the journey based on the delivery date
Filter the journey based on order value
Use data from newly added attributes, without needing to restart to development lifecycle on the trigger itself
You can include multiple Entity references too so we will also include the ‘Customer voice survey invitation’ for the unique survey URL attribute but also maybe the survey/project name could be used in journey/email variations too. Maybe other things - why not make it all available!

Create a trigger with ‘Entity References’
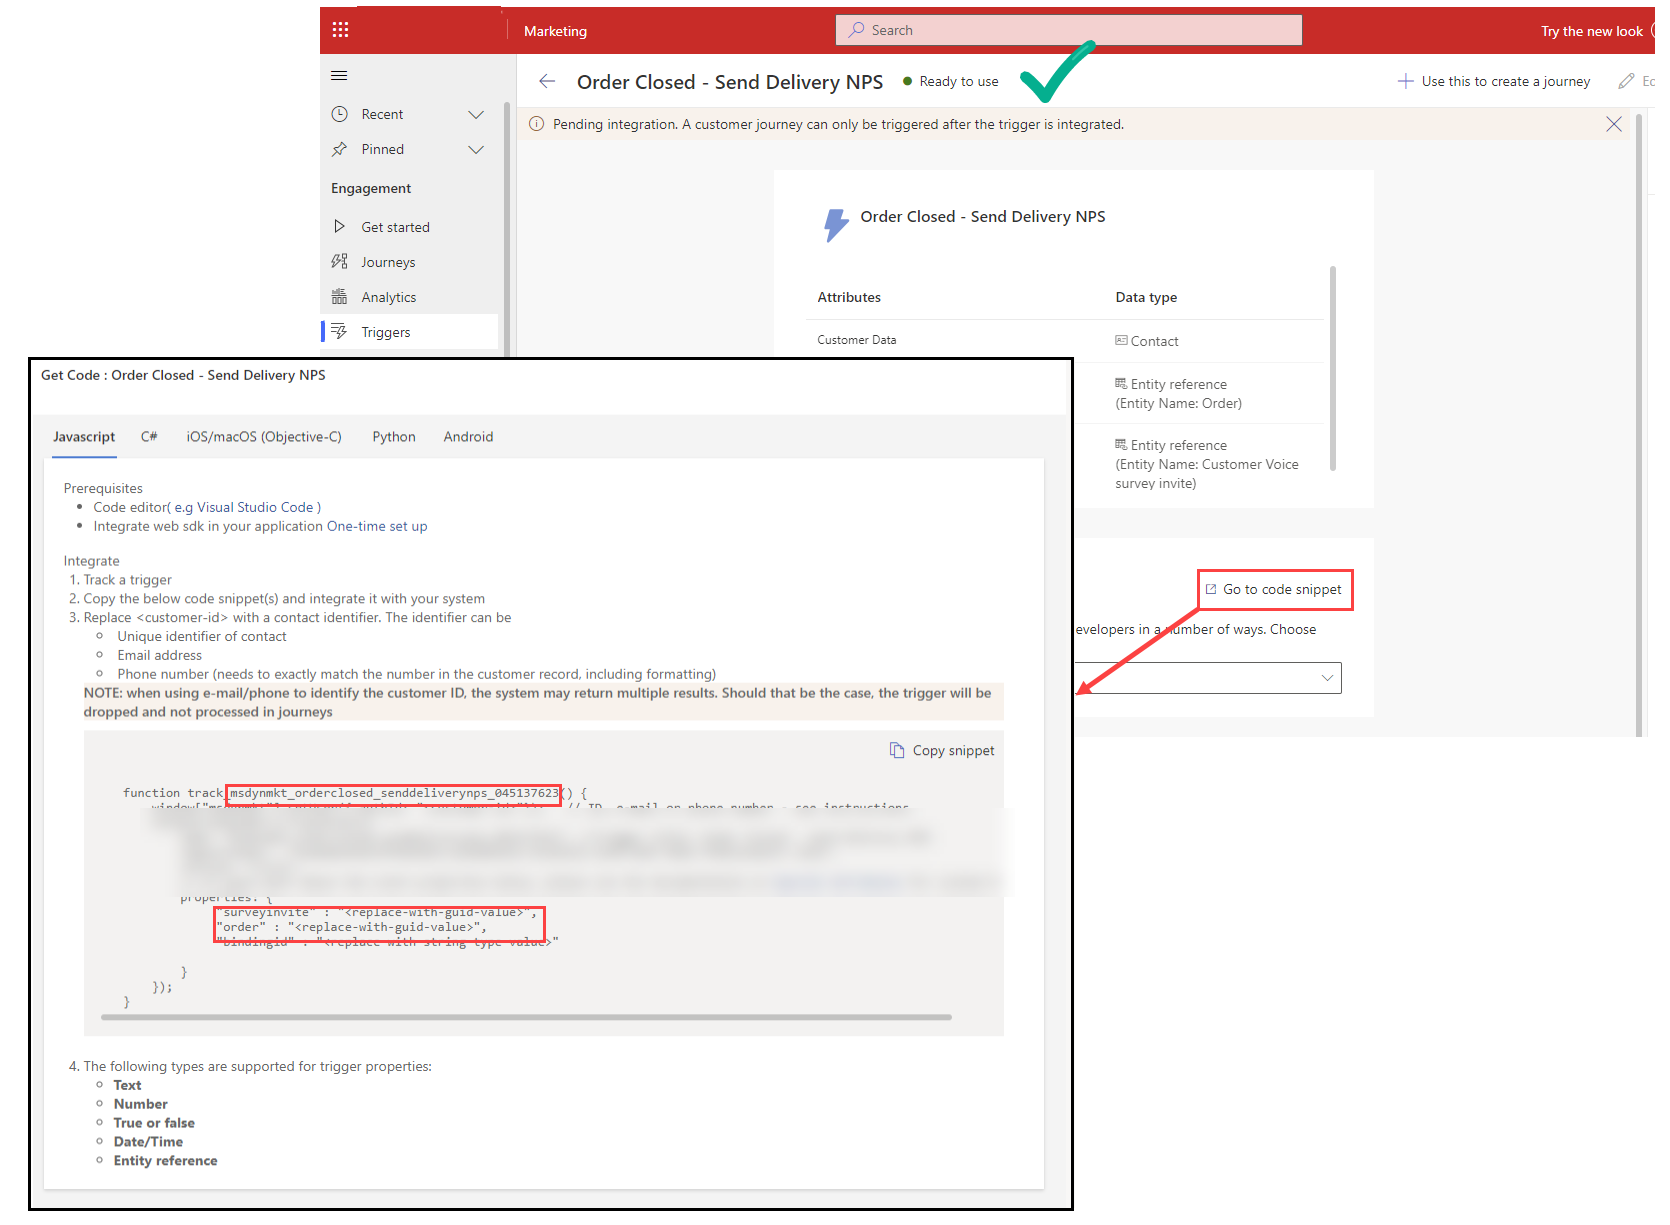
Setting up the trigger is really easy, set the Attribute data type to ‘Entity Reference’ and select the specific table you want to use. Add any additional attributes and mark the trigger as ‘Ready to use’.

Go to code snippet
Once the trigger is ready you will see an ‘integrate the code’ section. Select ‘Go to code snippet’. We need to find a few important piece of information here to use in our trigger.
Trigger name: the text between track_ and () e.g. msdynmkt_orderclosed_senddeliverynps_123456
Attribute names: Under ‘Properties’ you will see the name of the entity reference attributes, including ‘bindingid’ e.g. order and surveyinvite
How NOT to trigger the trigger in Power Automate
Using the technique I showed in my previous blog using Dataverse ‘Perform an unbound action’ will not work here unfortunately. The action tries to expand the entity reference to be individual columns of the table, which means you cannot populate the reference, your browser will probably crash and if you are super lucky the flow bombs out due to hitting attribute limits per action.

Trigger a custom trigger with ‘Entity References’ in Power Automate
Instead we can build our own trigger action inputs, and use a HTTP POST request.

Compose the action inputs
Add a ‘Data Operations - Compose’ action where we can build out the JSON message to use in the HTTP request next. Sample code snippet included below.
The following attributes must be included in all triggers as standard
msdynmkt_bindingid - this is used to make each journey run for a contact unique, a contact can have many orders and surveys so the binding id should be the order or survey reference reference, more info about this can be found here
msdynmkt_signalingestiontimestamp & msdynmkt_signaltimestamp - utcNow()
msdynmkt_signaluserauthid & msdynmkt_profileid - Contact GUID
From the example we also have out two custom attributes that we need to pass through. In the trigger ‘code snippet’ we looked at above they were called order and surveyinvite. To use them in the trigger we append them on to msdynmkt_
msdynmkt_order
msdynmkt_surveyinvite
Because we are using ‘entity references we need to give the fully resolvable lookup value like you would use to set a lookup in Dataverse using power automate. Which uses the ‘Entity set name’ aka the plural version of the logical name. It varies depending on the table you are using so its best to check, e.g.
Order
Single: salesorder
Plural: salesorders
Customer Voice Survey Invites
Single: msfp_surveyinvite
Plural: msfp_surveyinvites
{
  "msdynmkt_order": "salesorders/<order_GUID>",
  "msdynmkt_surveyinvite": "msfp_surveyinvites/<survey_invitiation_GUID>",
  "msdynmkt_bindingid": "msfp_surveyinvites/<survey_invitiation_GUID>",
  "msdynmkt_signalingestiontimestamp": "@{utcnow()}",
  "msdynmkt_signaltimestamp": "@{utcnow()}",
  "msdynmkt_signaluserauthid": "<contact_GUID>",
  "msdynmkt_profileid": "<contact_GUID>"
}

Trigger the trigger!
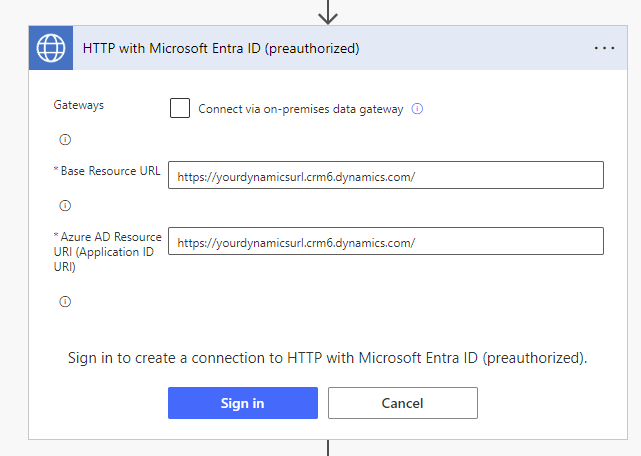
Add an action ‘HTTP with Microsoft Entra ID (preauthorized)’ - ‘Invoke an HTTP request’, create the connection as shown below with Base Resource URL and Azure AD Resource URI (Application ID URI) should both be your dynamics 365 base URL e.g. https://yourdynamicsurl.crm6.dynamics.com/ then select ‘Sign In’.
Method: POST
Url of the request: https://<yourdynamicsurl.crm6.dynamics.com>/api/data/v9.2/<trigger name from ‘go to code snippet’>
Body of the request: <Outputs from the previous compose step>
For tips on referencing the ‘yourdynamicsurl.crm6.dynamics.com’ part dynamically take a look at this blog post.
Connect to HTTP with Microsoft Entra ID
Make it work with any custom trigger and entity reference
The beauty of custom triggers is they are unique to your needs so the image below should help to explain how you can work out your own trigger names and inputs.


Is it working?
The most reliable way to test is to set up a journey and an email with some of the trigger based dynamic content to verify everything looks ok but generally the HTTP request will fail/complain if there is any issues. In this case statusCode 204 is a good thing.
And the moral of the story is if you hit your head against a flow enough times, you will find a way to make it work! Hopefully this helps you to unlock the power of entity references in custom triggers.