Event Waitlist Journeys & Triggers
Event waitlists have arrived for Customer Insights - Journeys which means we can more easily manage and maximise event capacity thanks to self service event cancellation and automated (or manual) registration of waitlisted registrations when slots become available. At the time of writing this, Waitlist in Real-time Journeys needs to be enabled in the feature switches to become available to use for events.
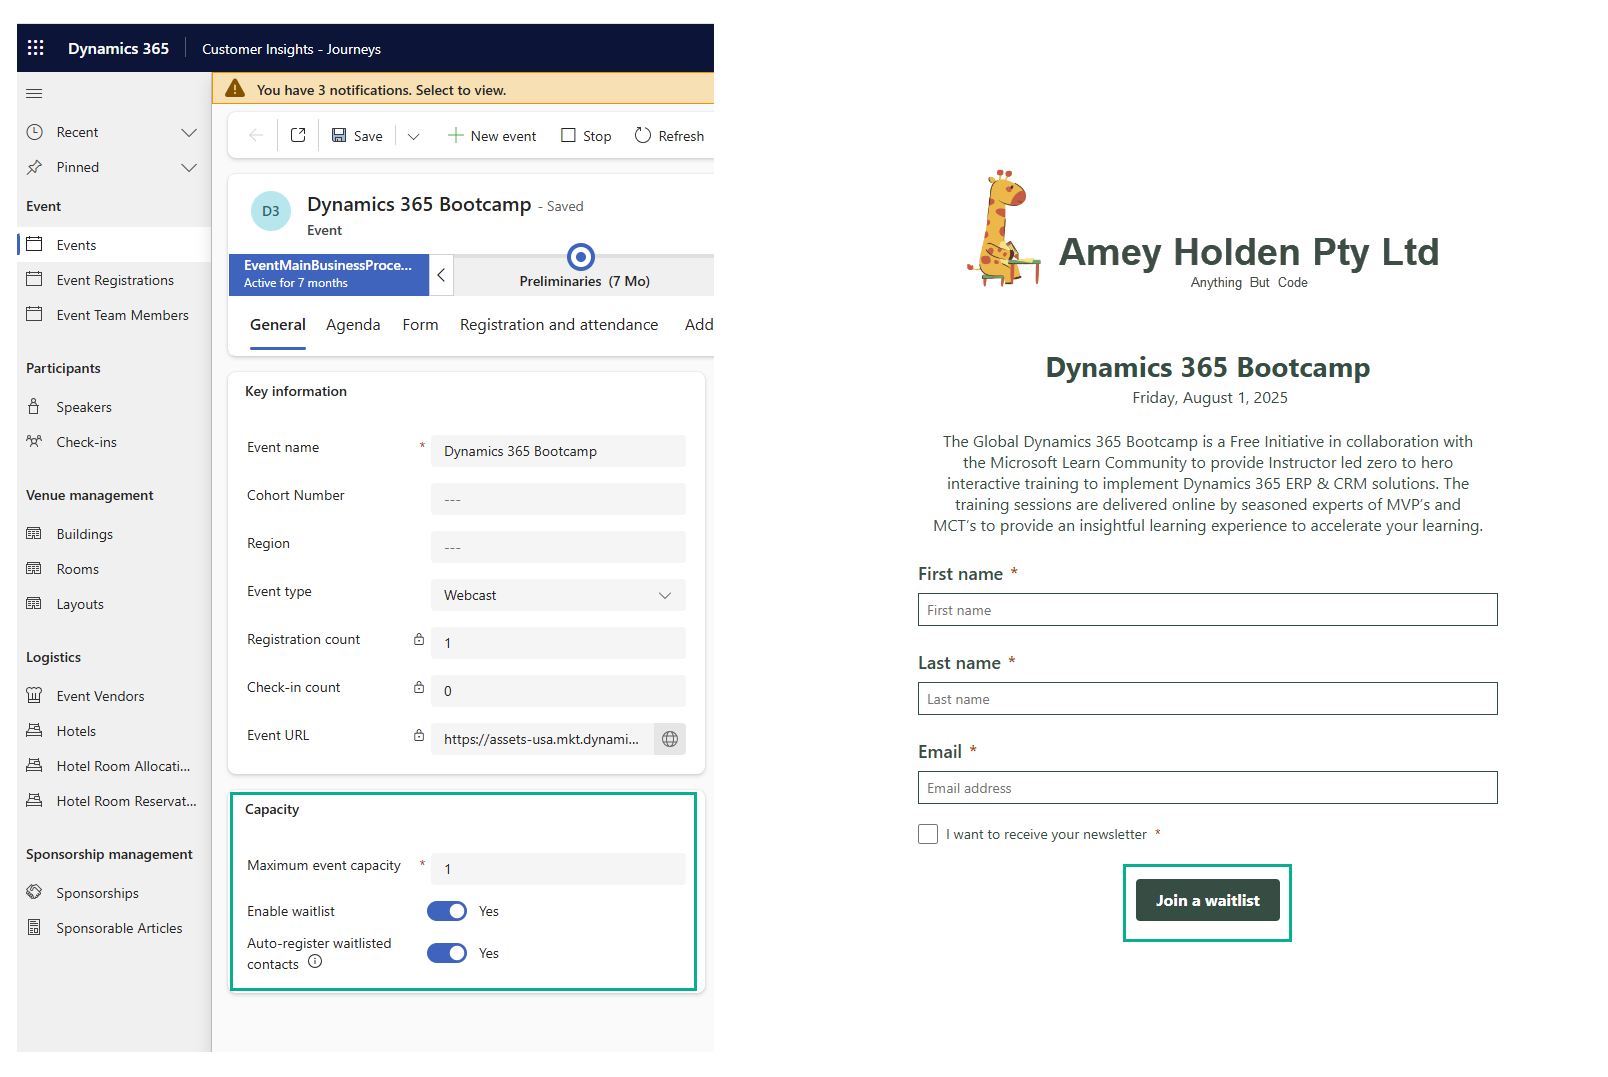
Warning: If you have any customisations on the dynamics Event form, they may block the functionality of the waitlist features. You will need to remove any unmanaged layers of the event form to allow the updates to be available, then re-add your customisations as needed.
You can use triggers to automate a one size fits all journey for event registration confirmation, reminders and follow up as kindly demonstrated by Megan V Walker here, however this journey relies on the trigger ‘Marketing Event Registration Created’. Which was fine for the outbound marketing days as event registrations were not created for ‘Waitlisted’ registrants. But now the event registration has a series of ‘Status Reasons’ which determines the type of registration it is.
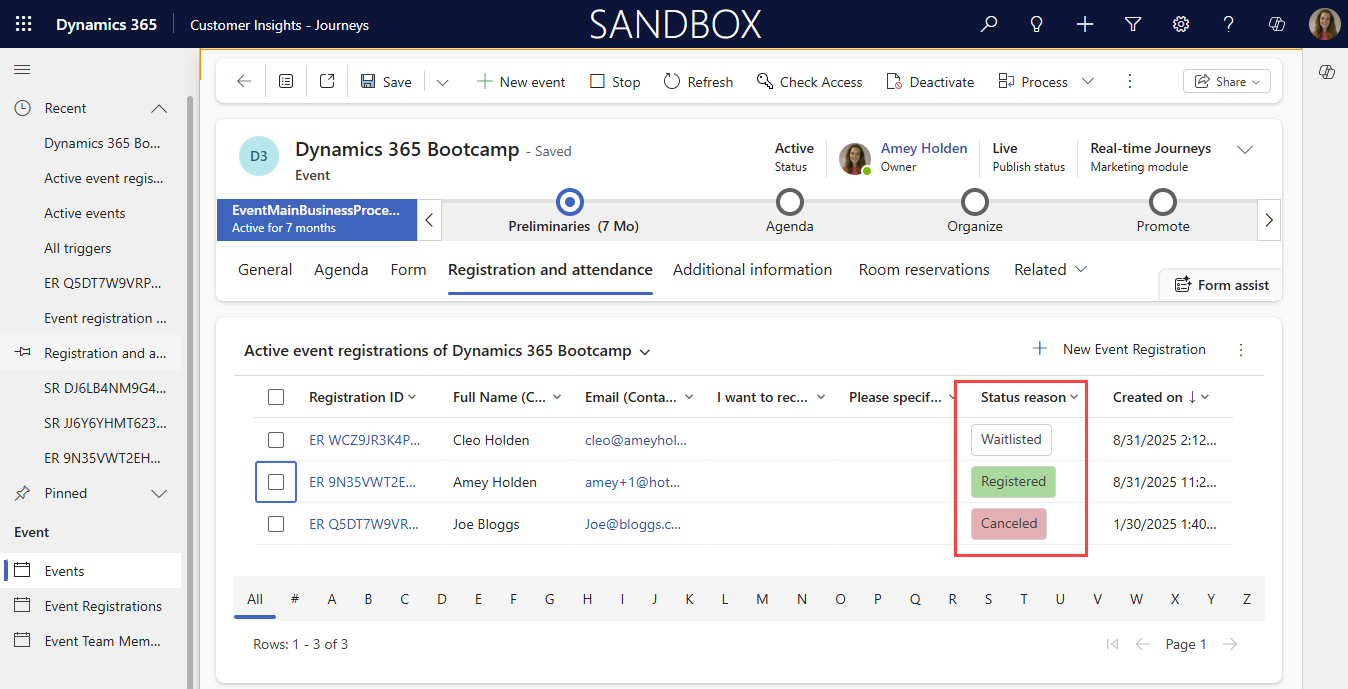
We now have three different triggers that need to be updated to handle event registrations with the relevant communications
Marketing Event Registration Created
Marketing Event Registration Created From Waitlist
Marketing Event Registration Waitlisted
The ‘Marketing Event Registration Created’ trigger will only fire when a registration is created as ‘Registered’, so if someone joins a waitlist, then later a space becomes available for them to register - they will not receive any of the communications in the ‘Marketing Event Registration Created’ journey. This means you would need to have two sets of confirmation and reminder emails, one form the ‘Marketing Event Registration Created’ trigger and another from the ‘Marketing Event Registration Created From Waitlist’ trigger which to me is almighty painful as the emails cannot be shared between the triggers. It will work but it’s a lot of baggage.
So what are my options?
Create a custom trigger that fires when an Event Registration is created or the ‘Status Reason’ is updated and use journey branching on the status reason to decide what communications to send. If the status us ‘Registered’ - Ideal if you are just getting started and don’t have anything set up yet.
Fire the ‘Marketing Event Registration Created’ trigger when a registration is converted from ‘Waitlisted’ to ‘Registered’ - Ideal if you already have a series of emails set up for ‘Marketing Event Registration Created’ trigger based journeys.
Create and manage two sets of confirmation and reminder emails in two separate journeys - one from ‘Marketing Event Registration Created’ and another from ‘Marketing Event Registration Created From Waitlist‘ - Yuck!
Option 1: Ideal for New Set Ups
If you don’t already have any long term journeys set up using the ‘Marketing Event Registration Created’ trigger then you should definitely start with a custom trigger.
Create a custom trigger
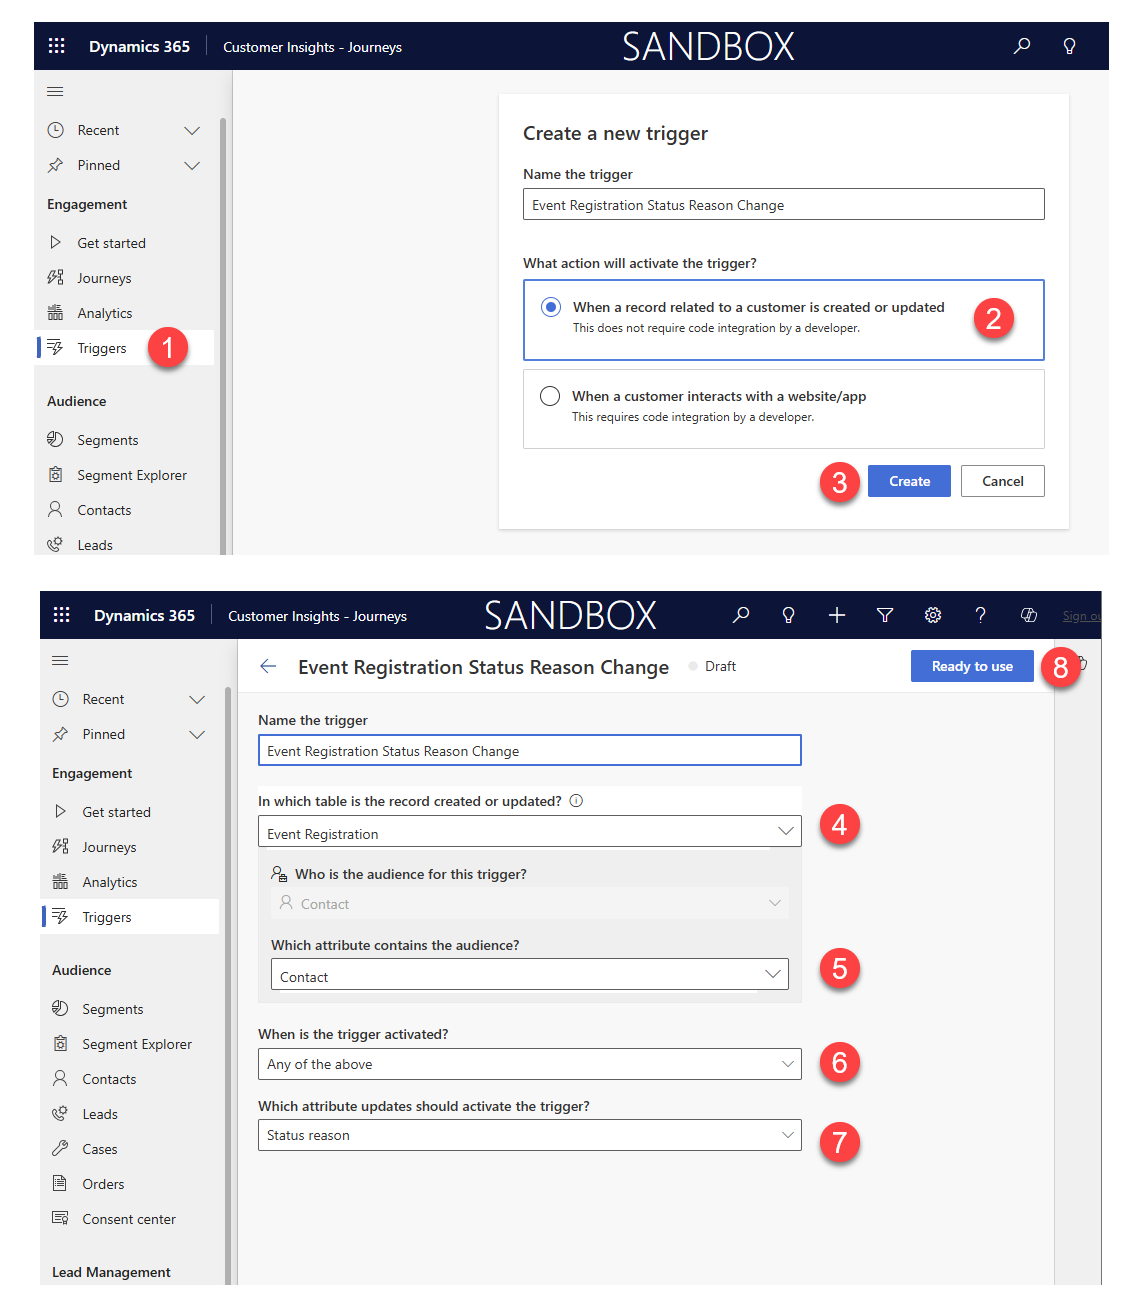
Create a new trigger ‘Event Registration Status Reason Change’, select the option ‘When a record related to a customer is created or updated‘. Update the settings as follows:
In which table is the record created or updated? Event Registration
Who is the audience for this trigger? Contact
Which attribute contains the audience? Contact
When is the trigger activated? Any of the above
Which attribute updates should activate the trigger? Status Reason
Select ‘Ready to Use’.
Filter the trigger based journey
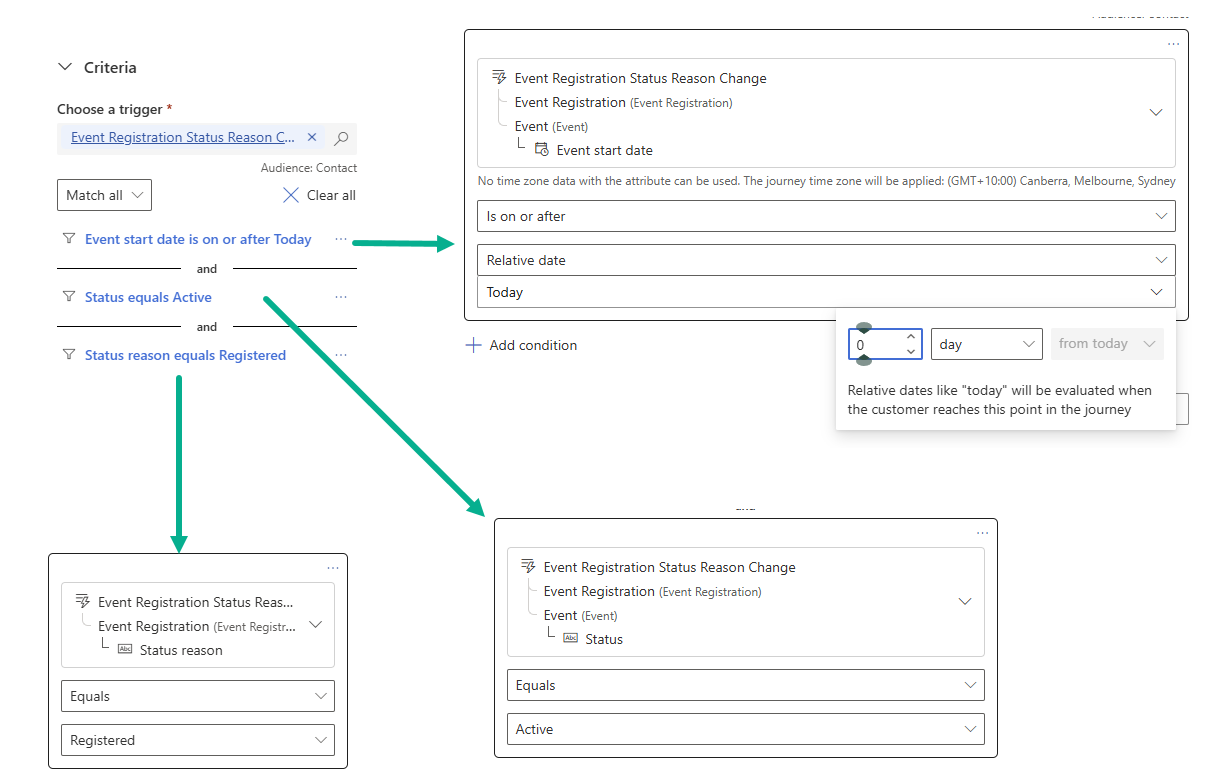
You can now use this trigger to handle all of your event registration communications! As a safety net I like to filter the trigger to only fire for events in the future and status ‘Active’, just in case someone does some data updates on old event registrations, we are not going to send customers information about event that have passed accidentally. I would recommend that you also filter the journey by Status Reason, and have three separate journeys so that you can use the exit triggers as well.
Status Reason ‘Registered’ - Exit Trigger ‘Marketing Event Registration Cancelled’ (stops the communications if they cancel)
Status Reason ‘Waitlisted’ - Exit Trigger ‘Marketing Event Registration Created From Waitlist’ (in case you have a sequence of communications for waitlisted registrations)
Status Reason ‘Cancelled’ - No Exit Trigger Required
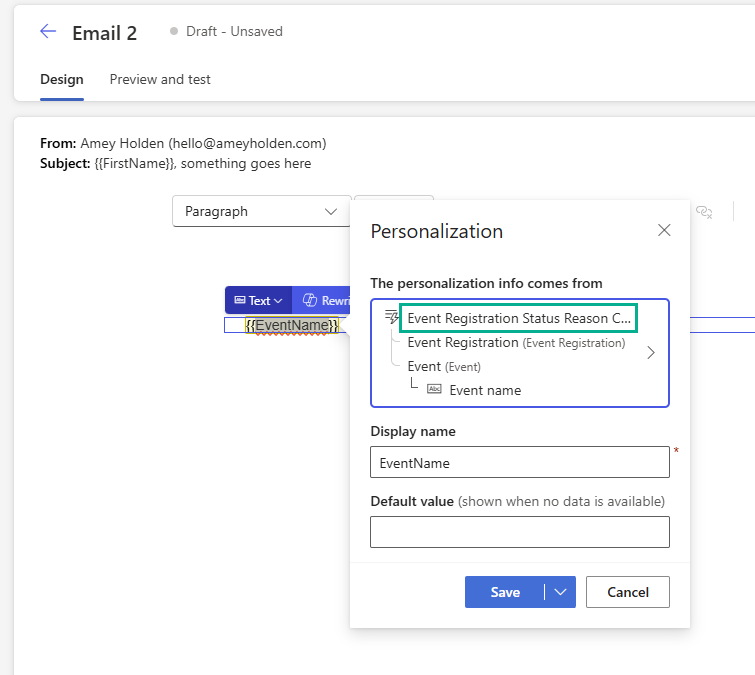
Use the custom trigger in all your event communication emails
This means that even if someone joins a waitlist and is then registered, they will receive the same communications as someone who did not join the waitlist first, and you only have to maintain one set of emails for event confirmations, reminders & follow ups.
Option 2: A good work around for existing ‘Marketing Event Registration Created’ journeys
If you already have a journey set up that is handling your event communications, it would be a lot of work to either maintain two sets of these or re-wire them all to a custom trigger. Instead we can use a different custom trigger, to fire the ‘Marketing Event Registration Created’ trigger when a registration is converted from ‘Waitlisted’ to ‘Registered’. It’s a bit of a cheeky hack, but nothing that is too icky or concerning and less risky than a rebuild of complex journeys/emails. You will need to build a flow but it’s quite simple and all the info below will show you how.
Create a custom trigger
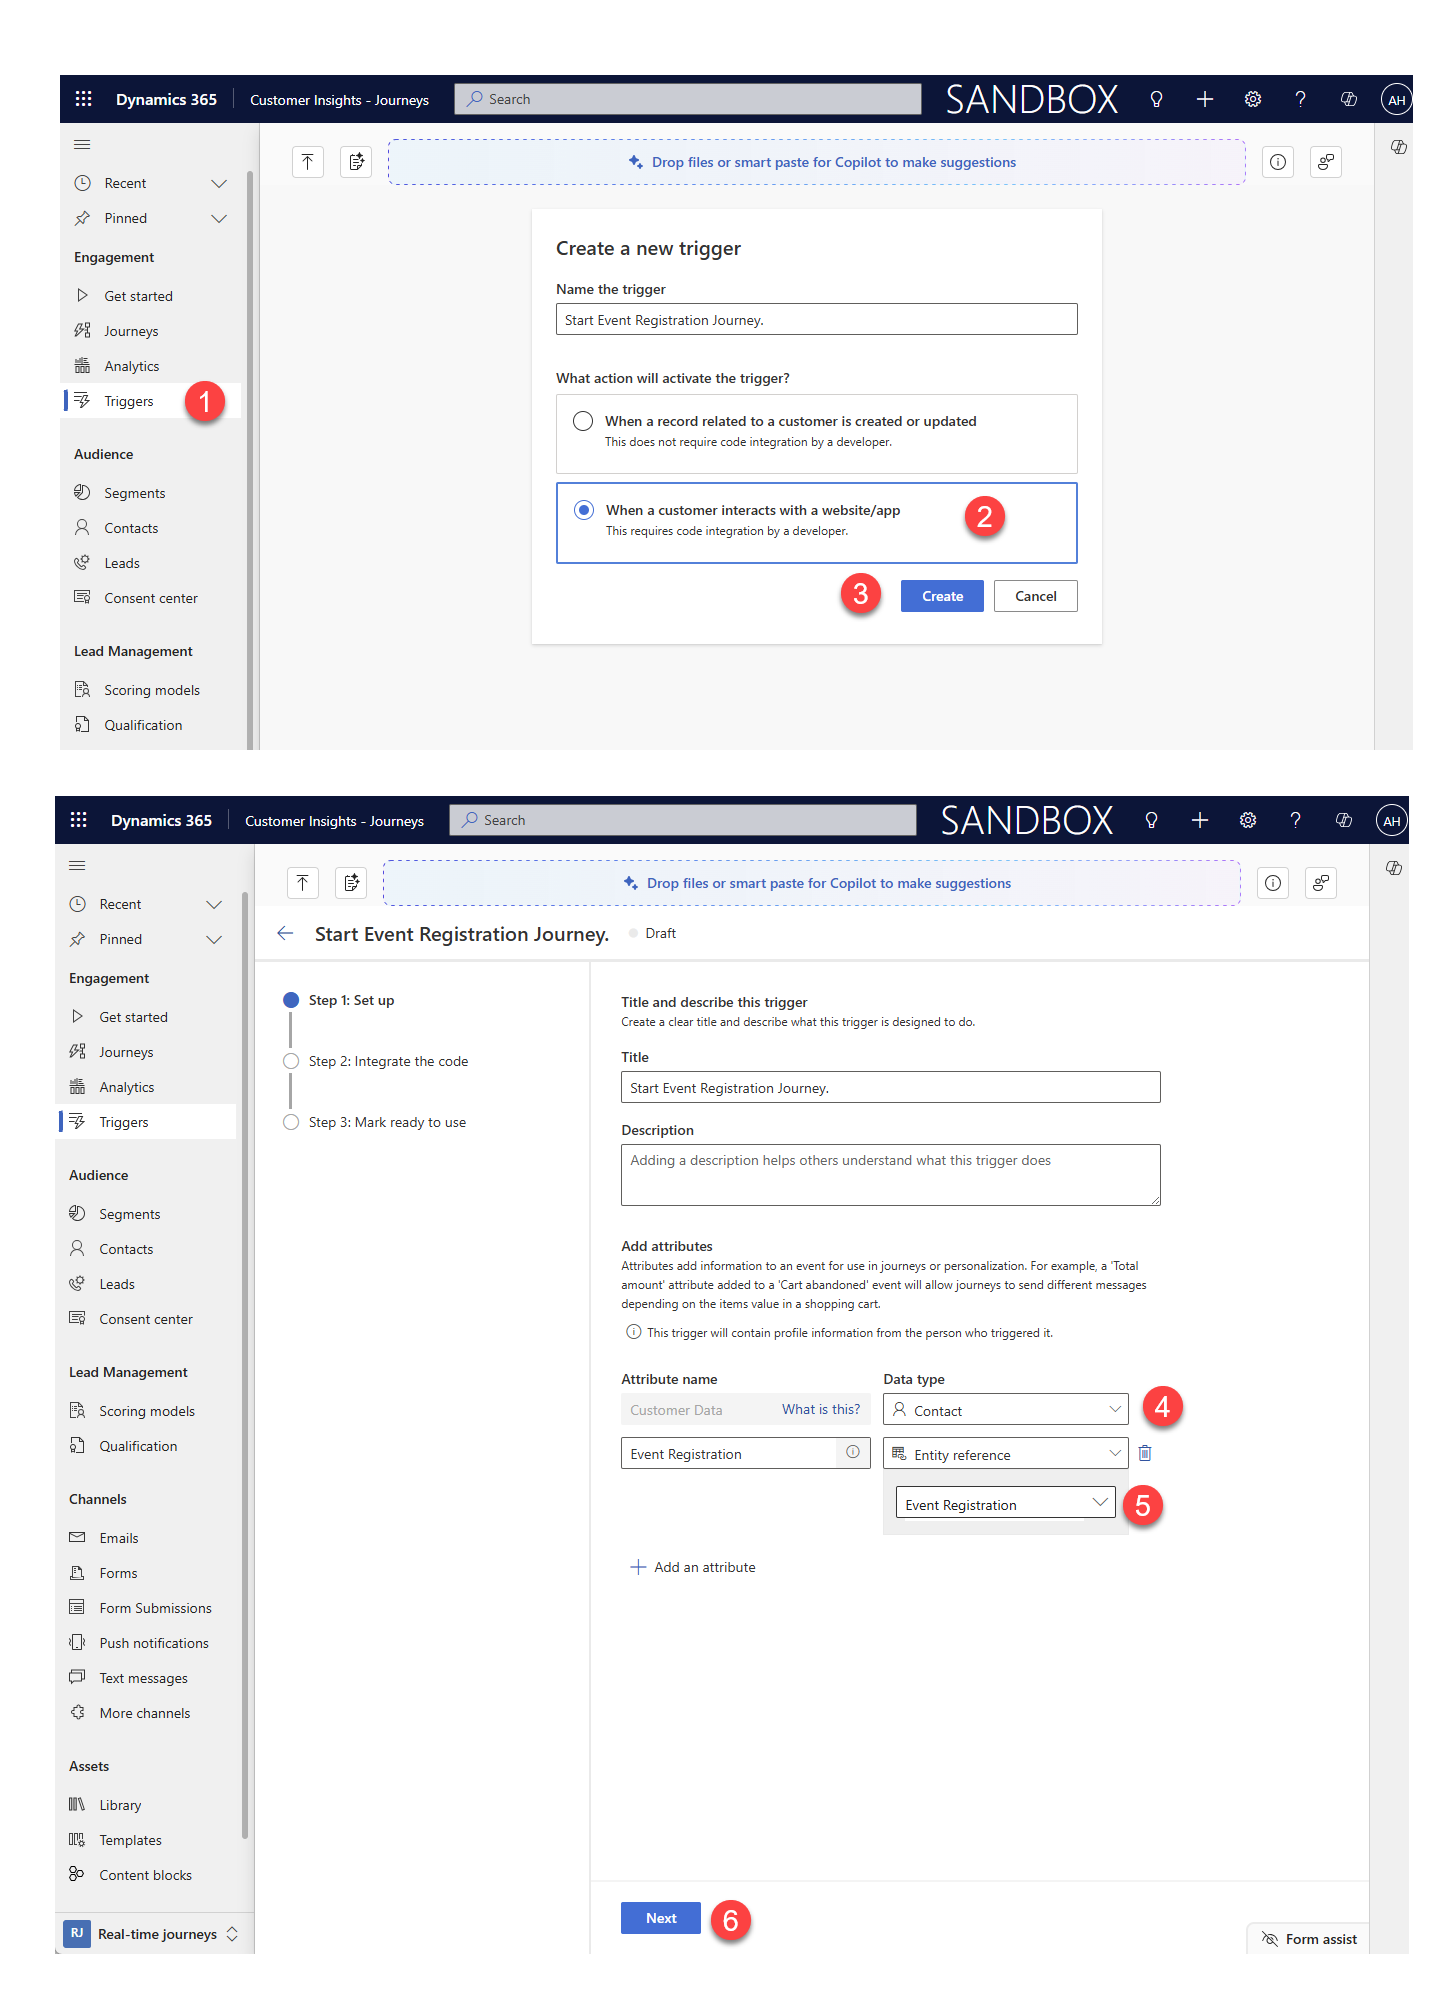
Create a new trigger ‘Start Event Registration Journey’, select the option ‘When a customer interacts with a website/app’, then ‘Create’. Set the Customer data as Contact and add an attribute called ‘Event Registration’ which is of type ‘Entity Reference’ to the table ‘Event Registration‘. Select Next -> Next -> Ready to use.

Set up a journey for registrations waitlisted and converted to registered
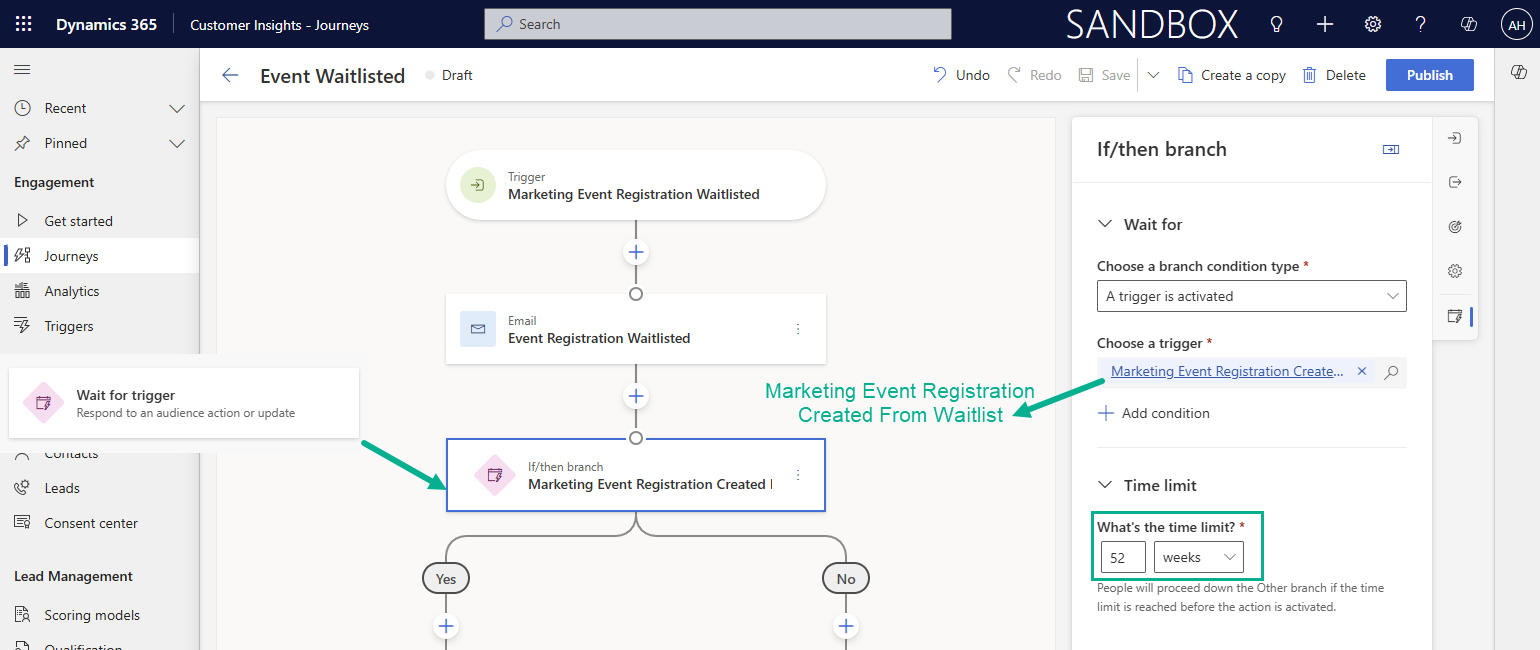
We want to make sure that this custom trigger is only used in the case where a registration is converted from ‘Waitlisted’ to ‘Registered’ so we can use the OOB triggers to decide this for us. Create a trigger based journey using the trigger ‘Marketing Event Registration Waitlisted’. Add the trigger ‘Marketing Event Registration Cancelled’ as an ‘Alternate exit’.

Create an email to send to the waitlisted registration to let them know they are on the waitlist and any other information you want to provide here. Then add a tile ‘Wait for a trigger’ and choose ‘Marketing Event Registration Created From Waitlist’, set the time limit to 52 weeks so something equally too long that will ensure it waits for long enough from registration launch to event date.
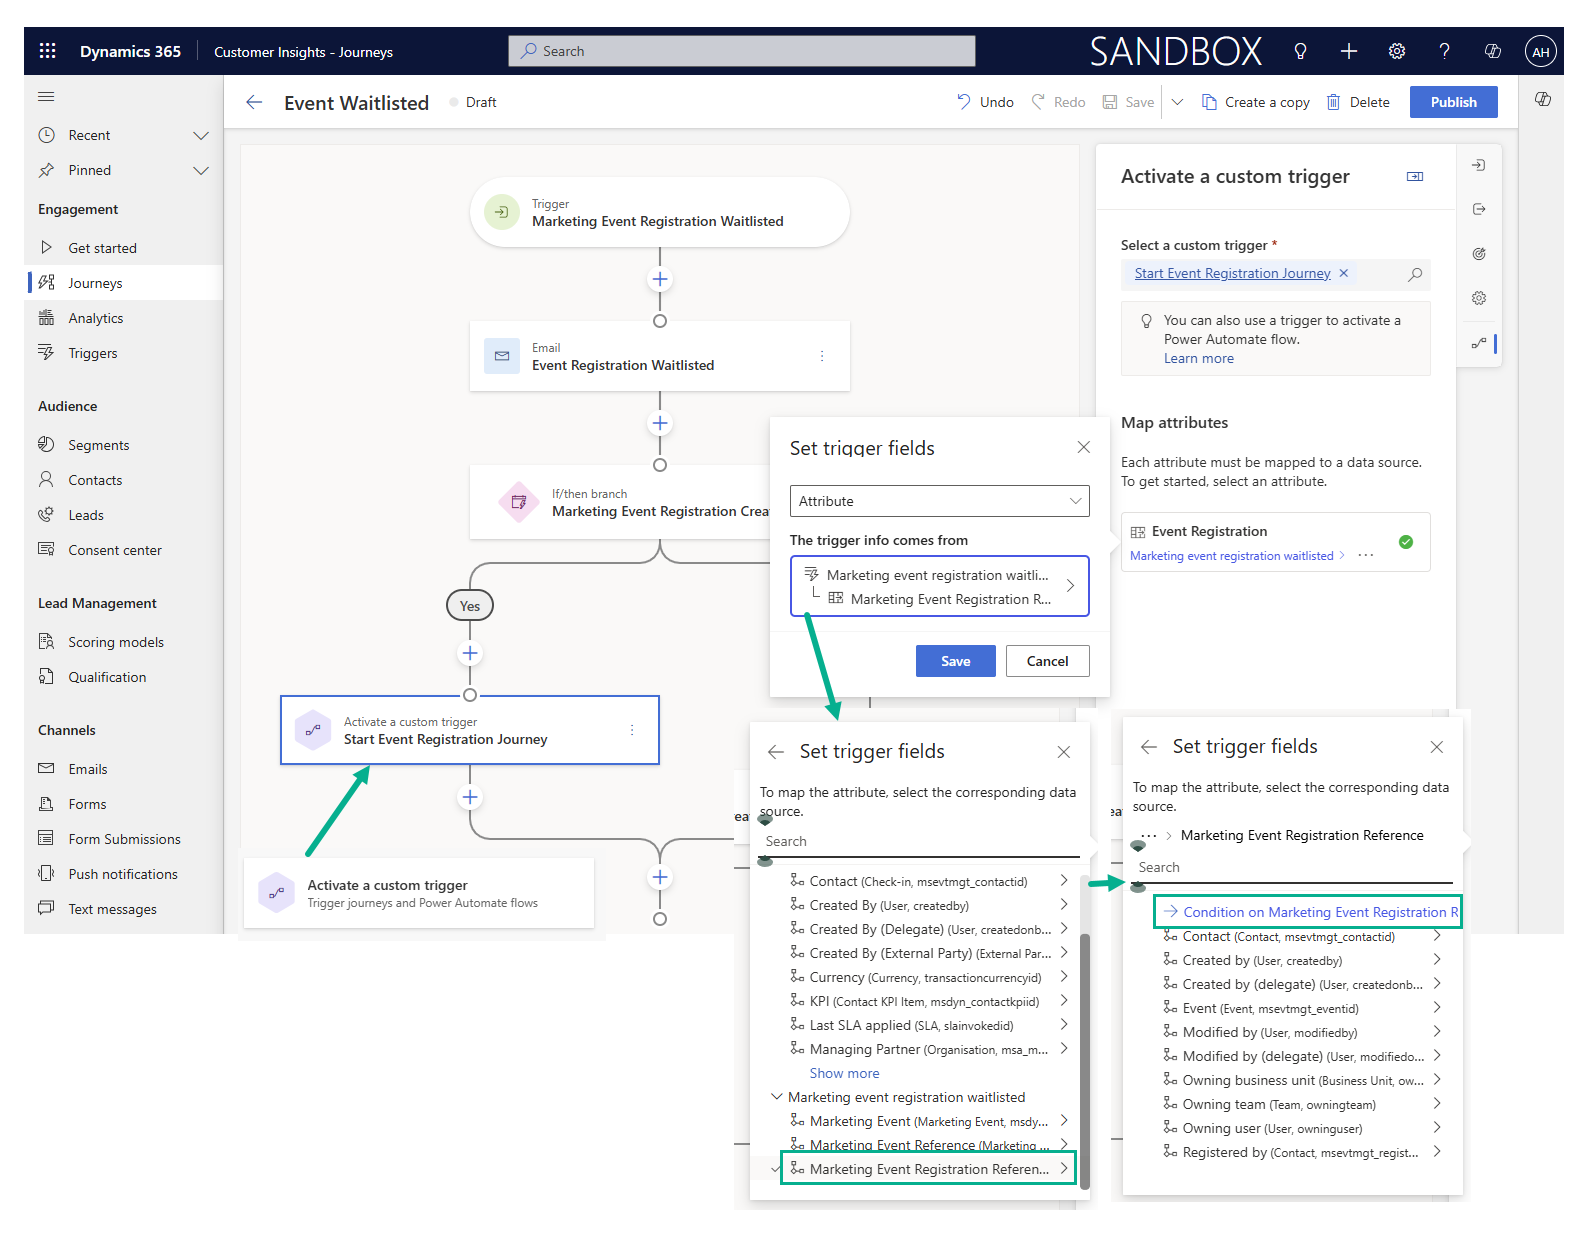
In the ‘Yes’ branch add a tile ‘Activate a custom trigger’ the select the trigger you created in earlier steps ‘Start Event Registration Journey’. Map the Event Registration attribute via the pathway Marketing Event Registration Waitlisted -> Marketing Event Registration Reference -> Condition on Marketing Event Registration Reference. As show in image below. Save & publish this journey.
Use the custom trigger, to fire the ‘Marketing Event Registration Created’ trigger
The journey you just built will fire the trigger ‘Start Event Registration Journey’ when a registration is converted from ‘Waitlisted’ to ‘Registered’. Now we need t a flow to listen for that trigger, and fire the ‘Marketing Event Registration Created’ trigger for us. I know it’s a bit convoluted to use a trigger to fire a trigger but when the alternative is rebuilding 5+ complex emails with conditional content and a journeys with 20+ steps - it seems like a reasonable compromise with way less room for human error.
When an action is performed
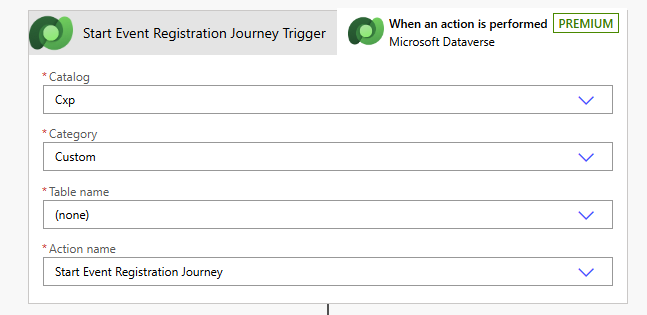
Create an automated flow using the Dataverse trigger ‘When an action is performed‘. The action name is the name of the trigger you created in the previous steps.
Start Event Registration Journey Trigger
Catalog: Cxp
Category: Custom
Table name: (none)
Action name: Start Event Registration Journey
2 Response
200

Response
This sends a response to the journey to say the trigger message was received and prevents it being triggered on a retry.
Response
Status Code: 200

Get a row by ID - Event Registration
Get the event registration row, using the ID passed from the triggers ‘Entity reference’.
Table name: Event Registrations
Row ID: triggerOutputs()?['body/InputParameters/msdynmkt_eventregistration/Id']
Select columns: _msevtmgt_eventid_value,msevtmgt_eventregistrationid,_msevtmgt_contactid_value

Compose - Trigger Inputs
These are the parameters for the the action behind the out of the box ‘Marketing Event Registration Created’ trigger.
TriggerInputs
Inputs: (code snippet below)
{
  "msdynmkt_eventid": "msevtmgt_events/@{outputs('GetEventReg')?['body/_msevtmgt_eventid_value']}",
  "msdynmkt_sourceentity": "msevtmgt_eventregistrations/@{outputs('GetEventReg')?['body/msevtmgt_eventregistrationid']}",
  "msdynmkt_eventregistrationid": "msevtmgt_eventregistrations/@{outputs('GetEventReg')?['body/msevtmgt_eventregistrationid']}",
  "msdynmkt_originaltimestamp": "@{utcNow()}",
  "msdynmkt_sourcesystem": 100000002,
  "msdynmkt_entityid": "contacts/@{outputs('GetEventReg')?['body/_msevtmgt_contactid_value']}"
}

Compose - Trigger Name
This is the name of the action behind the out of the box ‘Marketing Event Registration Created’ trigger.
TriggerName
Inputs: msevtmgt_eventregistrationcreated

Perform an unbound action - Marketing Event Registration Created
Using the two above compose steps - fill in the Action name & parameters. Calling this action will fire the ‘Marketing Event Registration Created’ trigger for your ‘Registered from waitlist' registration.
TriggerEventRegCreated
Action Name: outputs('TriggerName')
Action parameters: outputs('TriggerInputs')
Flow steps end to end
In case you need it

Option 3: Create and manage two sets of emails/journeys
I’m not giving you any instructions on this one, it’s a terrible idea and should only be used in sheer desperation.
The end
Getting new features is fun, adapting to make sure it works hurt my head.