Sending Digital Applications with Customer Voice & Power Automate
In this series of posts I will focus on how I leveraged specific parts of Power Automate to create a seamless process from application initiation, through to submission, follow up and beyond. There are two key Power Automate flows - one to send the application to the enquirer and one to receive the completed application from the customer.
For context and the Customer Voice side of things. Last time we looked at error handling application send failures. This post will focus on sending a personalised and uniquely identifiable application form to a potential customer from the click of a button on a business process flow.
Send
Sending the application is triggered from the business process flow after the enquirer has been to visit and would like to complete a digital application.
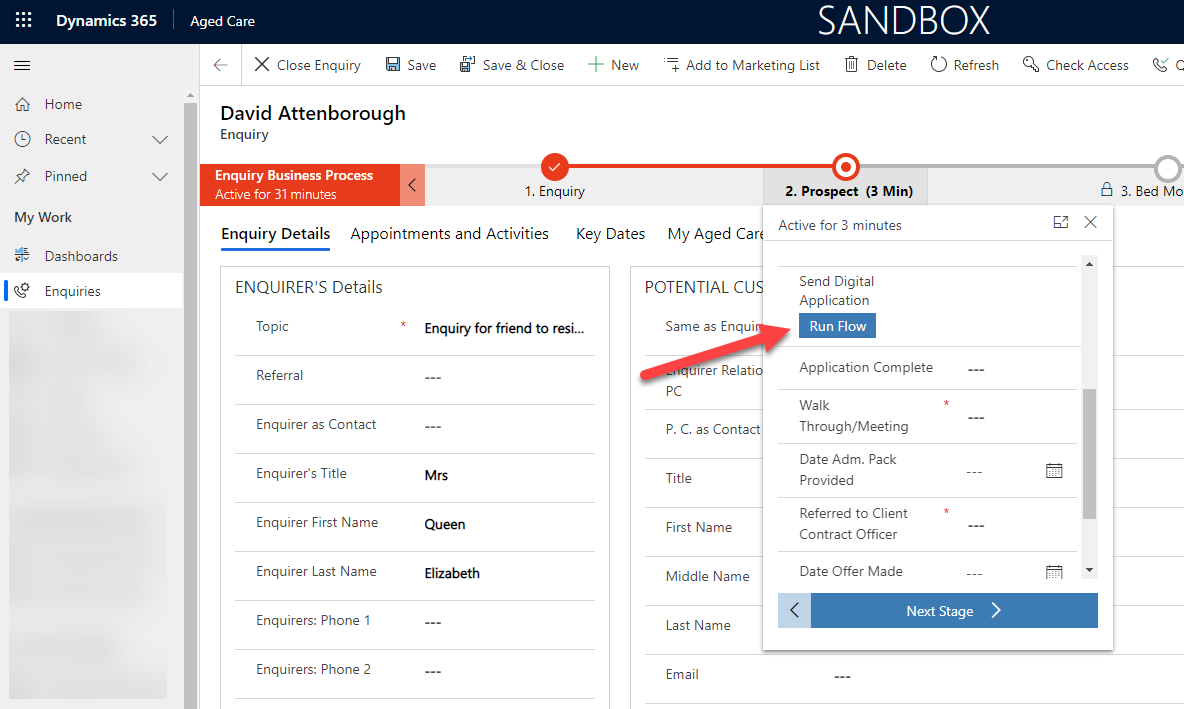
Get context of the record the ‘Run Flow’ button was called from
Use get record and ‘BPF Flow Stage Table Row ID’ to get the record which the flow button was called from - in this case the ‘Enquiry’

Initialise variable for email invitation content
We will use this ‘InfoURLs’ variable later in the flow to dynamically add information based on the enquirers location preference. For now we establish the base HTML for the email content.
<p style='margin-right:0cm;margin-left:0cm;font-size:15px;font-family:"Calibri",sans-serif;margin:0cm;background:white;'>
<span style="font-family: Tahoma,Geneva, sans-serif;color:black;">
Please find below links to the relevant information regarding your prefered aged care location,
please contact us if you would like some infromation about an alternative location which interests you.</p>
<br>

Create unique invitation
Creating an invitation does not automatically send the application invitation to the customer, but it does create the ‘Customer Voice Survey Invite’ record in Dataverse which has a unique application link and can be linked to the relevant record/customer etc. Note the slightly quirky method of setting the regarding using the TableName,RowID syntax rather than TableName(RowID) structure we using in the Dataverse connector.

Generate dynamic invitation content
As we already know which location the enquirer is considering applying for, we can leverage this to create a more personalised invitation experience. This set of conditions calibrates all the relevant info sheets and price lists related to the particular location. Where a link exists it wraps it in the relevant HTML tags and appends it to the ‘InfoURLs’ variable we established earlier. By using append the variable will grow to contain many links rather than be replaced each time it is updated.

Once each condition has been run to check all the possible links have been captured, we do a final check to see that at least one link was found, and if not we do not include the ‘InfoURLs’ variable in the final email content. I use a text to HTML generator to create my HTML code for the base email content then just drop in the personalised information where it has been generated in the flow.

Get calling user & Create the email
The email is best to be sent ‘from’ the user who initiated the application send, as this is most likely the person who conducted the tour and will have been communicating with the enquirer prior to this. We can use the Azure ‘User Id’ from the flow button press to find the Dataverse user record with a ‘List Records’ query.
To avoid unnecessary loops, we need to use the first syntax to get only one user ID (as there is only one!)
We know one of the outputs from the previous step will be blank and the other will be populated, we can add both outputs into the description field with confidence it wont have double email content. More more info on some other handy email creating tips such as sending the email to non user/contacts (‘unresolved recipients’) and setting ‘Regarding’ in Dataverse check my previous post.
azureactivedirectoryobjectid eq '@{triggerOutputs()['headers']['x-ms-user-id']}'
first(outputs('GetUser')?['body/value'])?['systemuserid']

Send customised email
By creating the invitation first rather than sending straight away ensures we have full control of the email content and ‘who’ the email is sent from whilst avoiding the mandatory ‘unsubscribe’ link which has to be included in all customer voice email templates. It also ensures there is no mention of or linkage with the term ‘survey’ we can then use the important to remove any mention of the word ‘survey’. The invitation is now ready to send. use the ‘Perform a bound action’ action to trigger the email to send from Dataverse


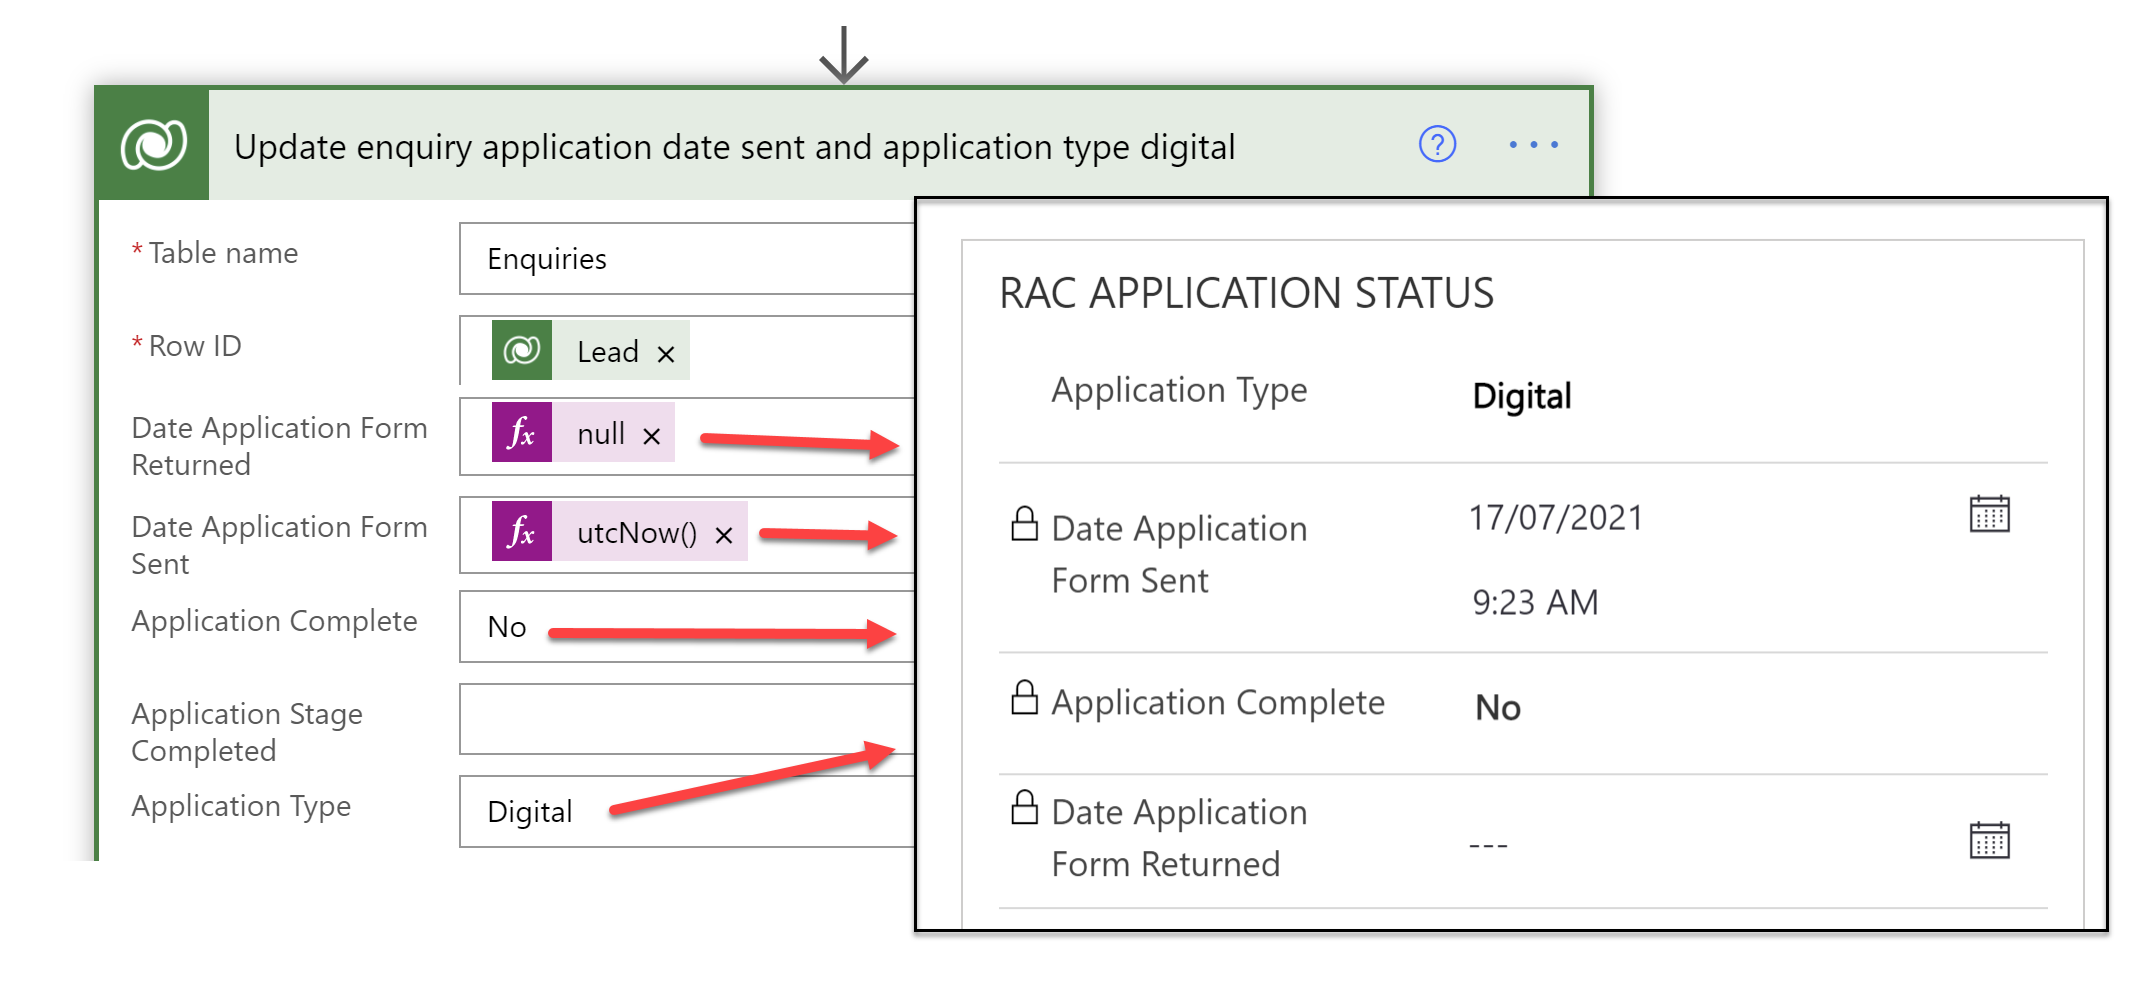
Update the enquiry
So from a functional point of view the journey ends here, but if a job is worth doing - its worth doing properly. So lets update the Enquiry with some details about the application and reassure the user that the ‘Run Flow’ button really is magical.
Mark business process flow step as succeeded
Use the Dataverse ‘Update record’ to update the process Log linked to the ‘Flows Workflow Log Id’ to ‘Succeeded’. Whether the flow fails or succeeds, if you don’t do this step the flow step will remain forever as ‘Processing’ which isn’t such a jolly user experience or audit trail. Check out my previous post on ‘Handling ‘Run Flow’ failures from a business process flow’ too!

What’s next?
Sending the application is just the start - the next post will explore how we can track and process the application response through to a successful and happy customer arriving in their new home.