Automated weekly product emails in Customer Insights - Journeys
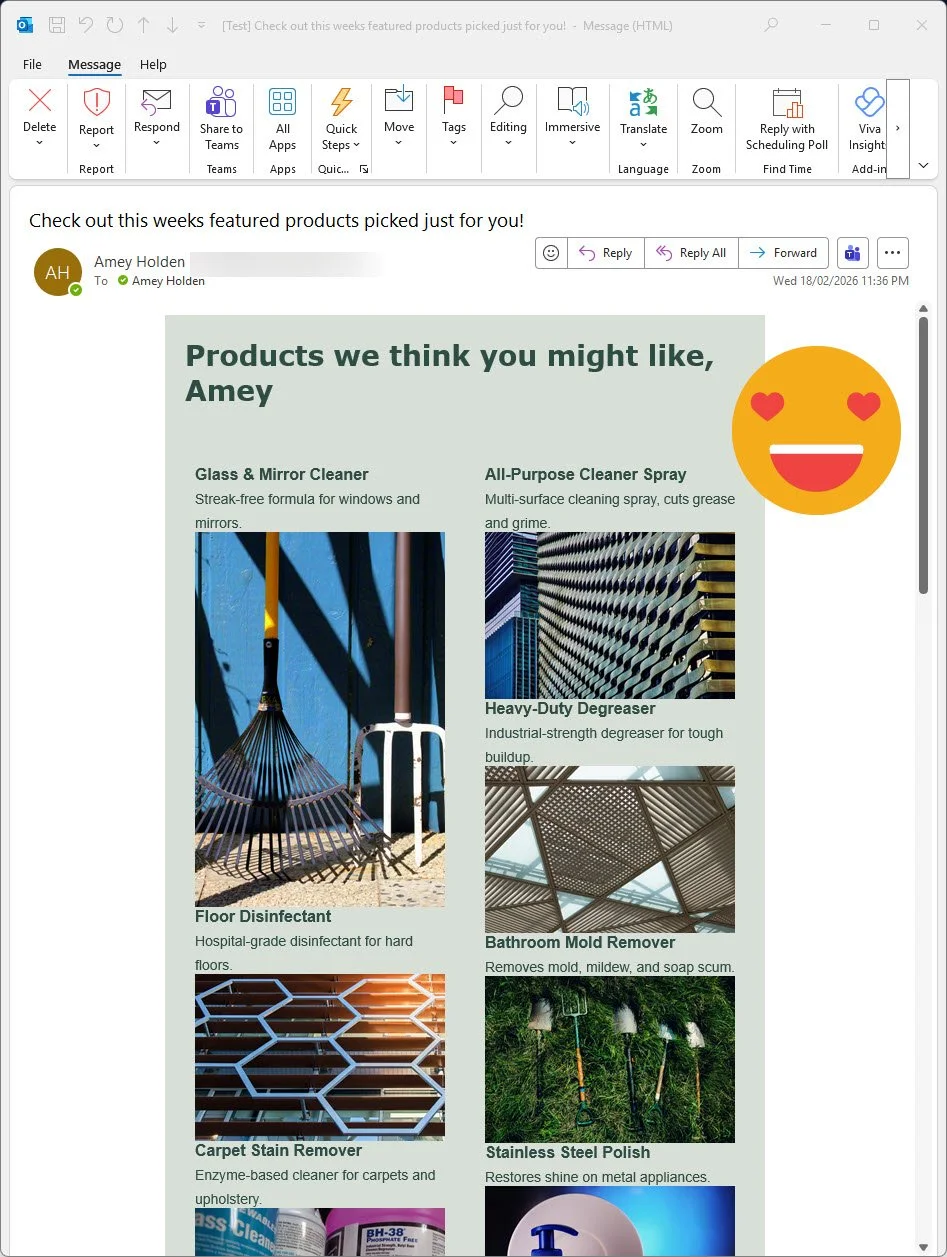
Wouldn’t it be good if you could have email that is automatically and dynamically generated on a regular basis to send customers information about products they might like, or current special offers, and all you have to do is set up the data in Dataverse with the product information you want to show. The answer is yes, it’s insanely cool, no power automate flows required here, only a delightfully configured Dataverse table, a Journey with branches, and an Email with conditional content.
And credits to Megan V Walker for the smart way to use ‘Lists’ in emails she showed in this post, where there isn’t an obvious direct relationship to the contact. I used this combined with challenging questions from customers to come up with this absolute beauty.
Limitation warning: due to the creative work around with lists limitations, this solution will only work where the product data is owned by the same business unit as the contact or lead. It’s probably not too hard to make this scenario work within the BU scope.
You can download this unmanaged solution which contains the conditional content configured email and the Feature Products table to install into a test environment so you can explore how it all works.
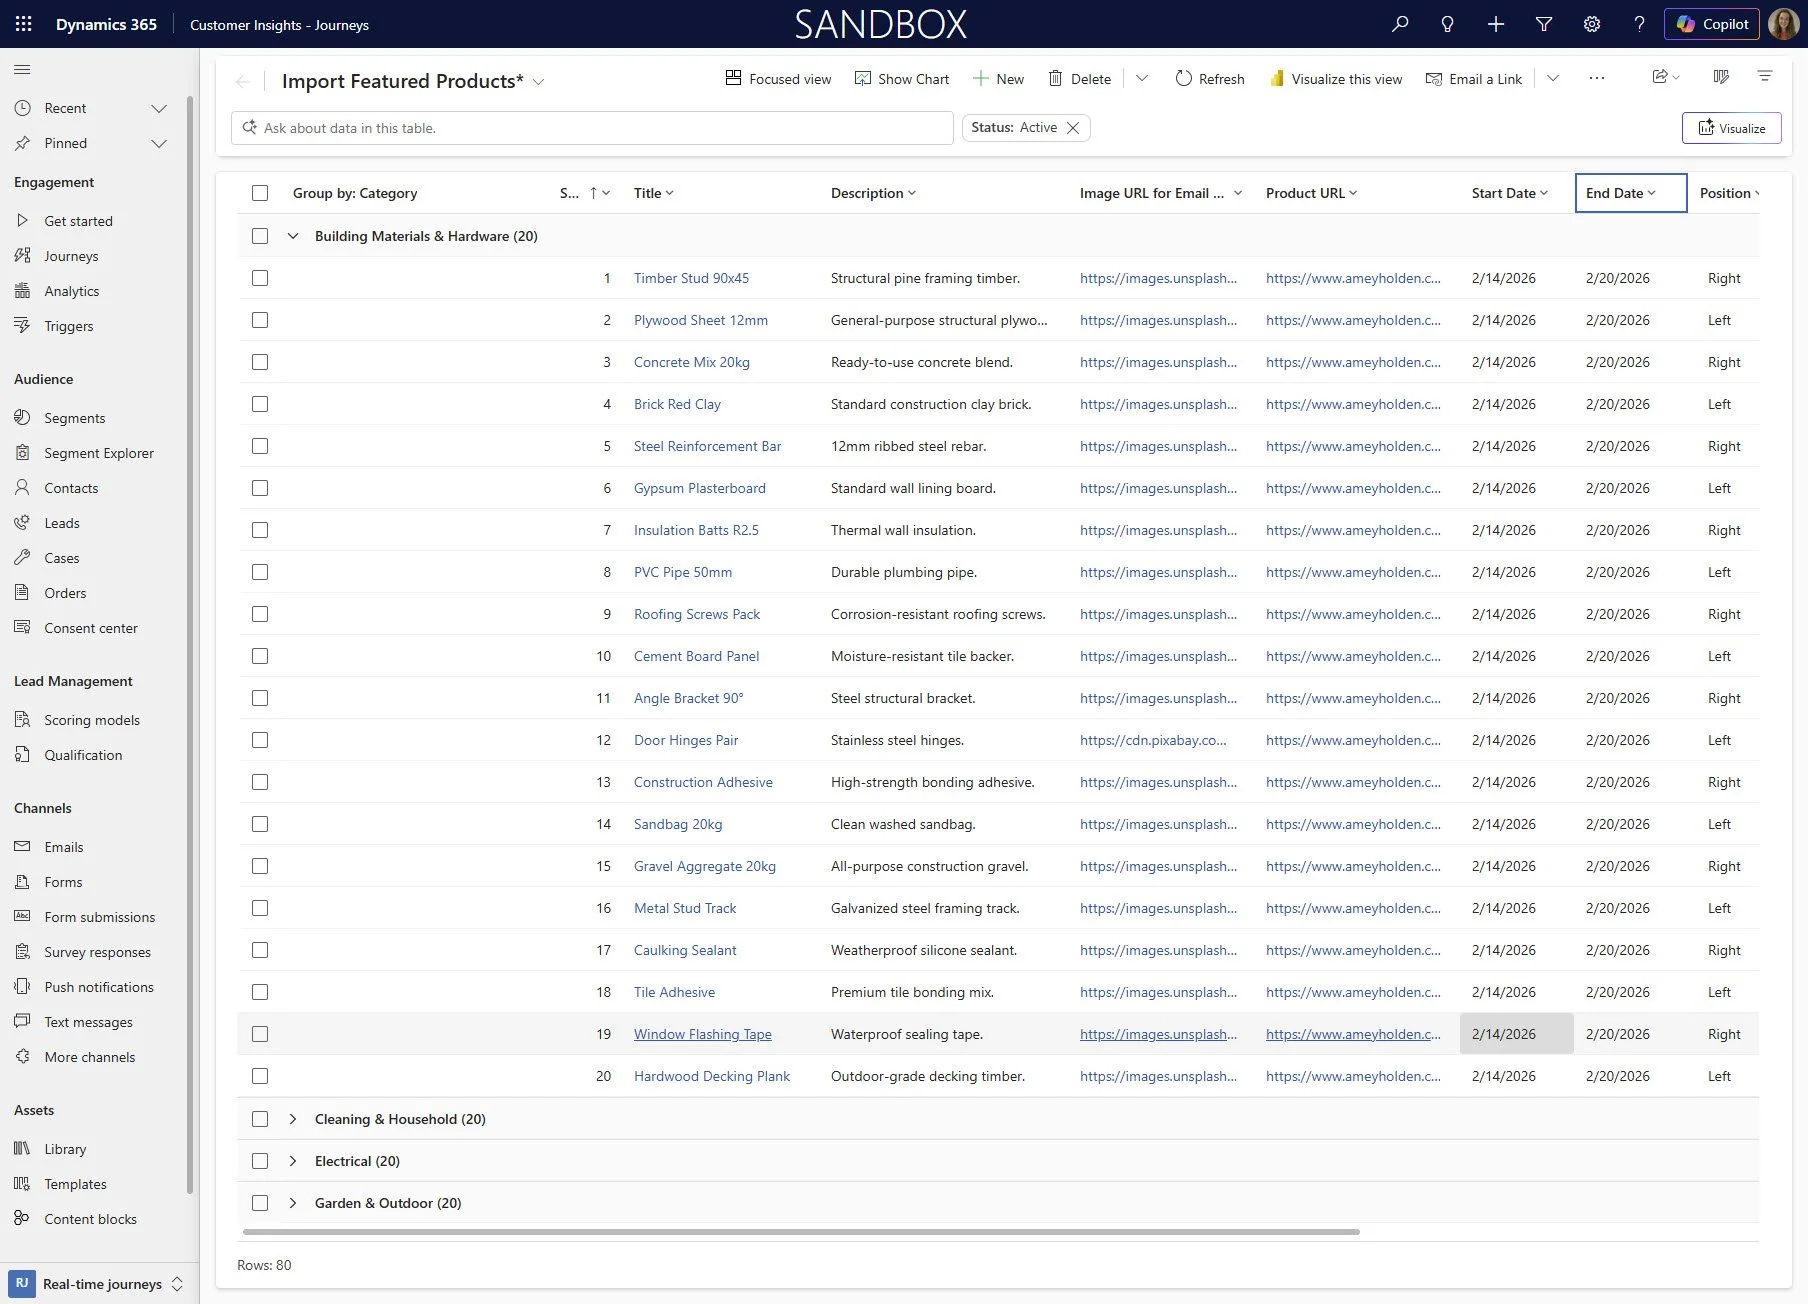
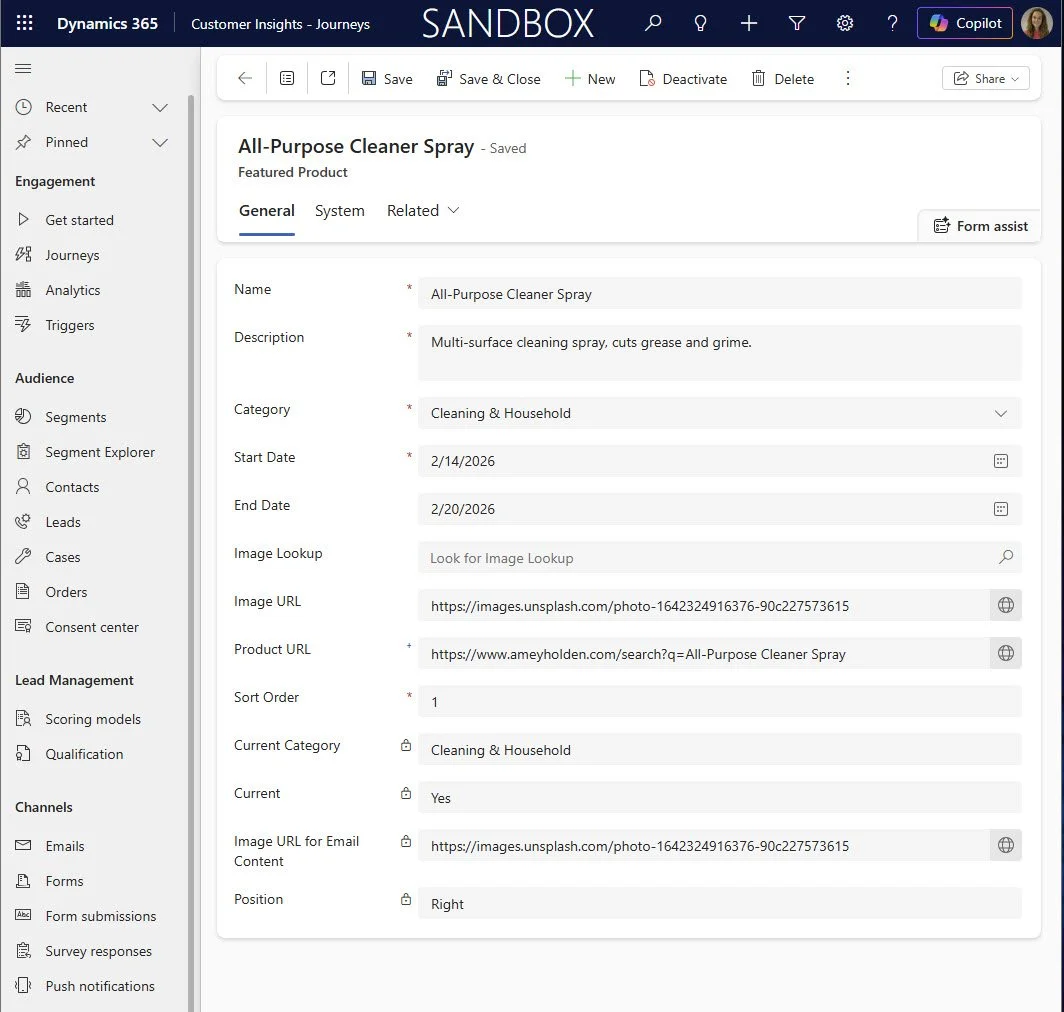
‘Featured Products’ Data
The only configuration part you need is to get the ‘Featured Products’ table set up with the correct columns and settings. So that you can set up your email content, like below.
Create a new table in Dataverse, ensure the table is a ‘Standard’ and ‘Record Ownership’ type is ‘User or team’
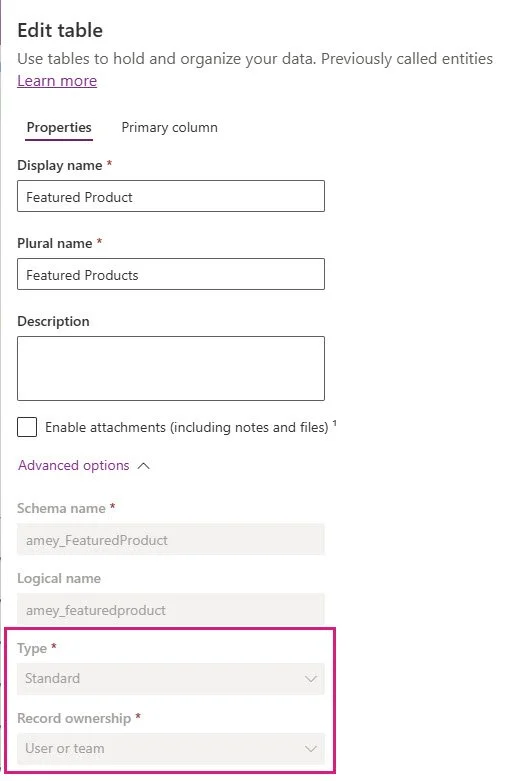
Table Columns
Configure the following columns on the table, note that some of these are really important to being able to reliably generate the dynamics email content. The actual content you capture/show in the email is entirely up to you once you have the base structure in place.
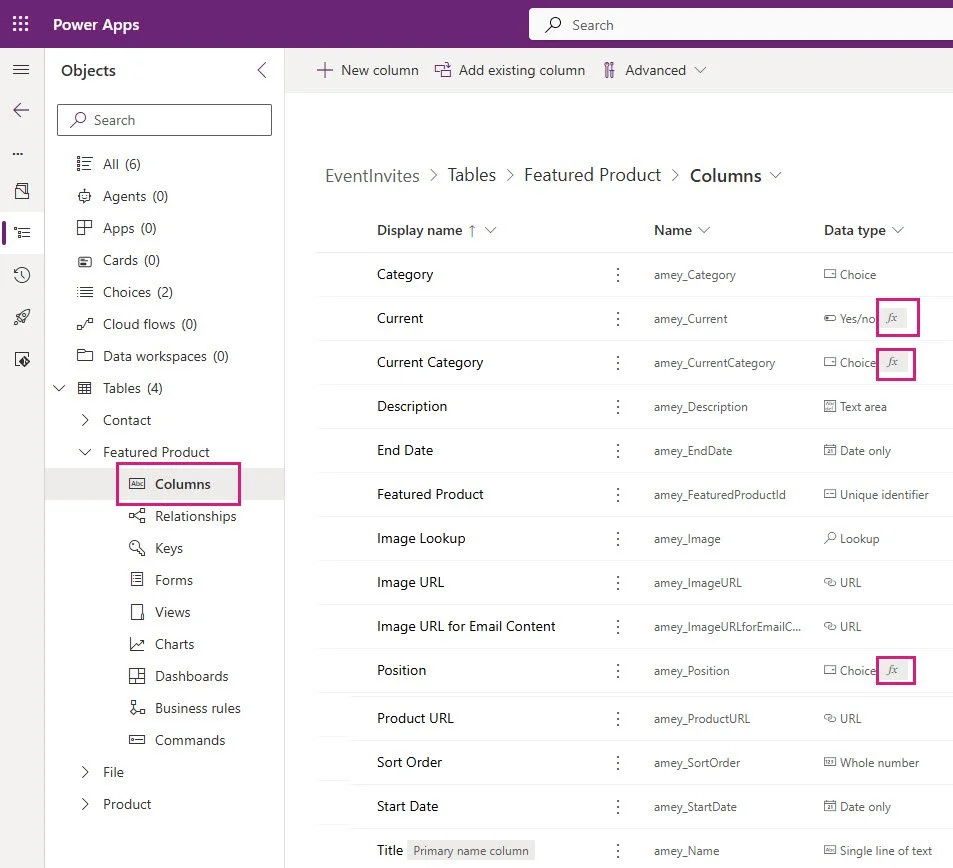
Description (amey_Description)
End Date (amey_EndDate) Date Only + Time zone independent (for compatibility with PowerFX Formula Columns)
Start Date (amey_StartDate) Date Only + Time zone independent (for compatibility with PowerFX Formula Columns)
Image Lookup (ameyImage) Lookup to ‘File’ (msdyncrm_file) aka the Asset Library
Image URL (amey_ImageURL) Text URL
Image URL for Email Content (amey_ImageURLForEmailContent) Text URL Calculated (Classic because Formula columns don;t support URL test inputs yet)
This ensures you only have to use one email for image URL input in the dynamics email content rather than building conditions inside the email itself.
If Image Lookup contains data - set Image URL for Email Content to (Image Lookup) BLOB CDN URL else if Image URL contains data - set Image URL for Email Content to Image URL
Product URL (amey_ProductURL) Text URL
Sort Order (amey_SortOrder) Whole Number Minimum Value 1
Title (amey_Name) Text
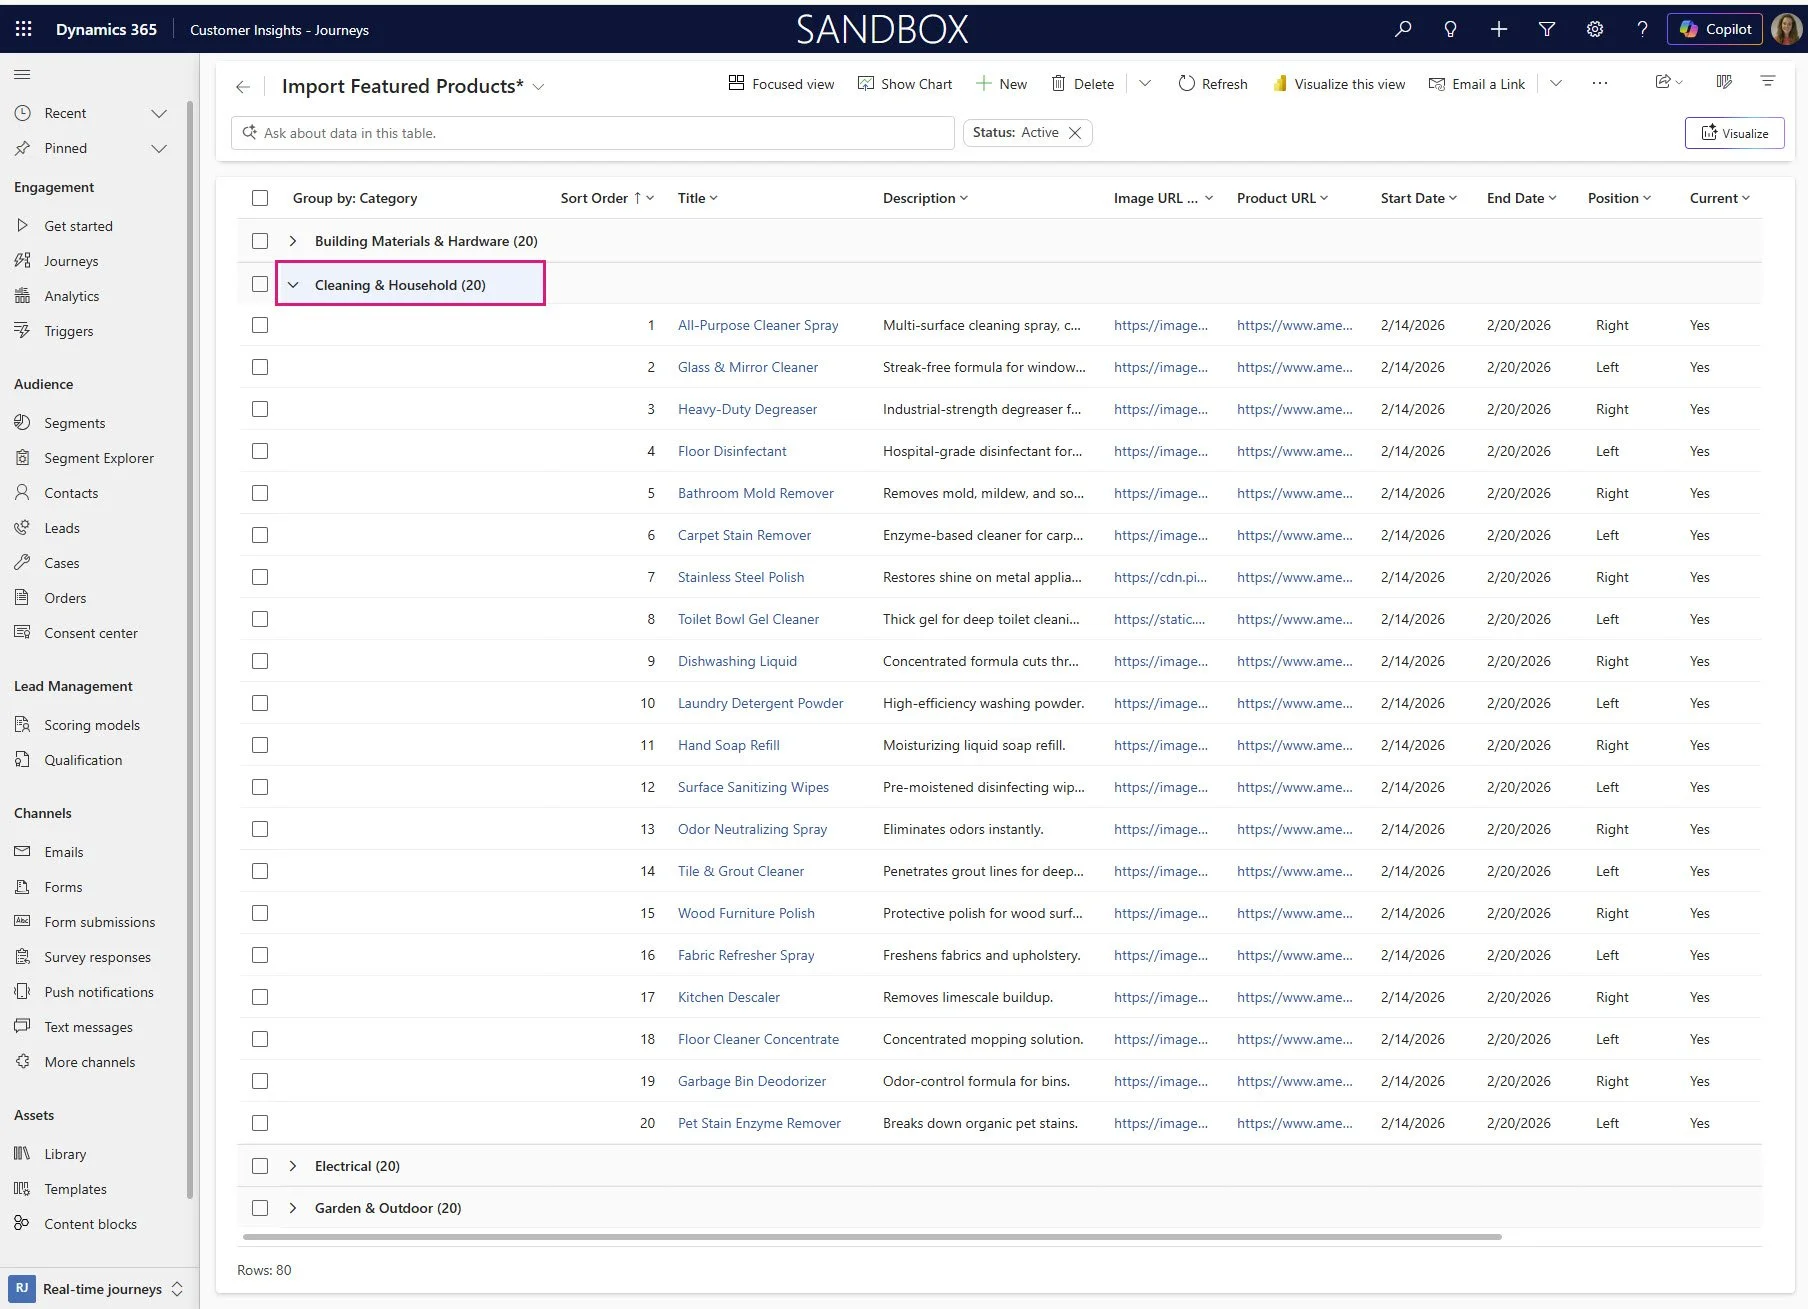
Category (amey_Category) Choice
I am using a global choice which is also used on the contact record to identify the type of customer, this can be something else you already user such as Customer Type or Lead Source etc. this siw hat allows us to have multiple types of products but only send the relevant ones to the customer. The choices I used are Building Materials & Hardware; Cleaning & Household; Electrical; Garden & Outdoor.
Position (amey_Position) Choice PowerFX Formula Column
Before creating this column, add a Global Choice Called ‘Position’ with Values ‘Left’ and ‘Right’ publish the choice.
Important for email content purposes.
If(Mod('Sort Order',2)=1,[@Position].Right,[@Position].Left)
Current (amey_Current) Yes/No Power FX Formula
I use DateAdd() to convert from UTC to AEST, adjust this accordingly for you! Having a yes/no here makes setting up the conditional content, journey branches and lists in the email so much easier.
If('Start Date'<DateAdd(UTCNow(),10,TimeUnit.Hours) && 'End Date'>DateAdd(UTCNow(),10,TimeUnit.Hours) && Status='Status (Featured Products)'.Active,true,false)
Current Category (amey_CurrentCategory)
You might need to publish the table changes you made above to be able to reference the ‘Current’ column in this formula.
Important for journey branching to ensure if no relevant products are available, the customer will not be sent a blank email!
If(Current,Category)
That’s the end of the configuration/development work, from here its journey and email creation! Make sure you add some data into the table for you to test this with (one of the few things I enjoy using AI tools for!).
For the email we are going to use a conditional content Section to show the correct list of data based on the contacts Category.
First, we will add the ‘Lists’ of data we will use as the email content. You will need to add two lists for each category - one of the left hand column, and one for the right.
In the ‘Personalise’ section of the email editor, under lists, +Add list
Choose an attribute -> Contact -> Owning Business Unity -> Featured products
Add filters to the list: Current Category = Building Materials & Hardware AND Position = Left
Order by: Sort order ascending
Max amount of items: that’s up to you
Columns: Product URL, Title , Image URL for Email Content , Description (+ any other info you want to include in the email content)
Display Name: FeaturedProductsLHSType1
Save & Copy -> Save
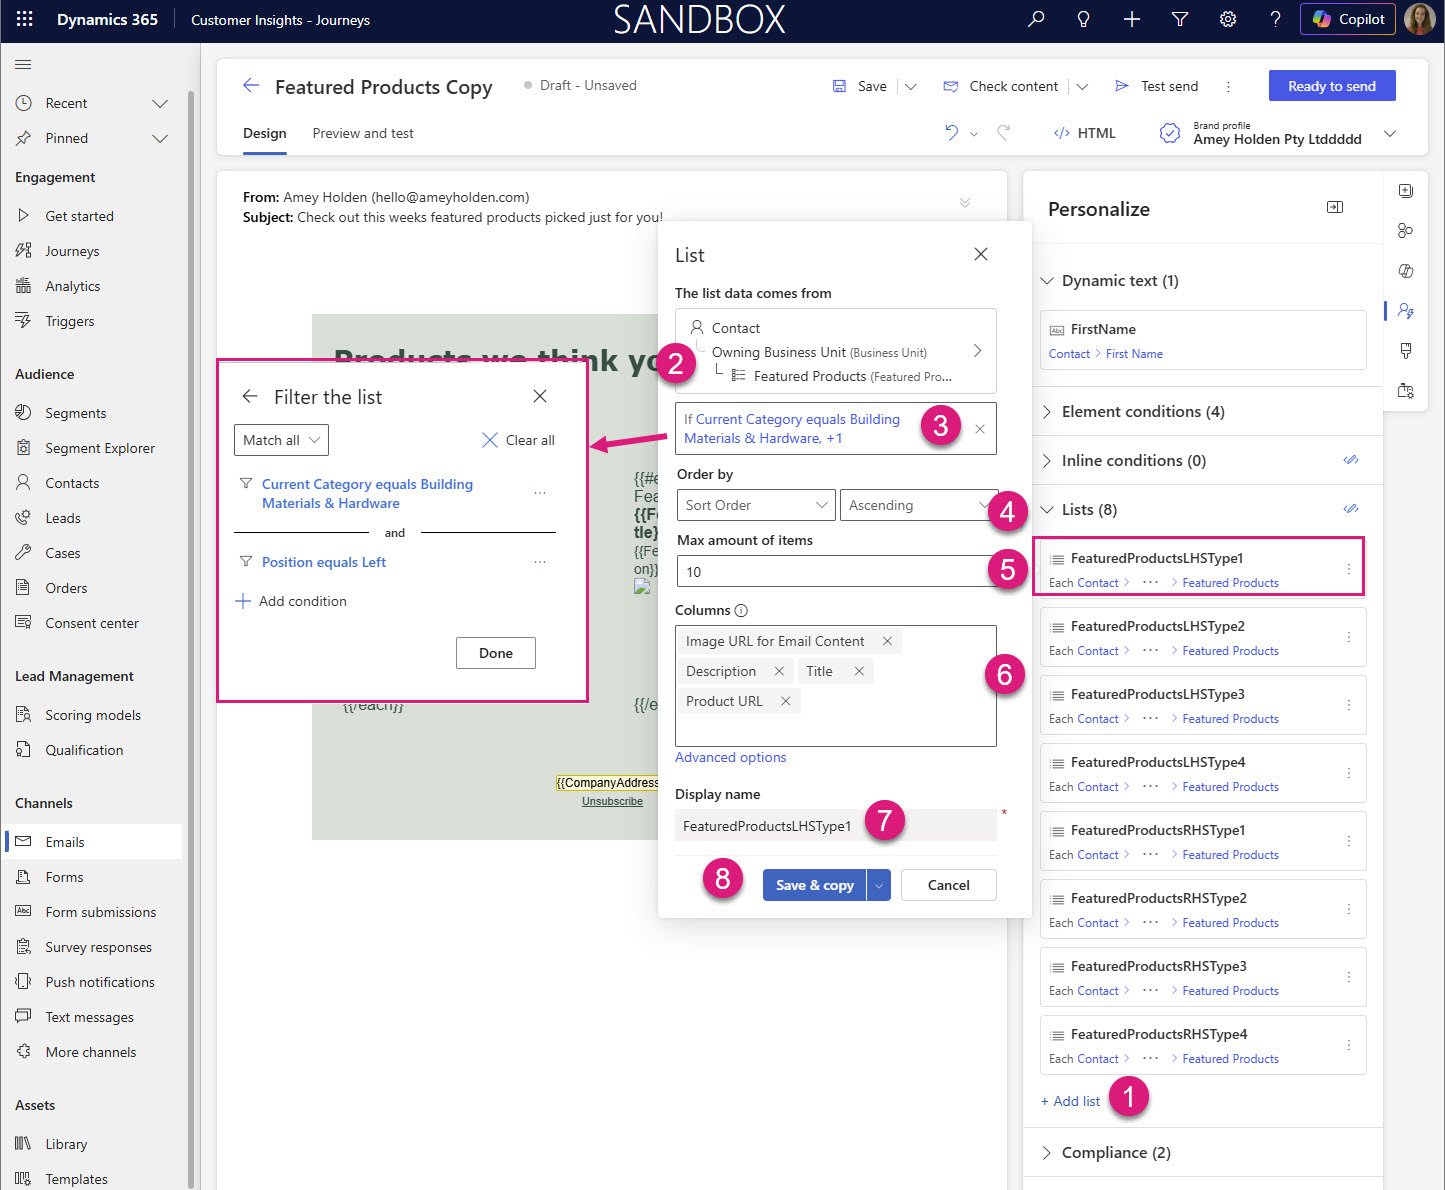
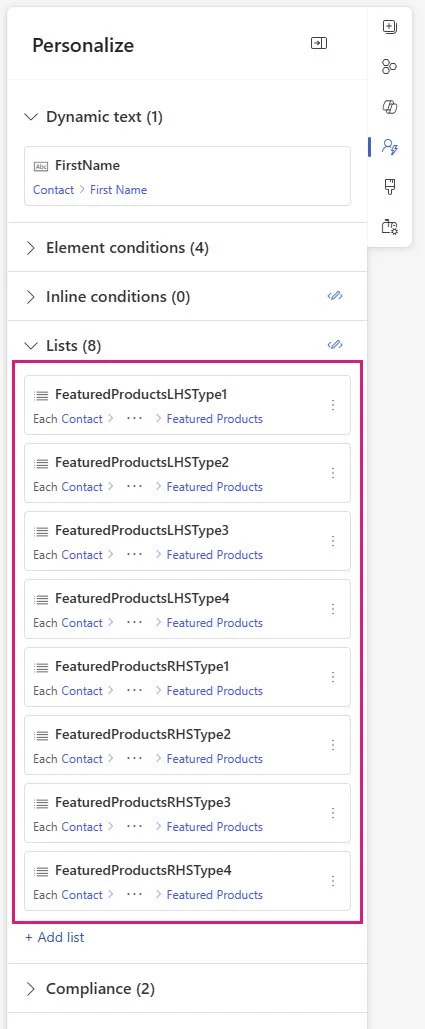
Repeat the steps above for Current Category = Building Materials & Hardware AND Position = RIGHT. Then the same for each other Category.
Now lets use that list data to get one of the categories sections working nicely, styled and tested before we replicate that to the other category sections. Add a 2 column layout section, in the left hand column add a text element. Copy the code from one of your Left lists and paste into the text element.
Now we need to style it to
make the produt title bold with a clickable link to the product url
include a repeating image control
Open the product url when the image is clicked
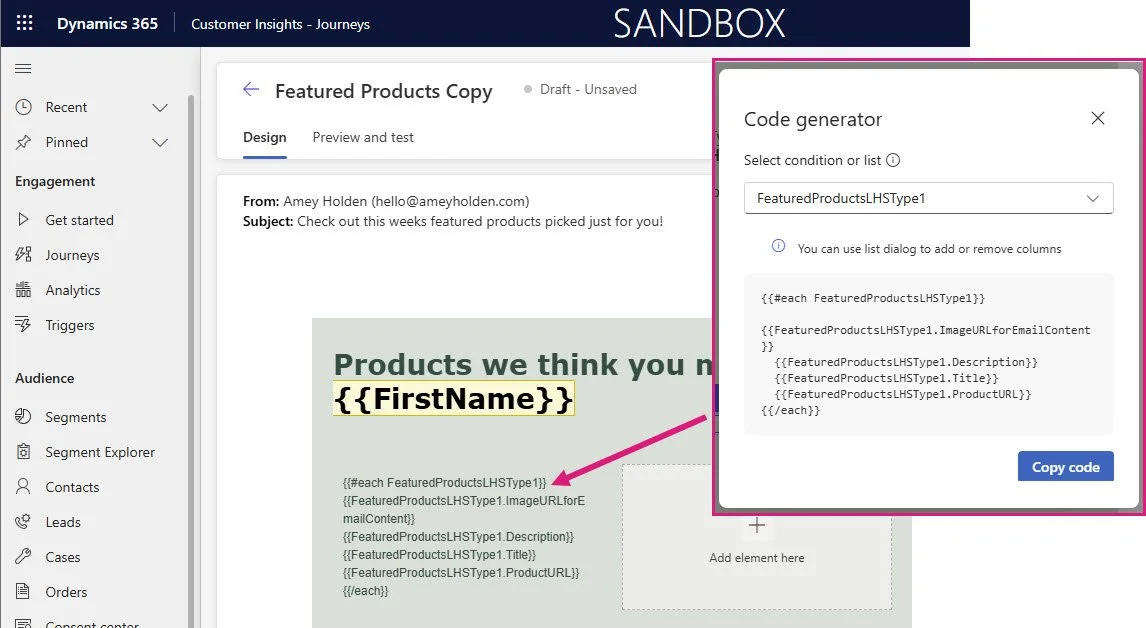
In the email HTML, find the snippet or text that starts with {{#each and ends with /each}}. Example below.
{{#each
FeaturedProductsLHSType1}}<br>
{{FeaturedProductsLHSType1.ImageURLforEmailContent}}<br>
{{FeaturedProductsLHSType1.Description}}<br>
{{FeaturedProductsLHSType1.Title}}<br>
{{FeaturedProductsLHSType1.ProductURL}}<br>
{{/each}}
Replace it with the sample below. What this does it to apply a link to the title, and also to insert an inline image that uses the dynamic list data too. You might need to adjust it a little but this should get you 90% of the way there!
{{#each
FeaturedProductsLHSType1}}</span><a
            href="{{FeaturedProductsLHSType1.ProductURL}}"
            style="font-weight: bold; font-size: 16px; color: rgb(46, 77, 68);text-decoration: none;">{{FeaturedProductsLHSType1.Title}}</a>
    </p>
    <p><span style="color: rgb(46, 77, 68); font-size: 14px;">{{FeaturedProductsLHSType1.Description}}</span>
    </p>
    <div align="Center" class="imageWrapper"
        style="min-height: 100px;"><a
            href="{{FeaturedProductsLHSType1.ProductURL}}">
            <img src="{{FeaturedProductsLHSType1.ImageURLforEmailContent}}" style="max-height: 100%; box-sizing: border-box; display: block; width: 250px !important;" width="250"></a>
    </div>
    <span style="font-size: 16px; color: rgb(46, 77, 68);"><div>
    <span style="font-size: 16px; color: rgb(46, 77, 68);"><br></span>
</div>
{{/each}}
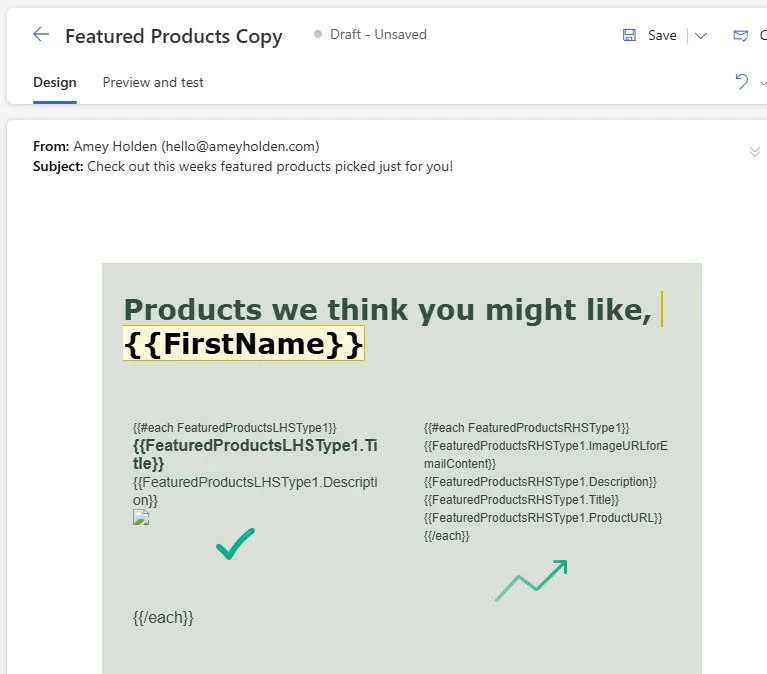
Now repeat the same on the right hand side, ensuring you choose the list source for the relevant category and position
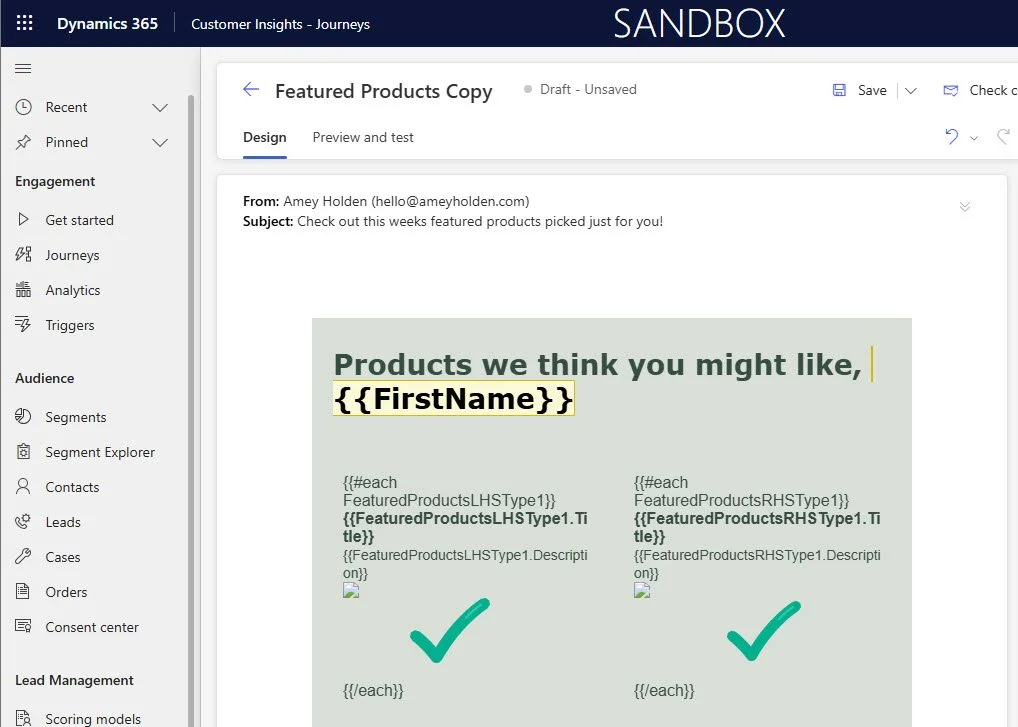
Test it out and make sure it looks good! Before you start adding the other categories, give it a test and adjust the styling/layout as you need to.
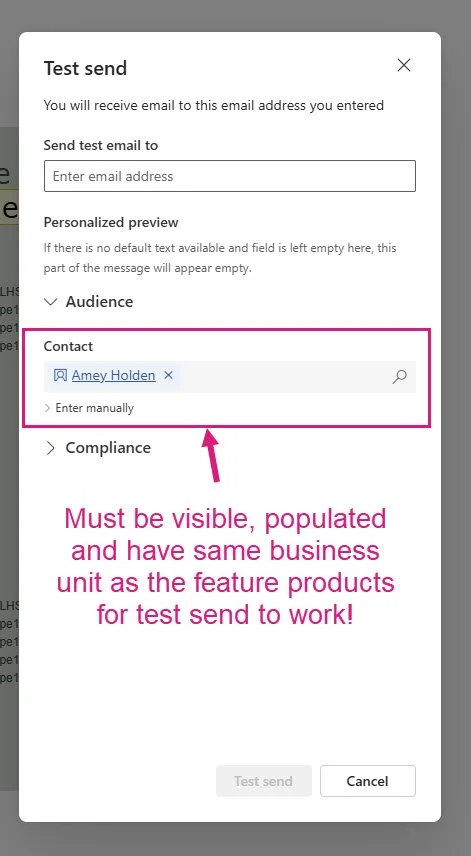
When you test send, make sure you expand and select an input for ‘Audience’ if using test send otherwise your email will be empty.
Once you are happy with the styling, you can enable conditional content. Make sure you select the section before enabling the conditional content.
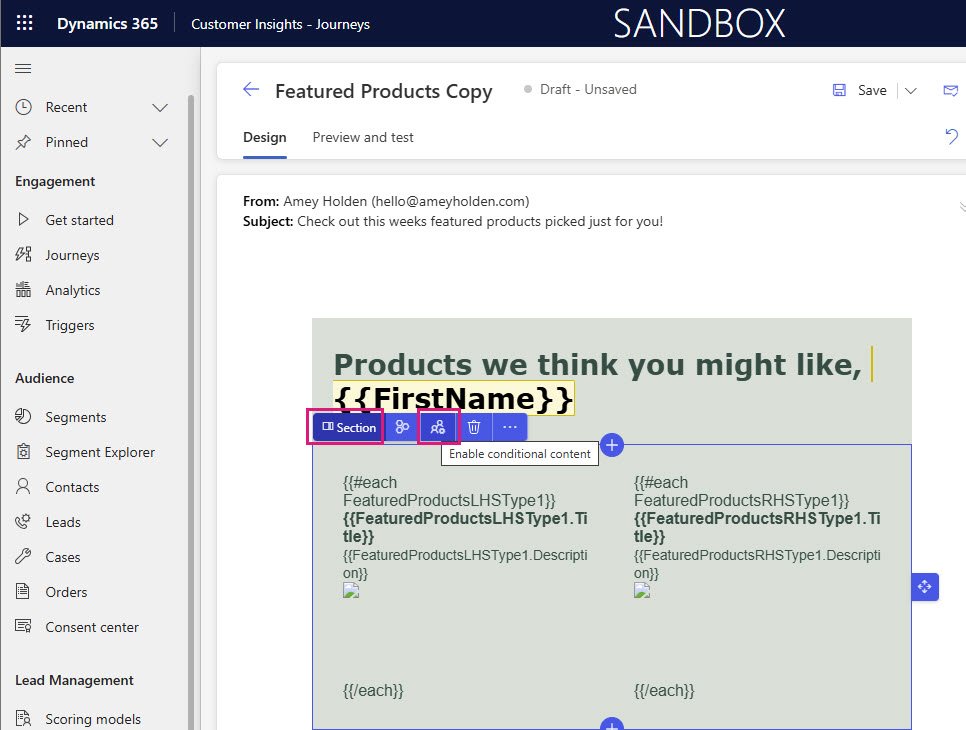
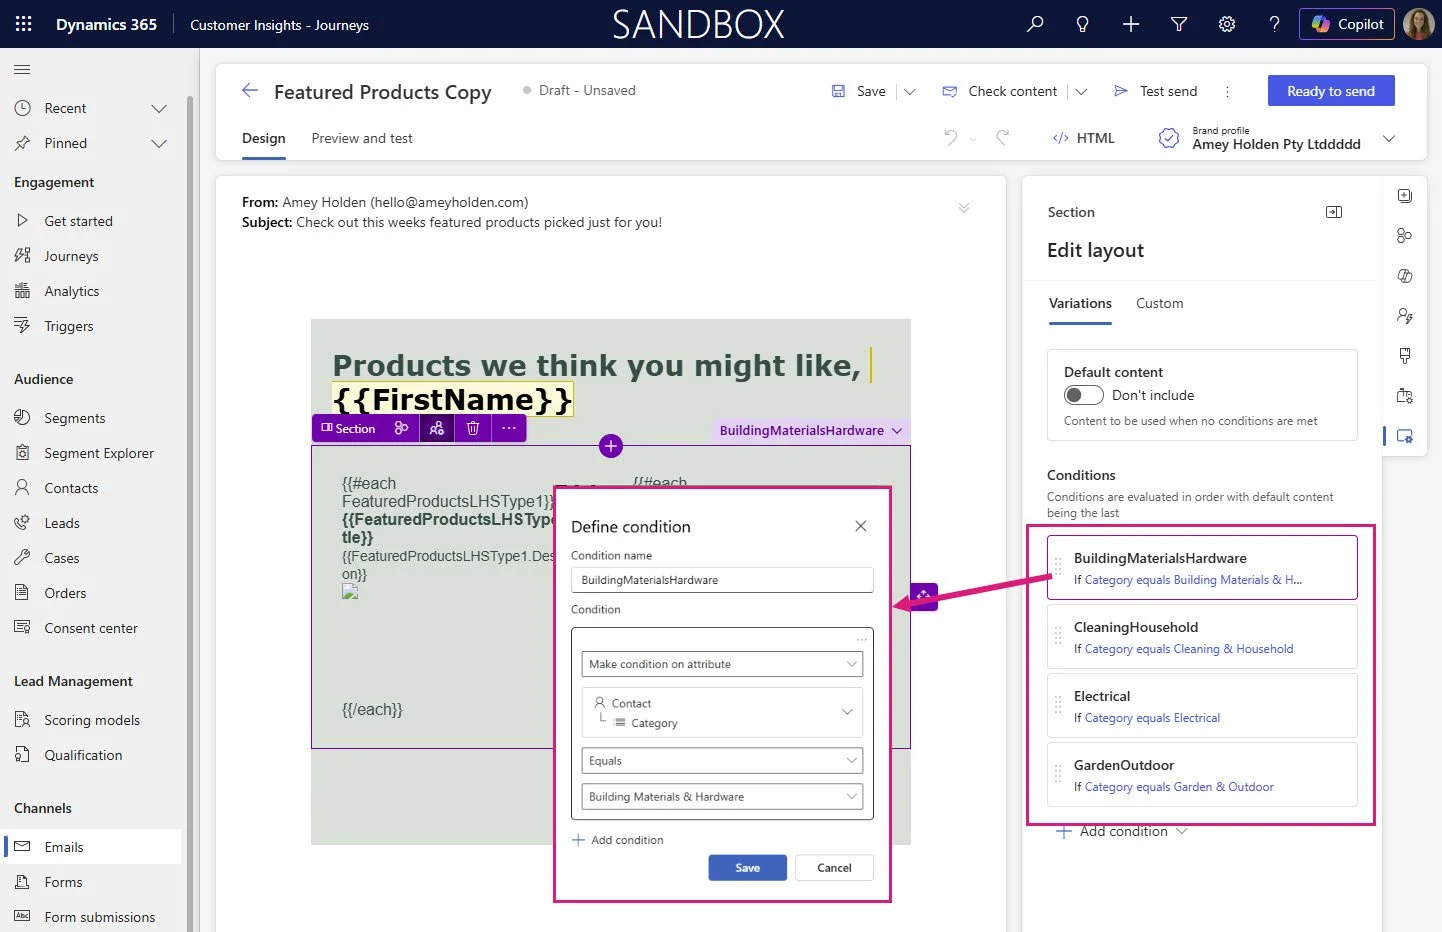
For each category, add a condition filtering on the contact category as shown below.
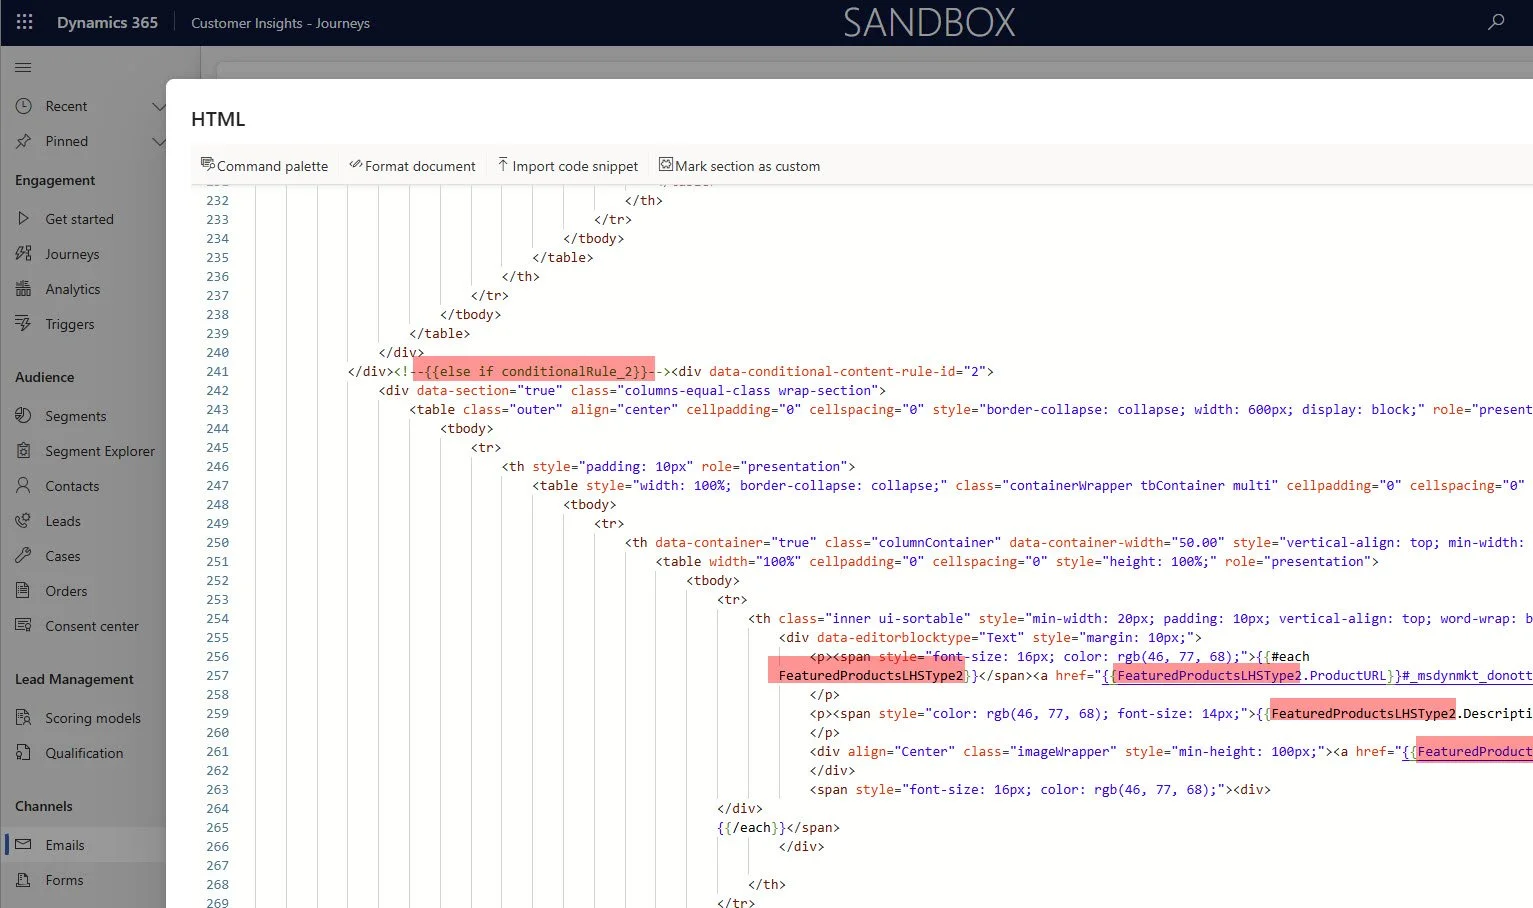
Now, for each section you just need to update the list name being used, easiest way to do in bulk and without breaking anything is in the HTML directly. So for the CleaningHousehold section I will replace all references for ‘FeaturedProductsLHSType1’ to be ‘FeaturedProductsLHSType2’ and all all references for ‘FeaturedProductsRHSType1’ to be ‘FeaturedProductsRHSType2’. It sounds totally nuts/too easy but trust me it works!
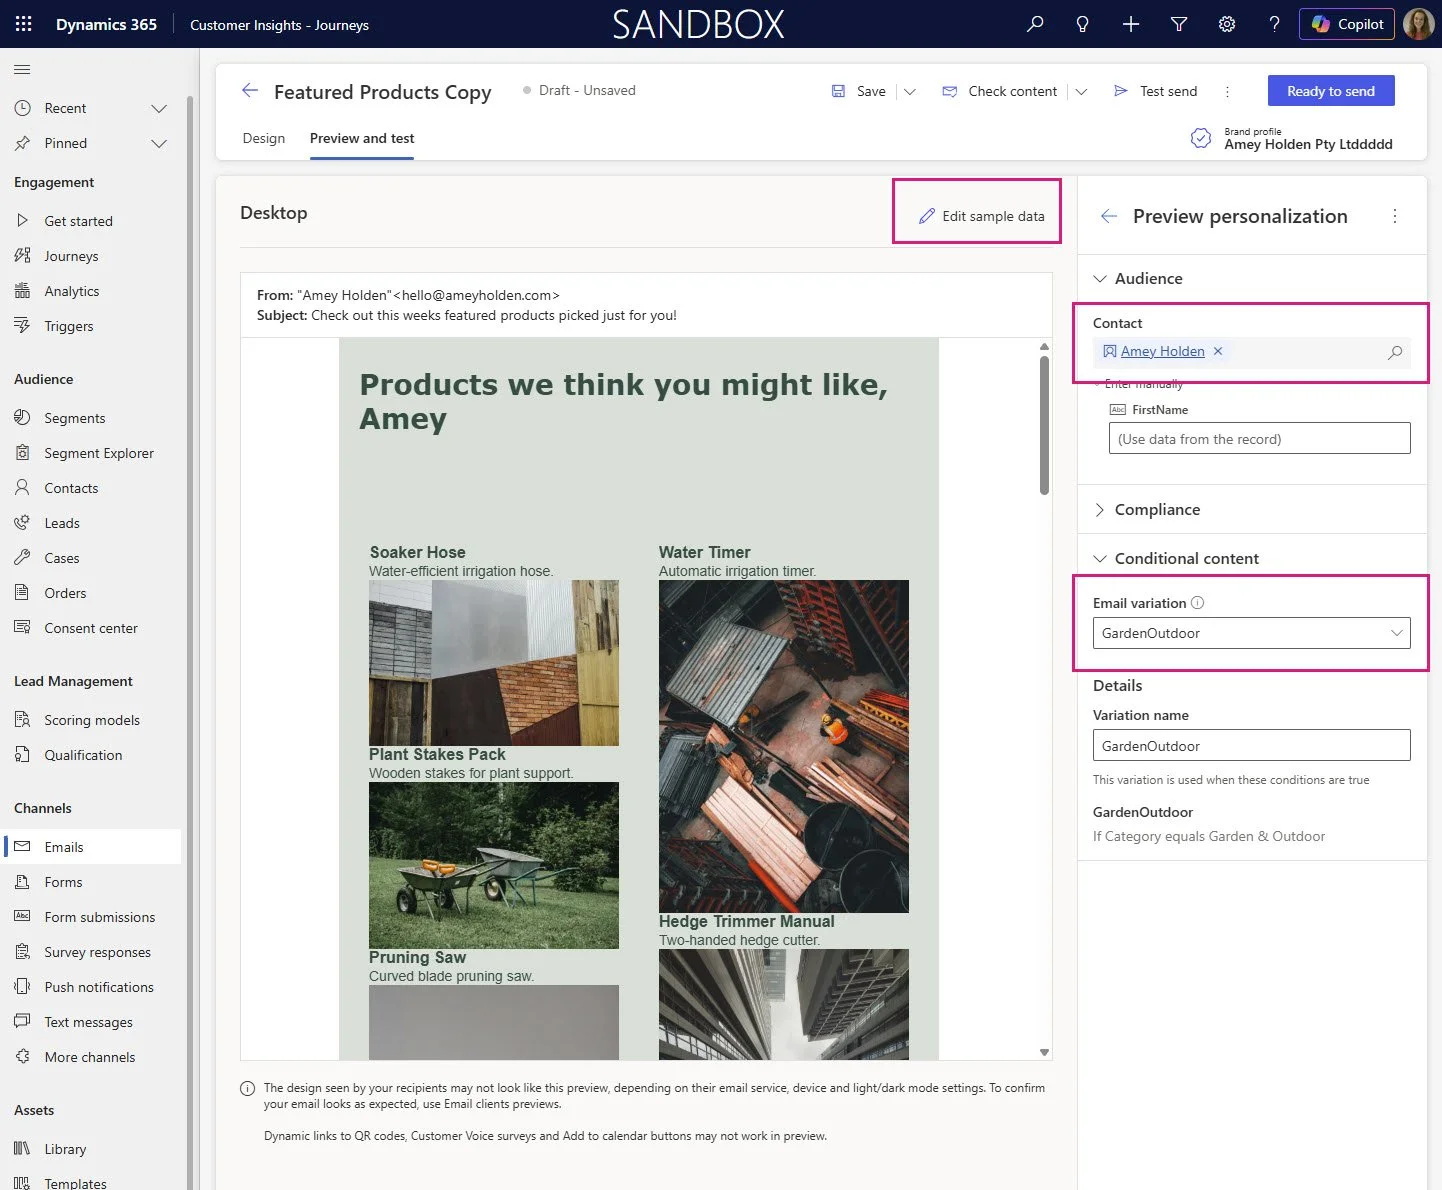
For the preview/testing of this one, you will need to ‘Edit sample data’ and select a Contact with the relevant category and also the conditional content.
Journey
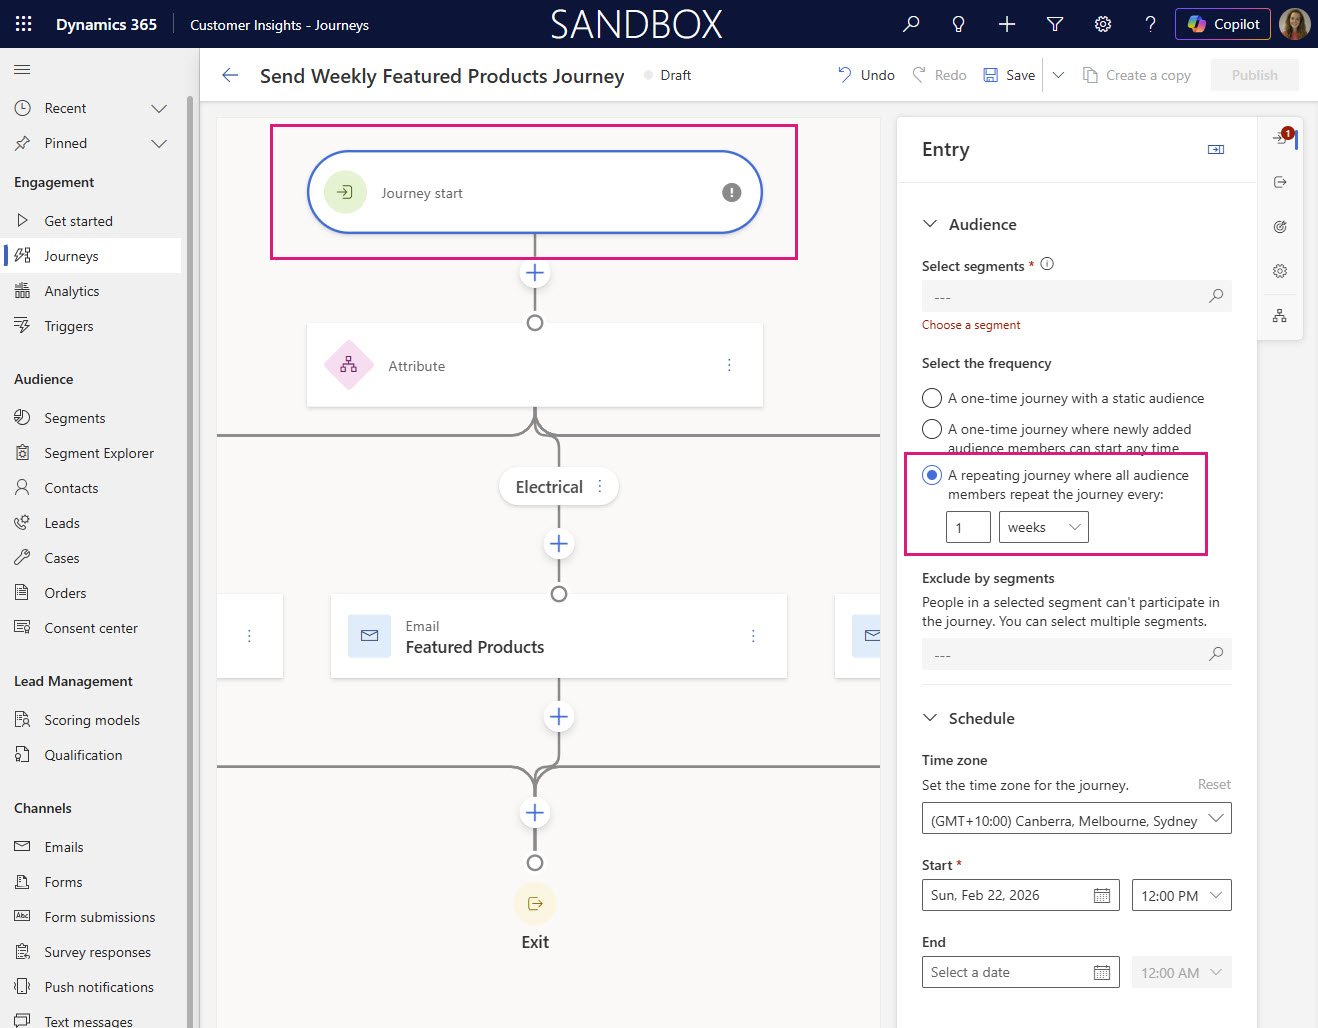
The same email is used in all branches, but the branching ensures that the contact has an applicable category and there are featured products available at journey run time. The journey will be a repeating journey that runs on whatever frequency you want, the only important thing is that the frequency on the journey isn’t more frequency that the feature products change otherwise you might send the same email to the same person more than once. The segment you use is just a pool of possible contacts or leads you wish to send this kind of email to. The journey branching will check the contacts eligibility to receive the email before it sends so it could be as simple as all your subscribed contacts (if that makes sense as a potential target market for the content).
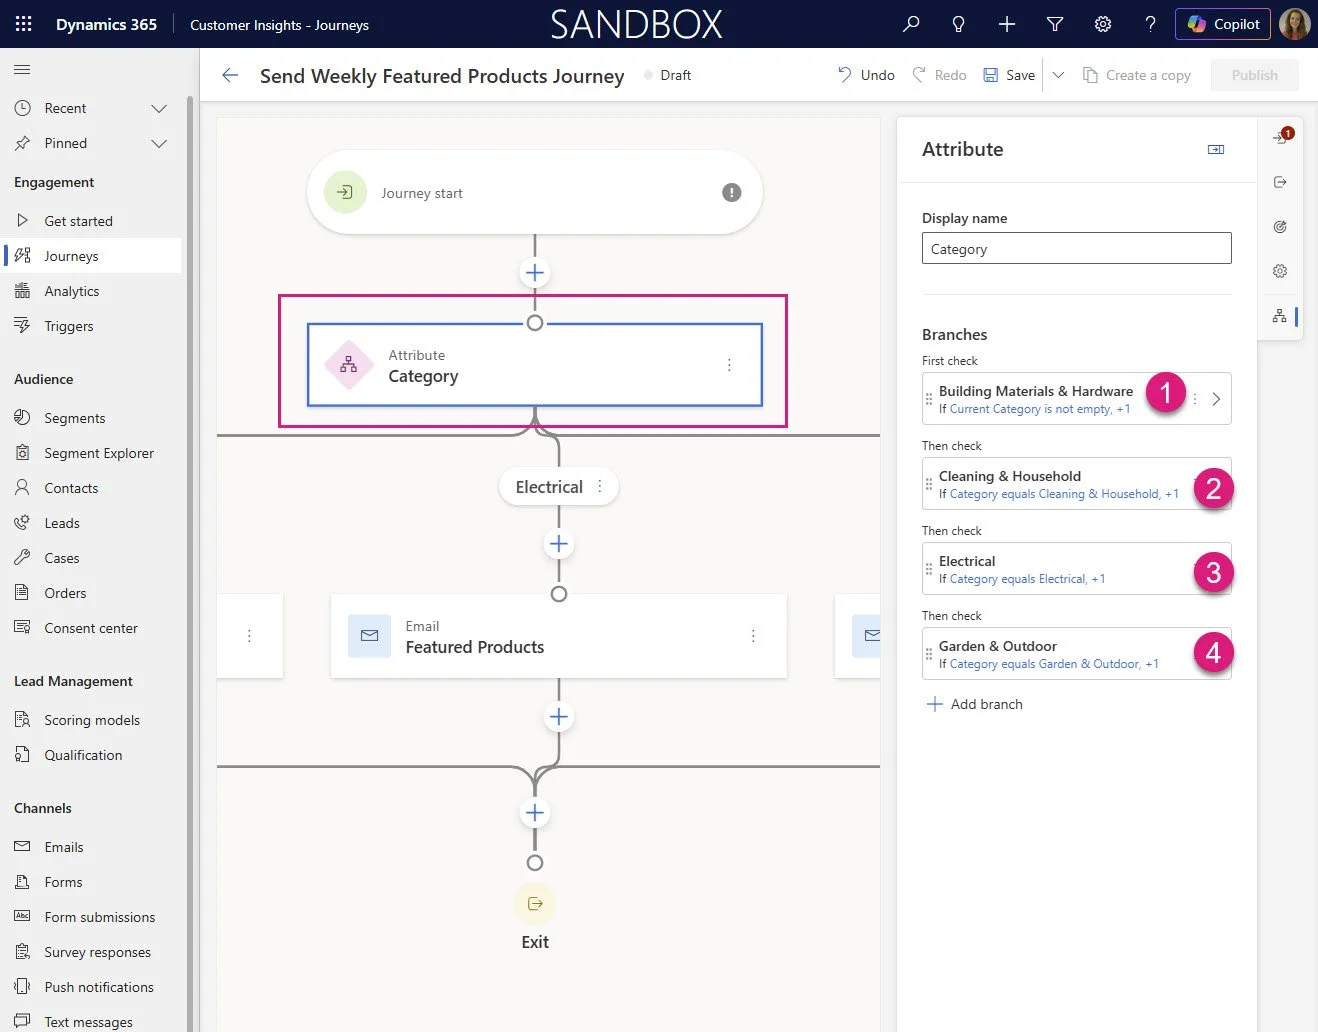
Add an attribute branch to the journey. Repeat the branch set up for each Category, example here for ‘Building Materials & Hardware’.
Condition 1 Attribute: Contact -> Owning Business Unit (Business Unit) -> Featured Products (Featured Product) -> Current Category.
Filter record: Featured Product Current Category equals Building Materials & Hardware
AND
Condition 2 Attribute: Contact → Category equals ‘Building Materials & Hardware
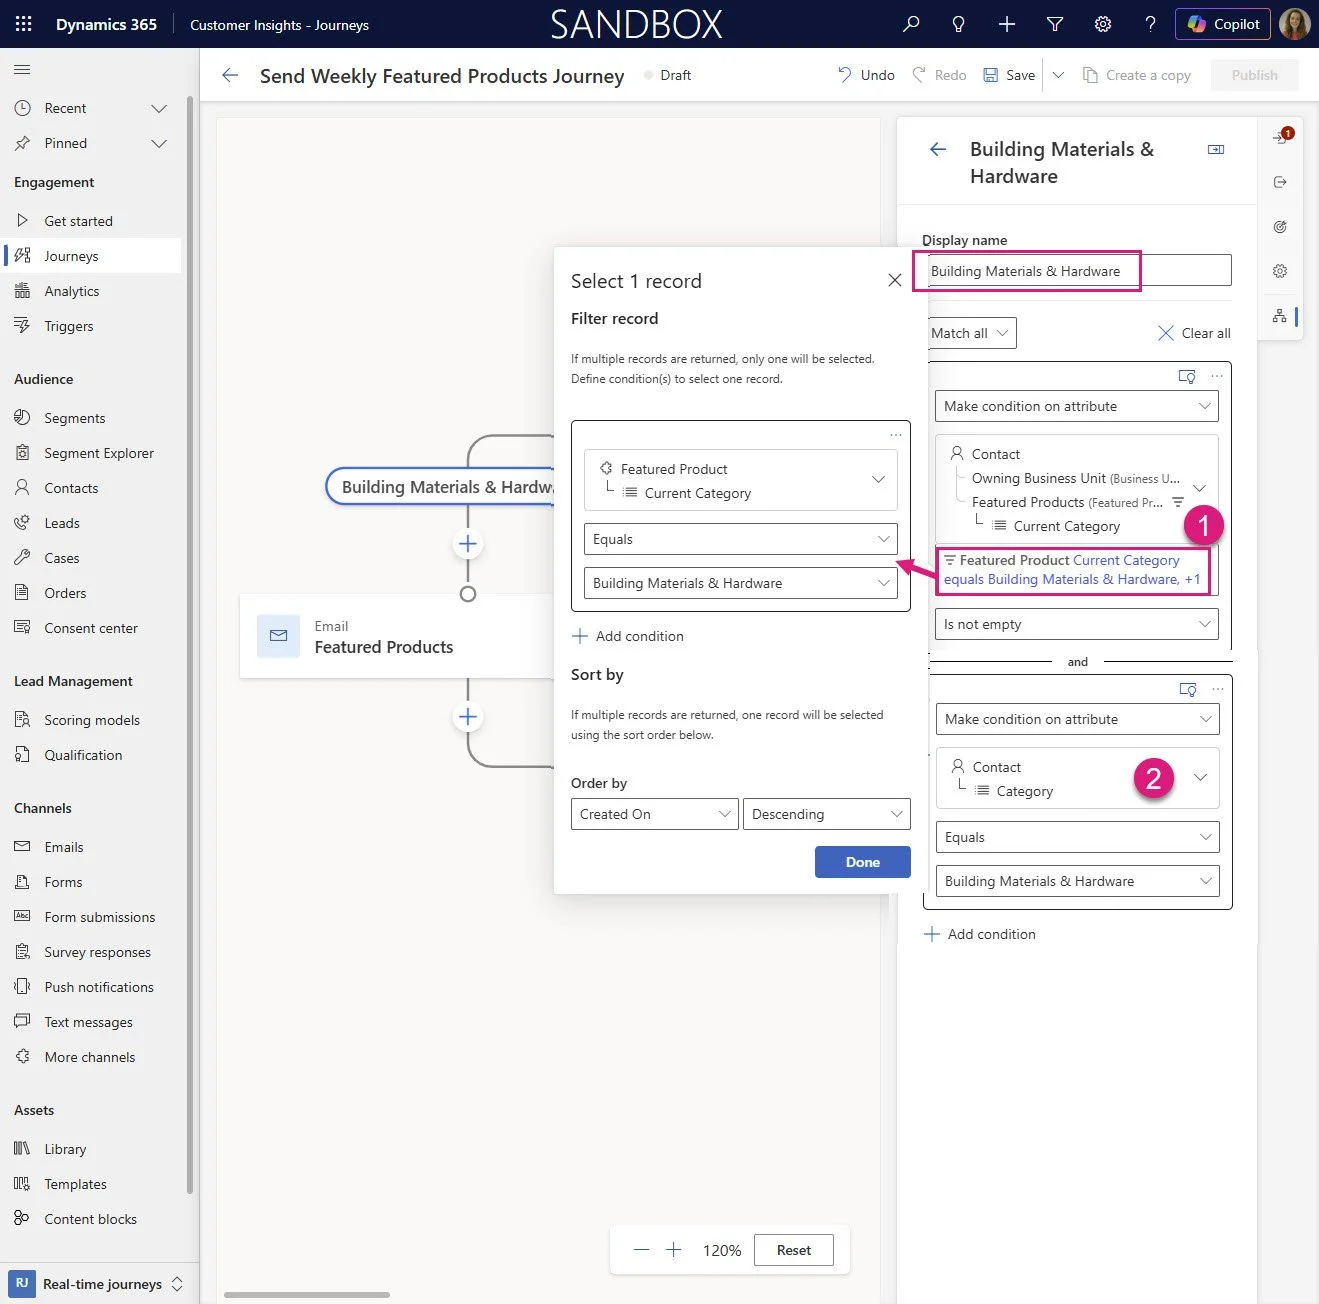
Each journey branch should have 2 conditions as shown above. One for the contact category and one for the featured products filter.
The final journey should look like this, same email in each branch.
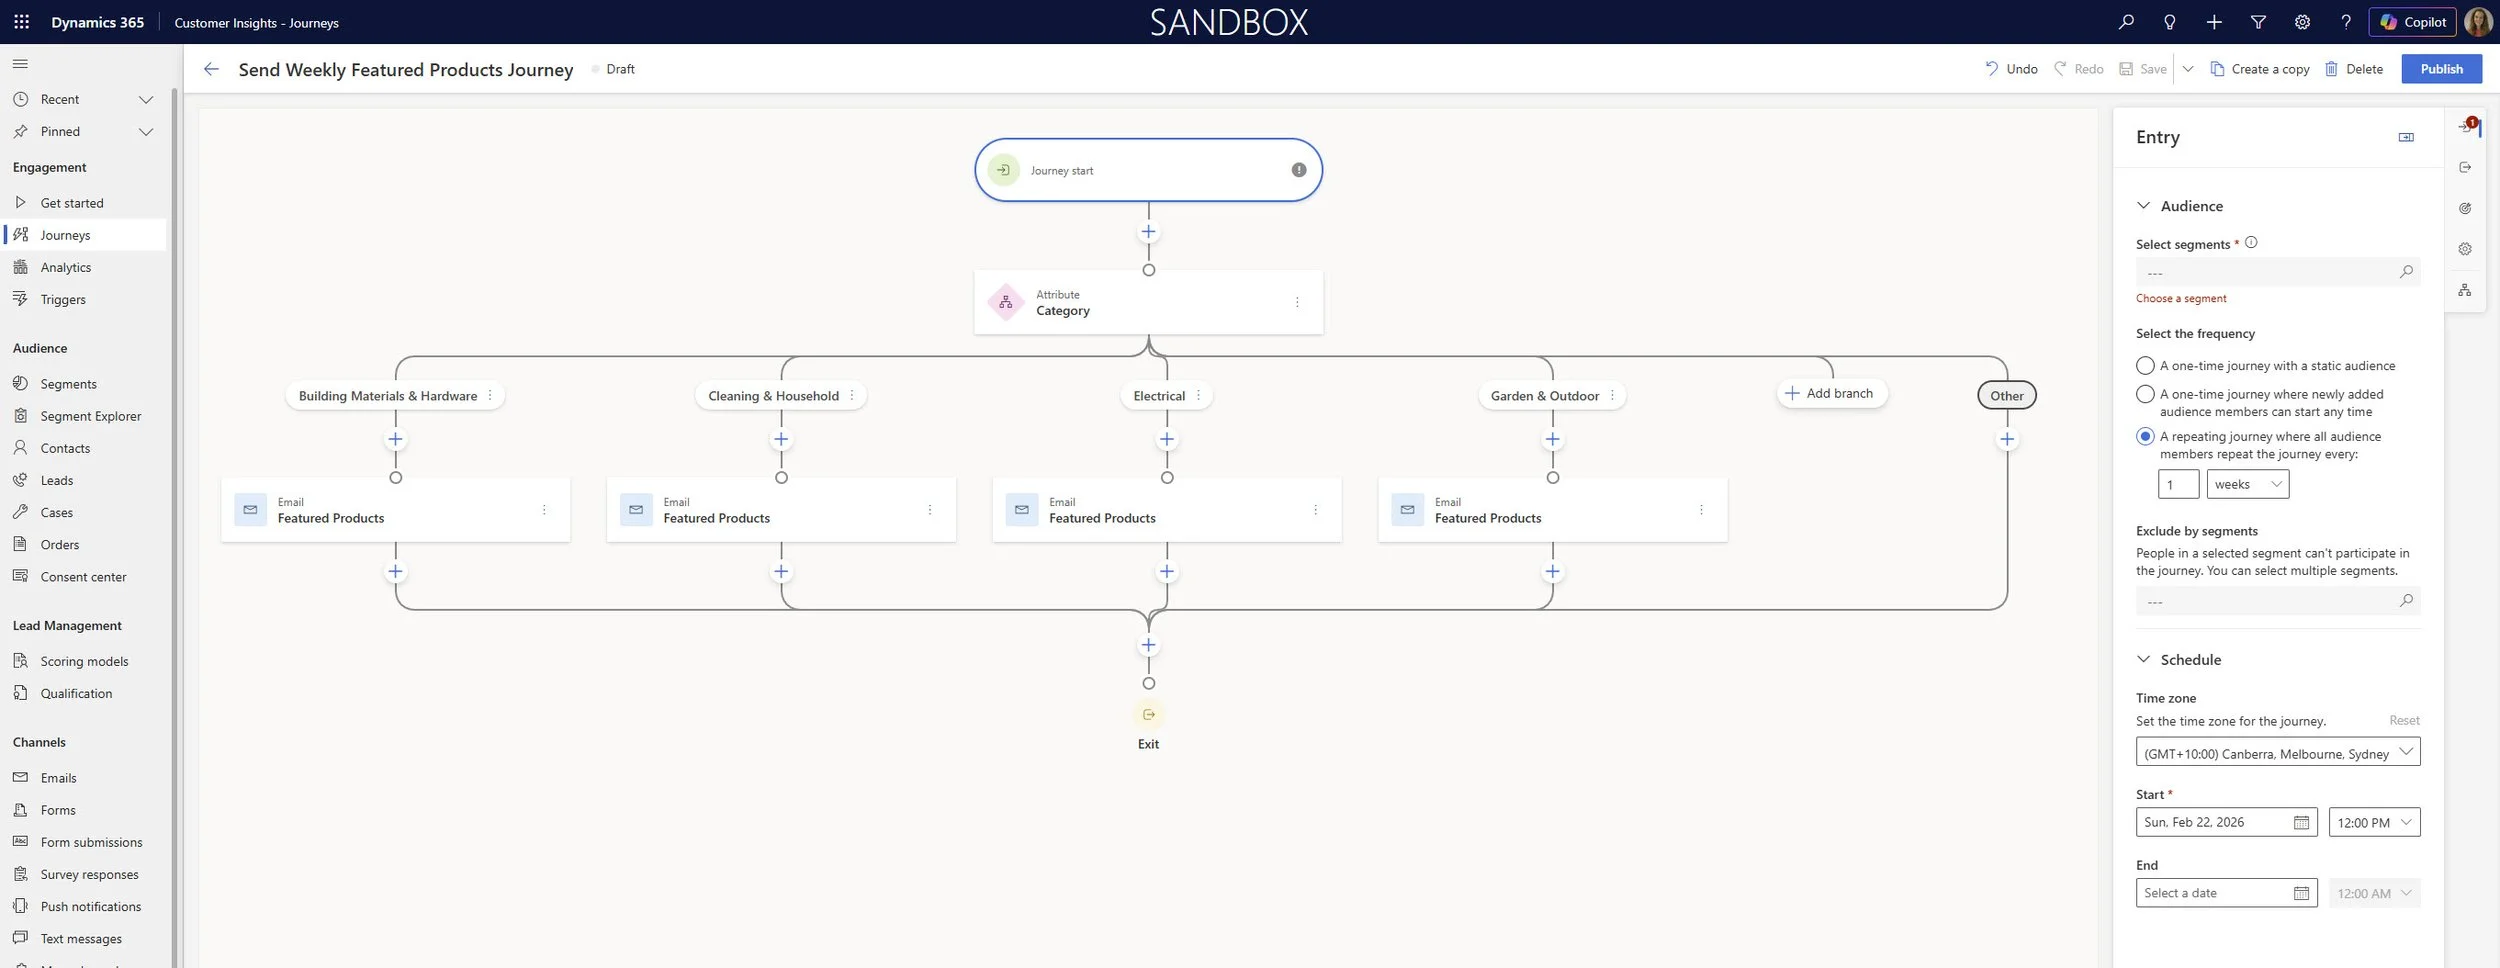
Pretty jazzy hey?
Journeys are not solution aware yet but you can download this unmanaged solution which contains the conditional content configured email and the Feature Products table to install into a test environment so you can explore how it all works. Questions, comments and great stories welcome below. Bye!