Respond to a Power Automate Flow Approval in a Power Apps Custom Page or Canvas App
This is so hard to write a succinct title for but once you know what I mean, it opens a lot more opportunities and options for using Power Automate Approvals. In case you have been living under a rock, Power Automate Approvals are a way to ‘automate sign-off requests and combine human decision-making for workflows.’ using Power Automate. They are pretty nifty and have a nice integration with Teams and obviously they work really nicely with Power Automate.
Users can access their approval requests and responses by Email, Teams and in the ‘Approvals’ area or Power Automate. The email/teams driven approach is great for users who are not using specific apps in their day to day job, but what if you want to use approvals where some (but not all) users are based in Model-Driven or Canvas apps? This post will show you how you can use a Custom Page or Canvas App to respond to Power Automate Approvals.
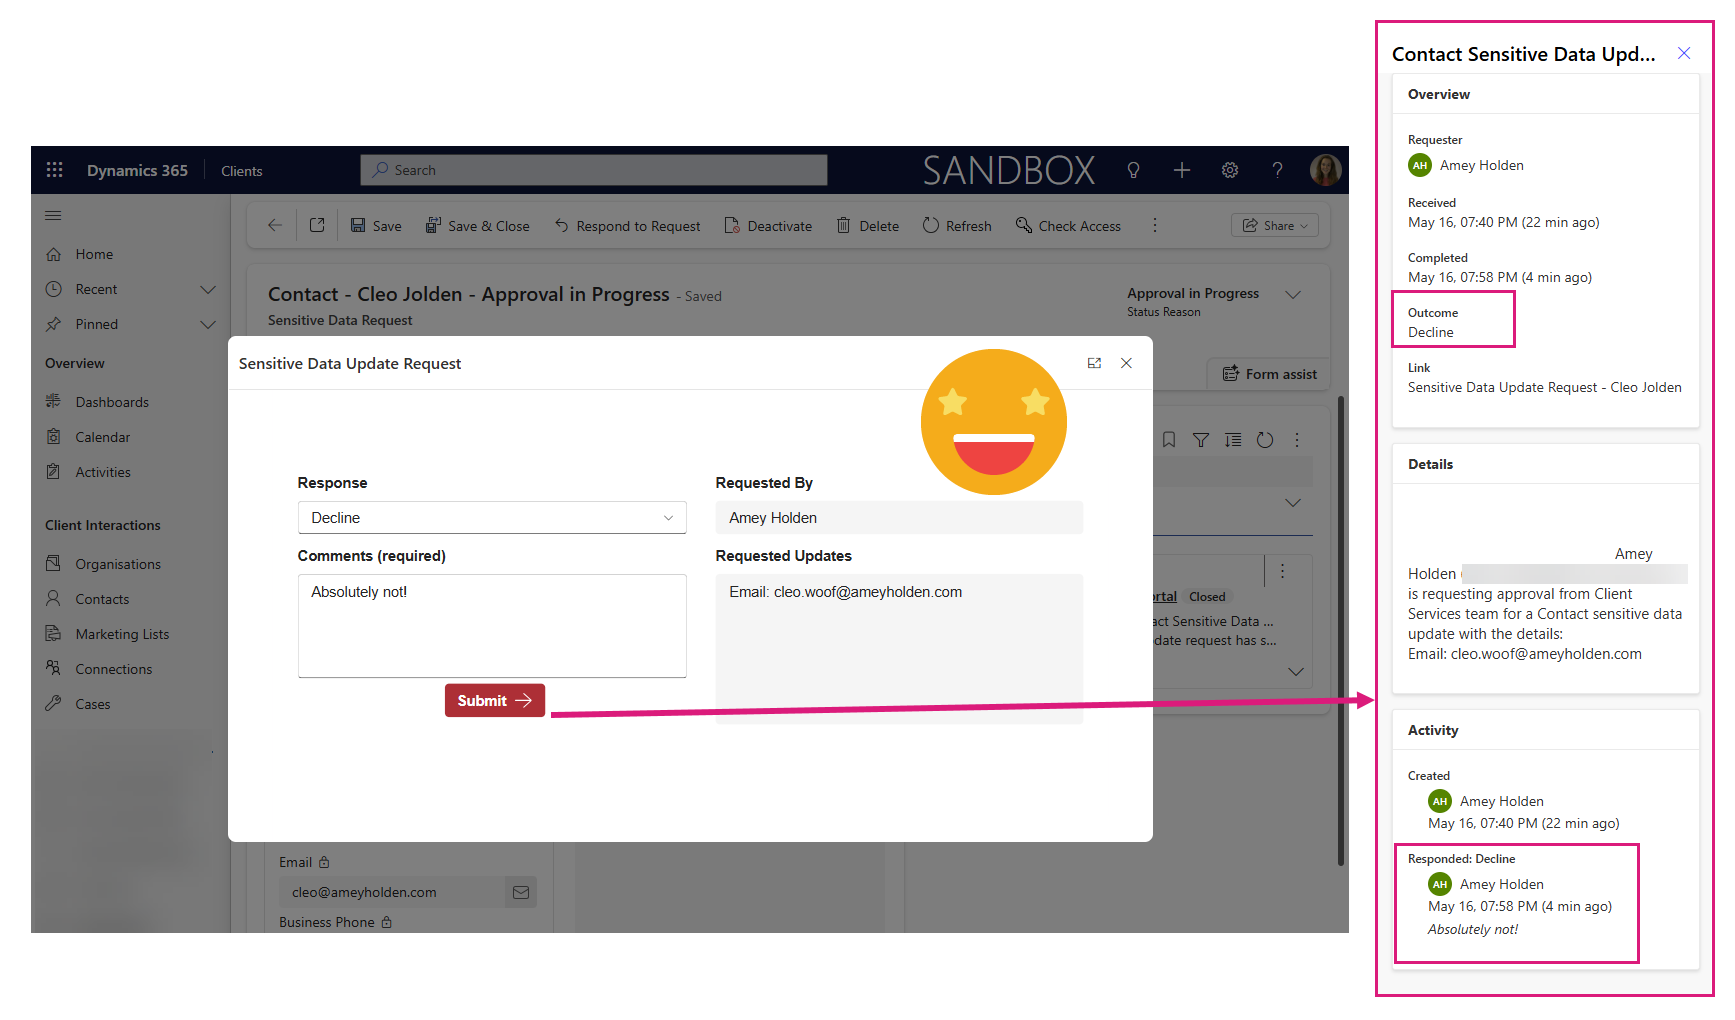
Scenario: Request, Review and Approve/Decline Updates to Protected Data
Approvals can be used in a million ways but for this example to set the scene we are going to look at a process to request updates to specific columns of data on the Contact record, the request starts an approval process for the proposed changes which once approved, the data updates are applied. How this whole things works is way beyond what I can cover in this blog post, but I may eventually piece it together in detail!
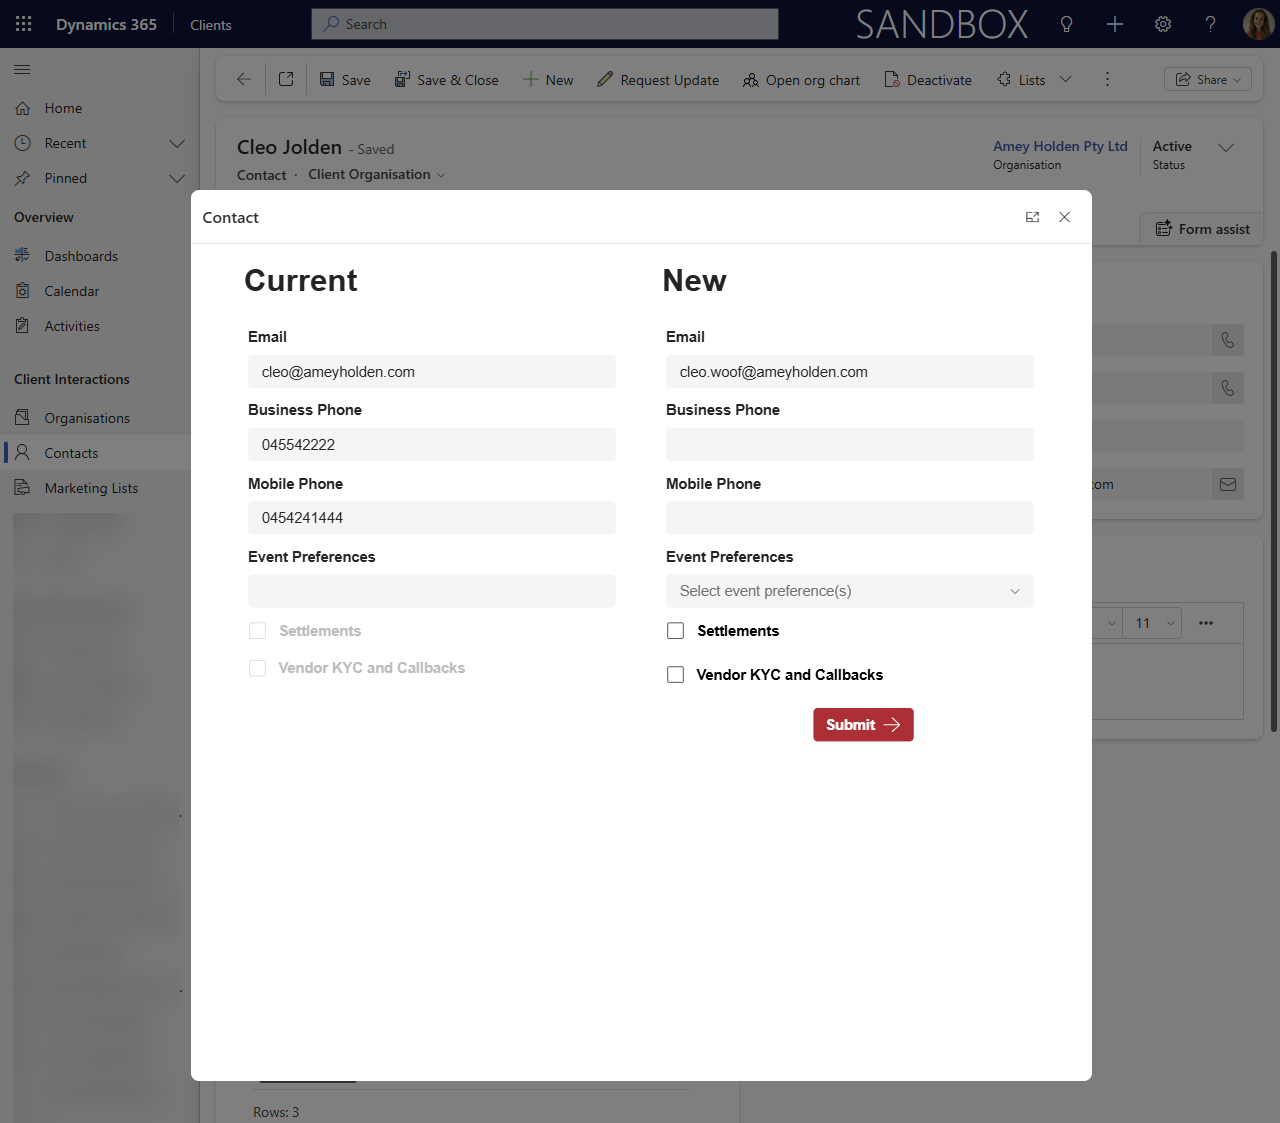
Create the approval request
The requestor submits the changes which creates a ‘Sensitive Data Update Request’ row in Dataverse, and starts the flow to create the approval request. The important details are:
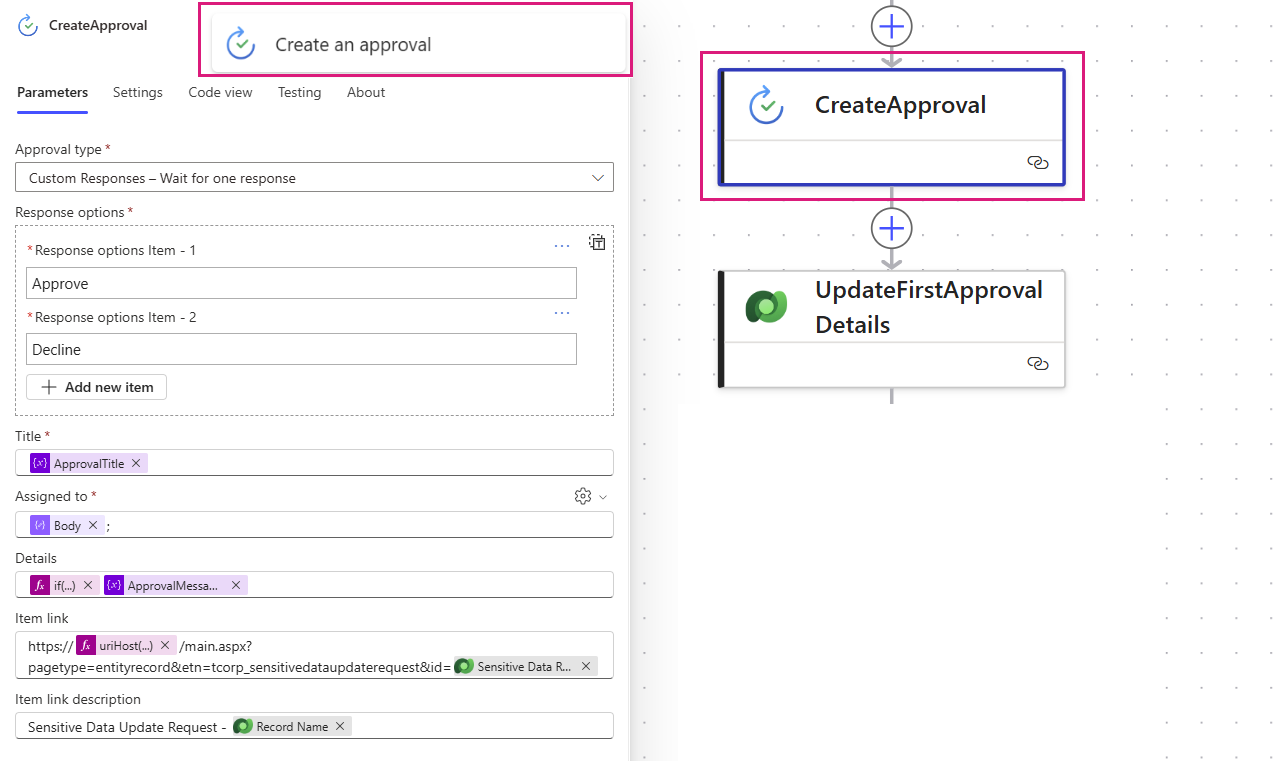
1) When you create the approval, use the action ‘Create an approval’ none of the ugly ‘start and wait for an approval’ business here please
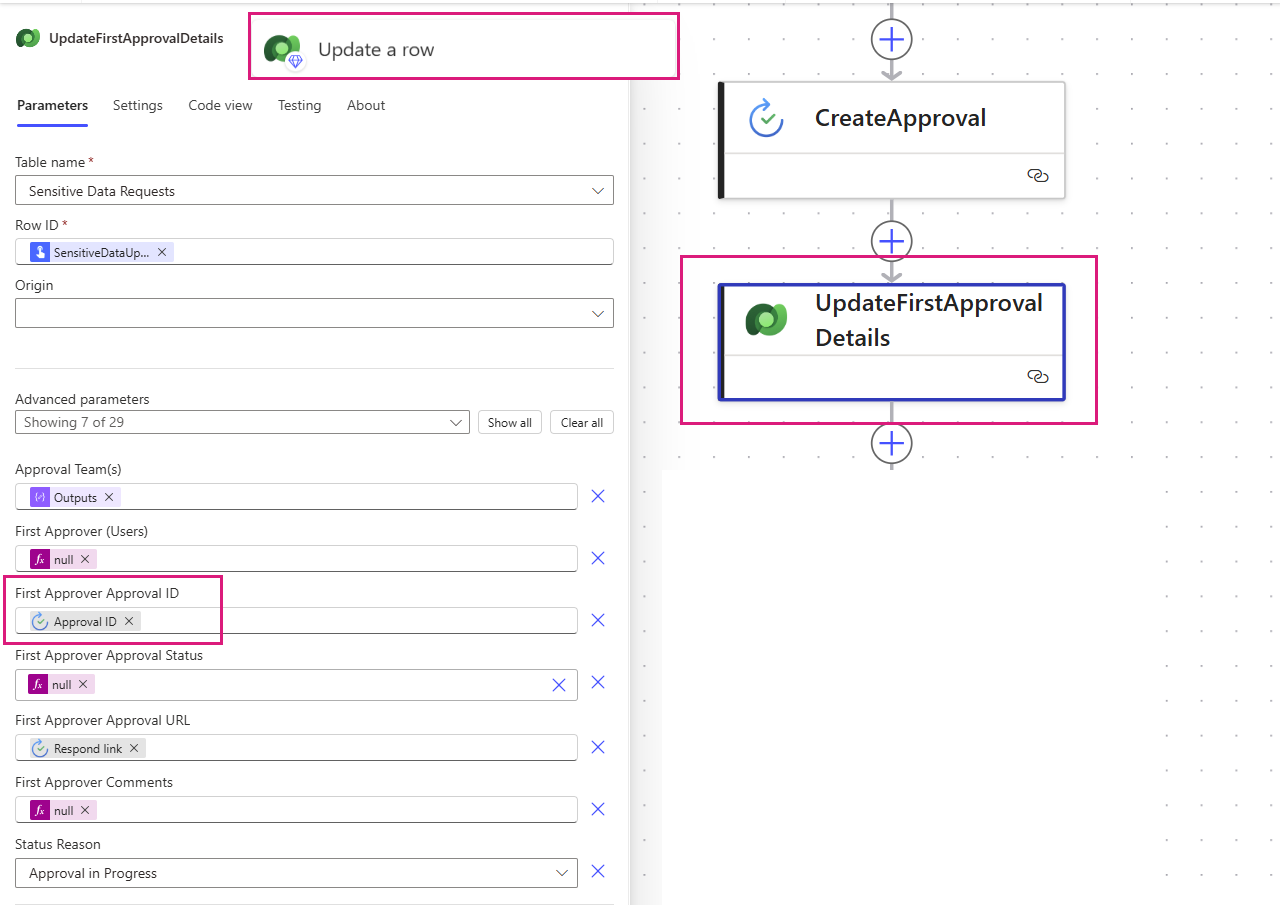
2) After you create the approval, capture the ‘Approval ID’ somewhere in Dataverse where the approval request can be linked to the thing it is about, here I added a ‘Approval ID’ column to the ‘Sensitive Data Update Request’ table
Respond to the approval request
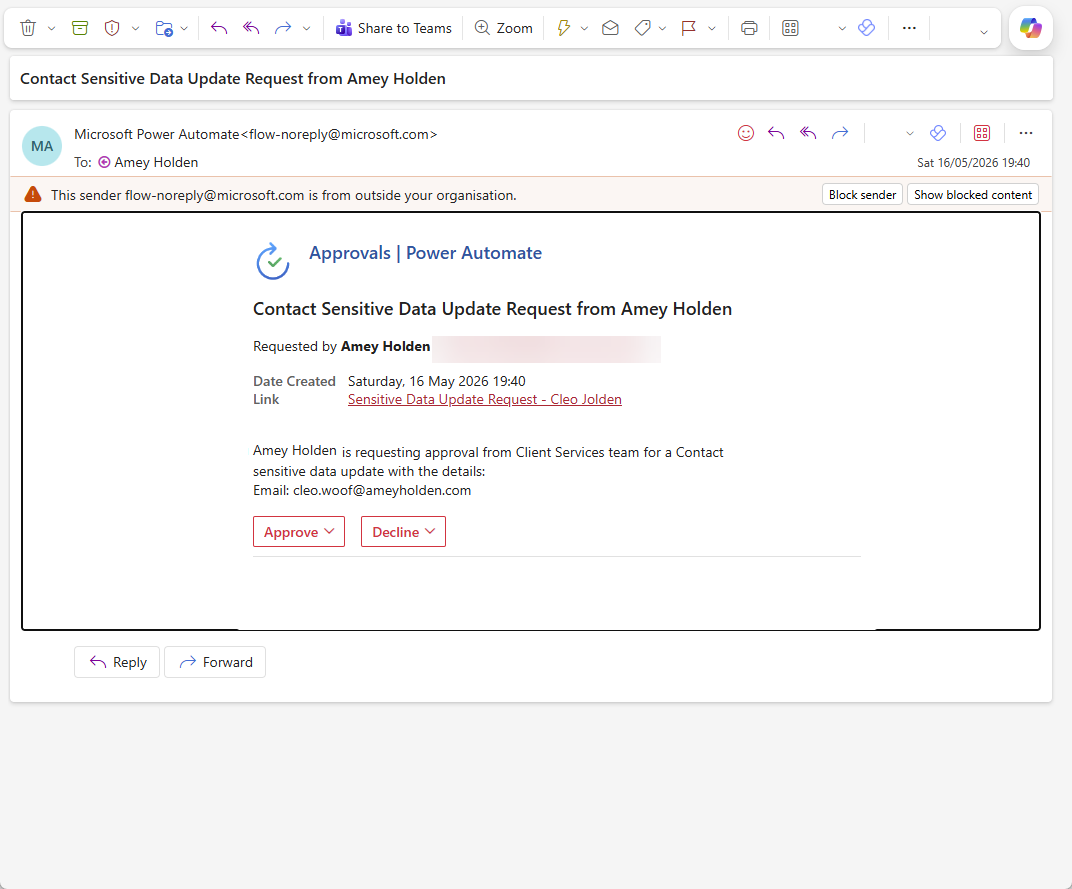
The Vanilla Method
You could use the notifications as show below:
The Adventurous App Oriented Approach
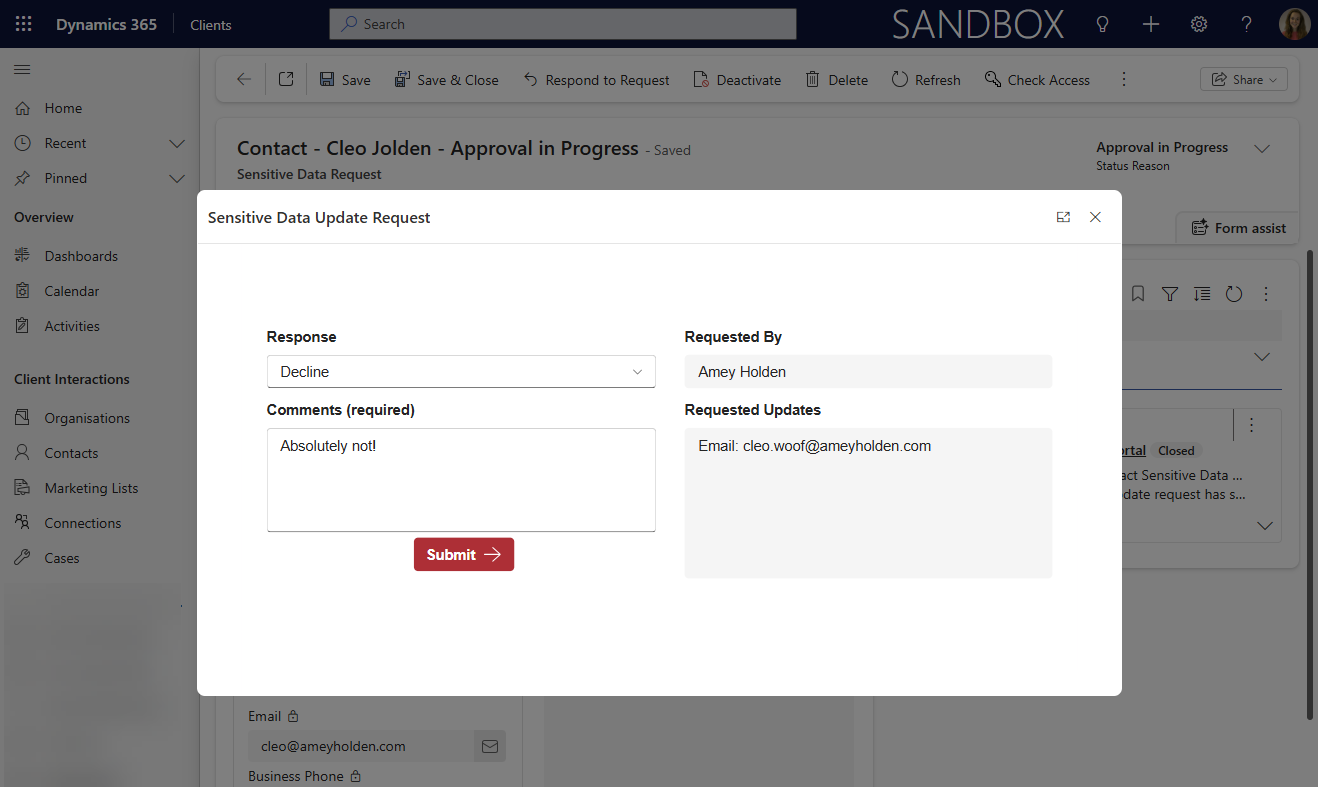
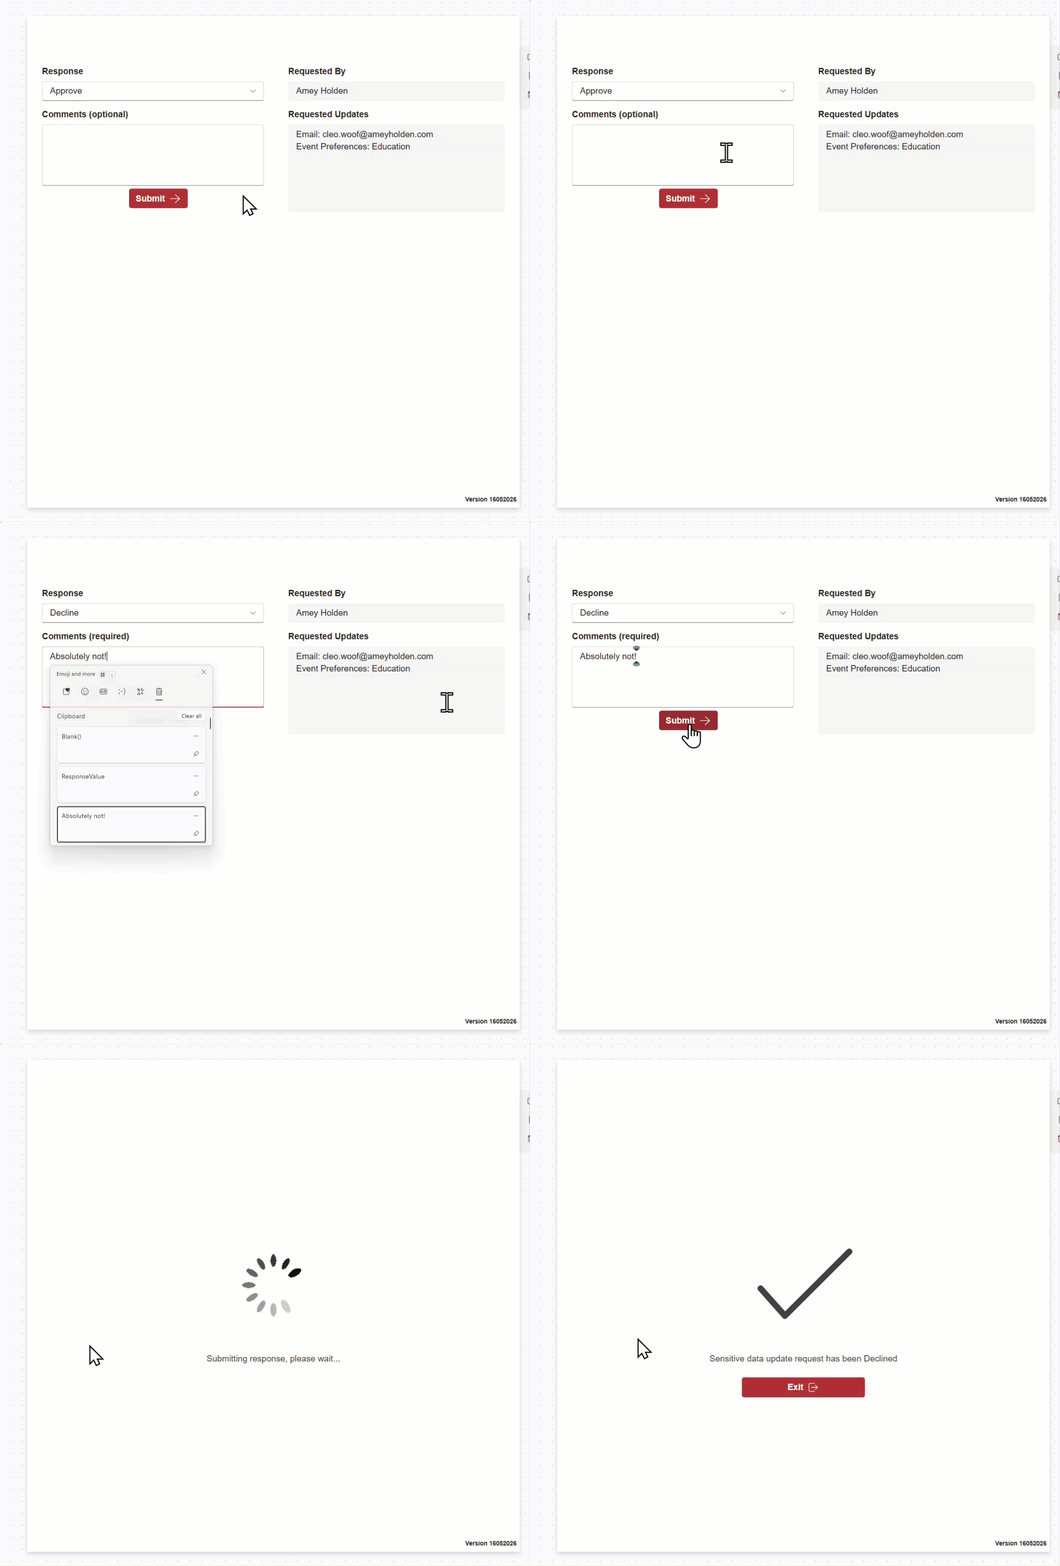
Using the Approval ID from the request stage, we can fetch the data of the approval and directly respond to the request, the same way the button from the email does, with the bonus of having more UI control for things such as mandatory comments for decline responses.
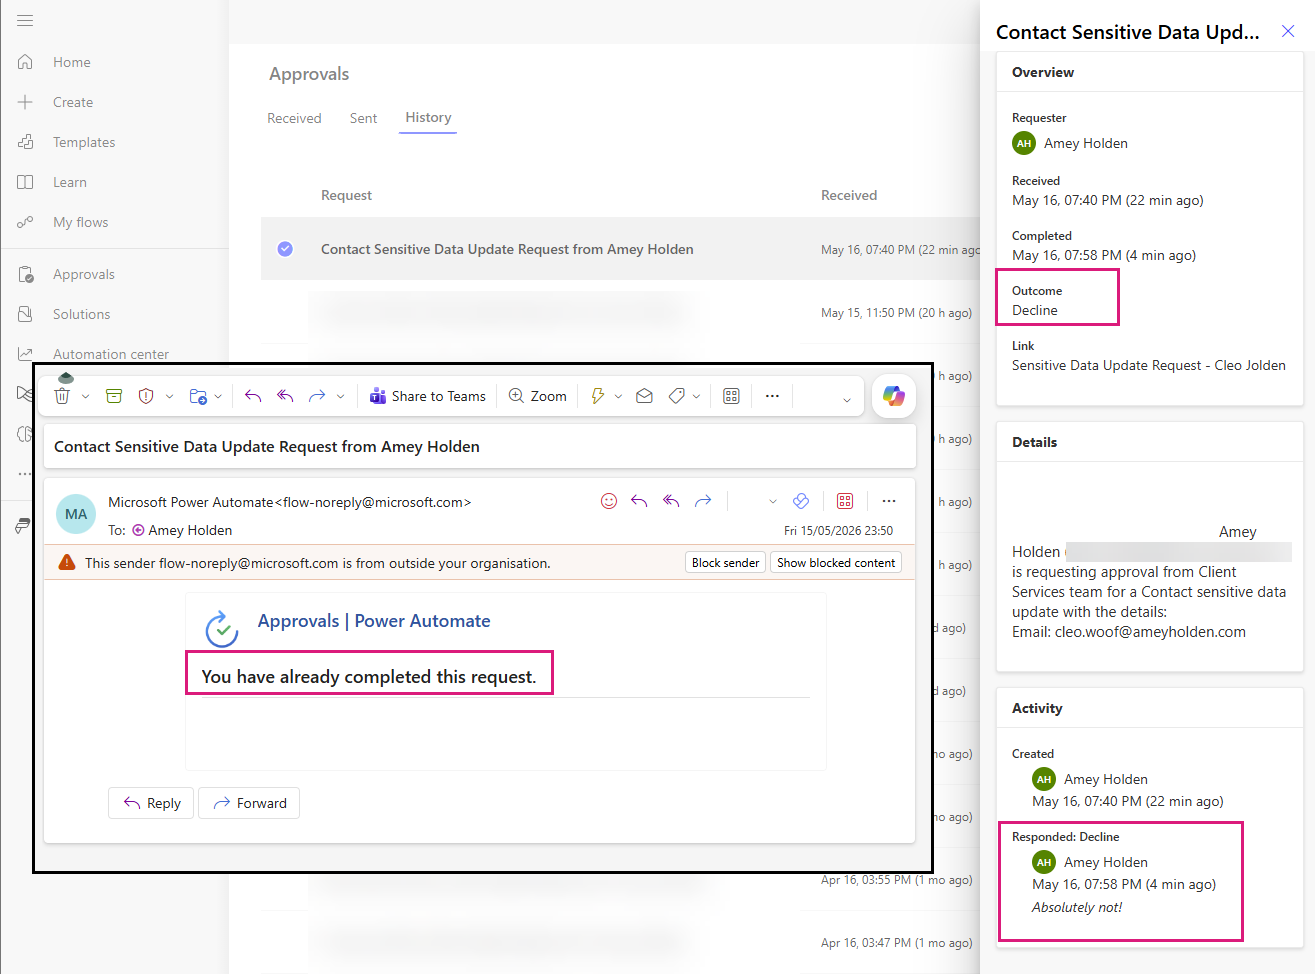
And behind the scenes the approval is closed out with a clean audit trail, exactly the same as it would from the vanilla approval method.
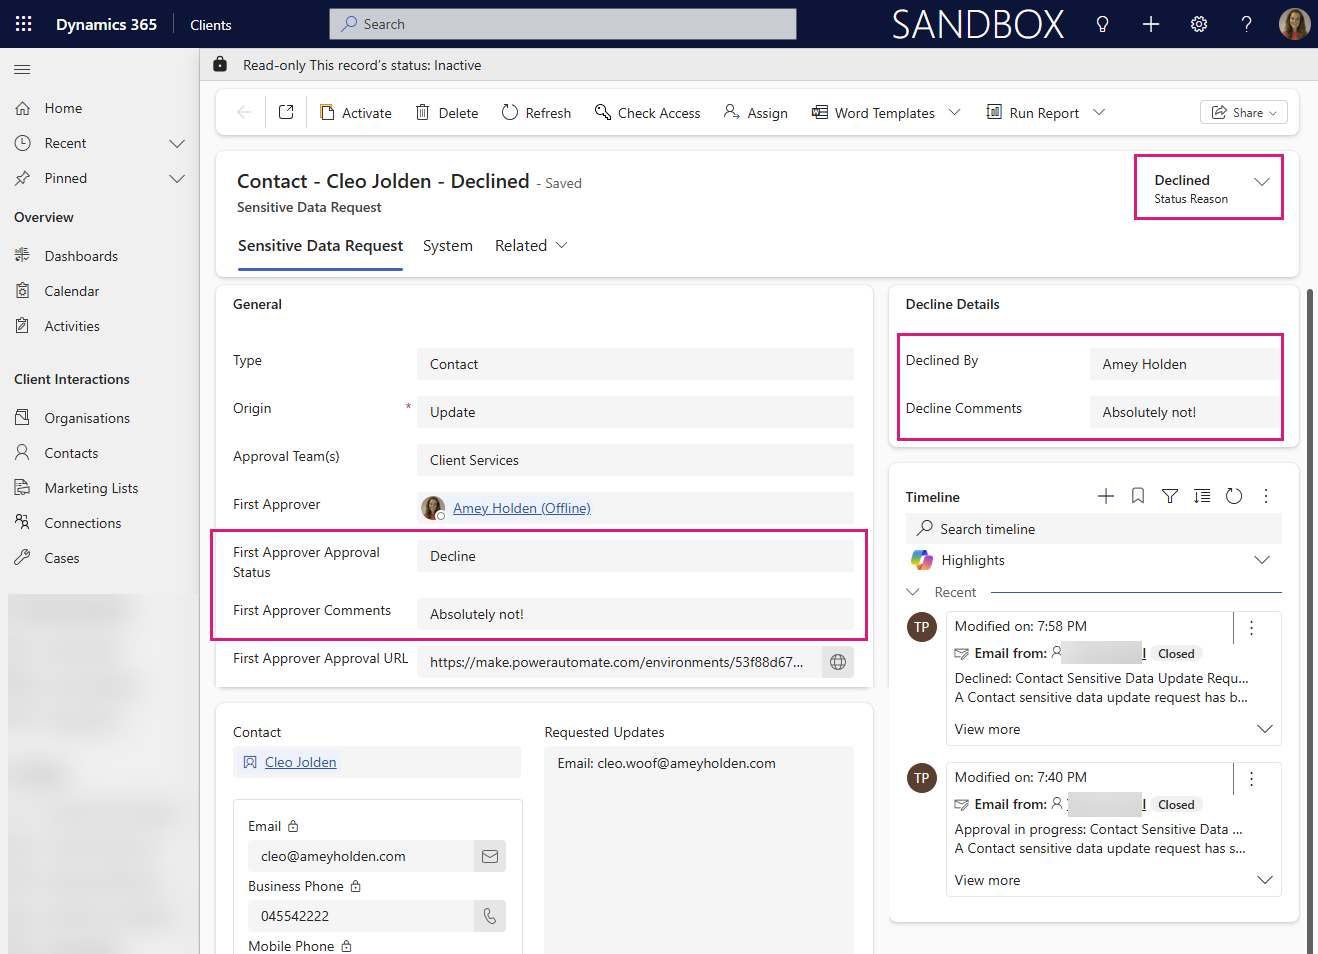
And since we have a link between the approval and the Dataverse record we can also surface the approval responses there, and trigger subsequent automations too such as notifications and automated record updates. I will add a link here once I post that blog!
A Custom Page or Canvas app for Approval Responses
So that was along explainer/intro but hopefully it helped explain why this is useful and has given you some ideas on how you might be able to use it for your Dataverse driven approval scenarios. In my case the table where I hold the request/response data is called ‘Sensitive Data Update Request’ but this can be any custom table you wish to use so long as you capture the ‘Approval ID’ somewhere.
To launch the custom page as a modal, check out the blog here from the pro-dev Diana Birkelbach.
NOTE: the code snippets below are stripped back to only show you the important properties, if you want to see something specific that I removed just drop me a message!
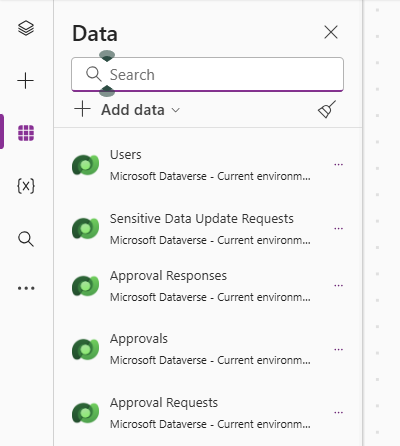
Add your data tables
The following tables are required to be able to retrieve and respond to Power Automate approvals, note that the ‘Approval’ tables are created by the installation of Power Automate approvals, the only custom table here is ‘Sensitive Data Update Requests’.
Users
Sensitive Data Update Requests
Approval Responses
Approvals
Approval Requests
App - OnStart
A lot of the logic is in ‘OnStart’, note that I have stripped this down to focus on the approval response part of this page, full OnStart code snippet below. The ‘Approval’ record has one or many ‘Approval Requests’ one for each person the approval was requested from. We can use this to check that the approval exists, the status of the approval, and that the user is eligible to approve.
Comment out the section //Testing stand alone (use this to test page in designer) to test inside your model driven app, or pass in a relevant GUID to test inside the canvas designer.
Check the comments below inline of the code to see what it is doing!
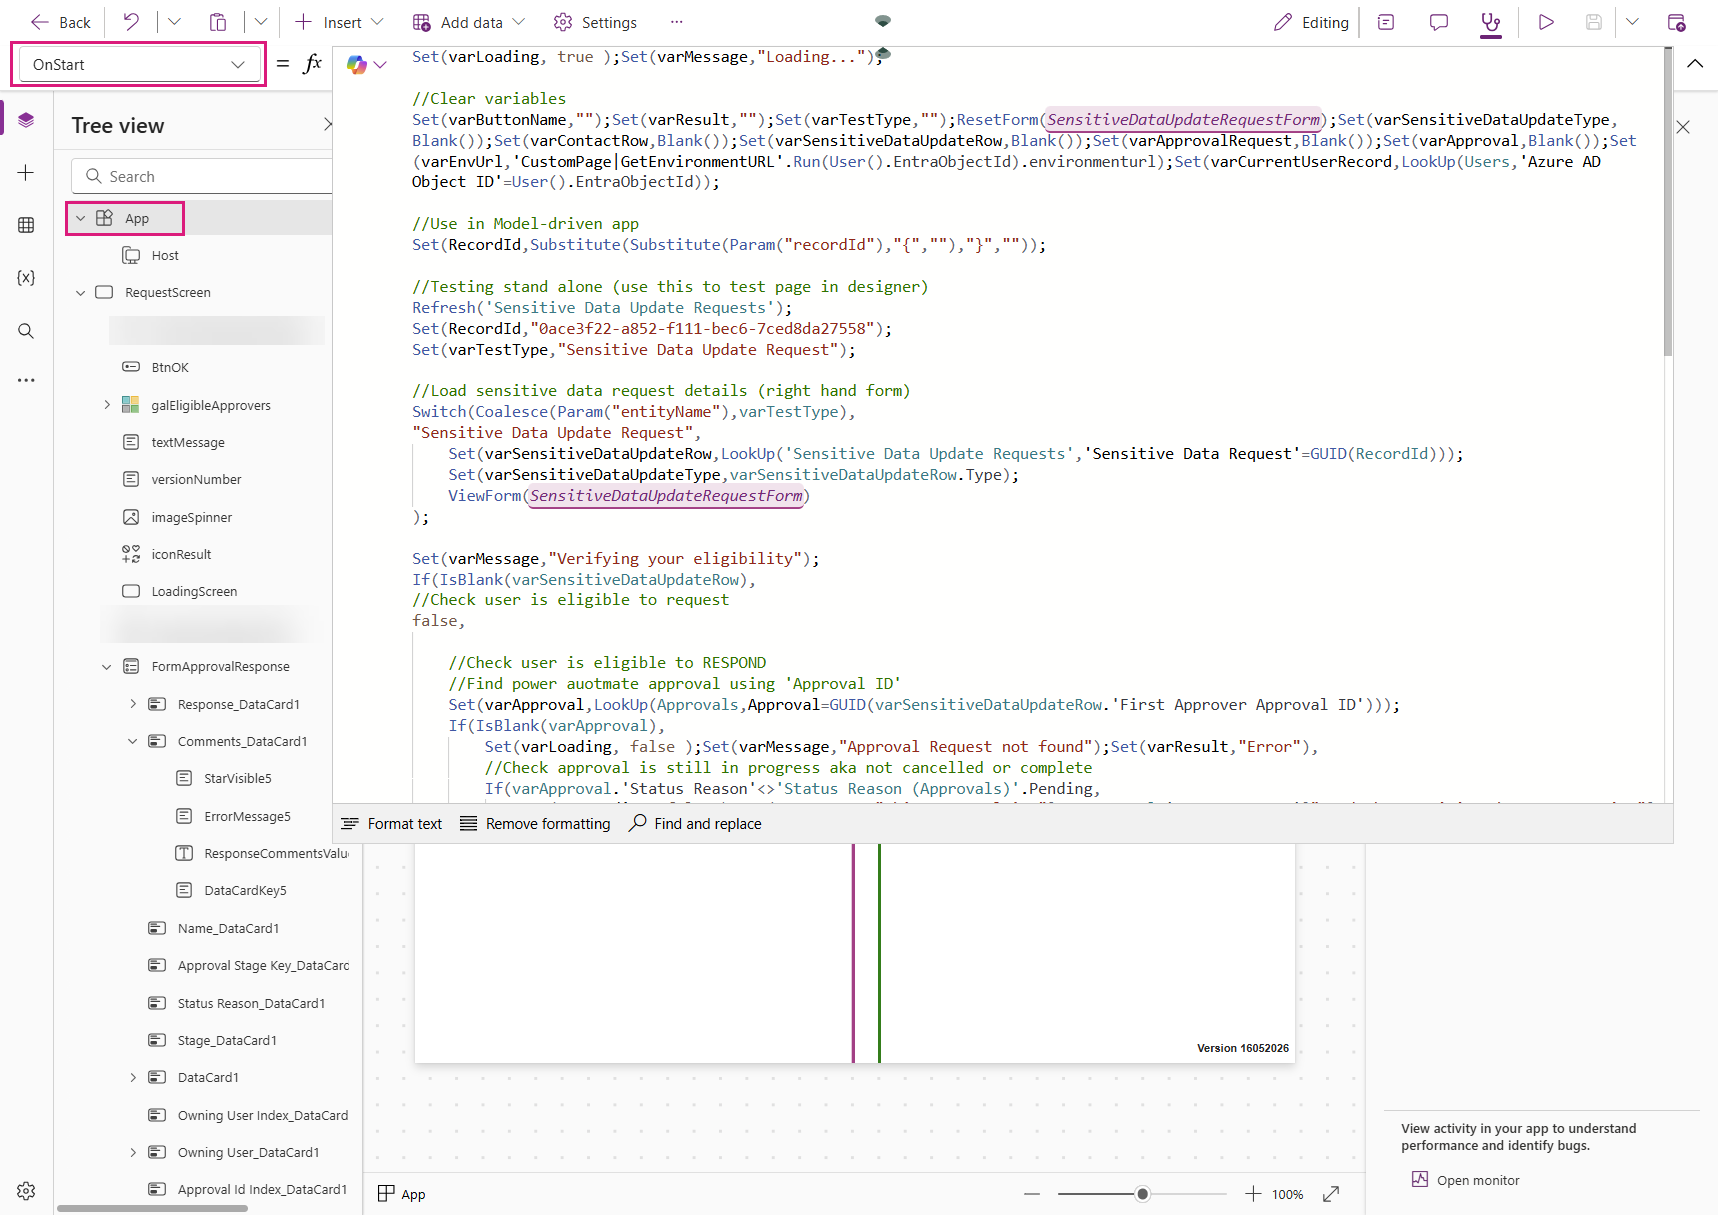
Set(varLoading, true );Set(varMessage,"Loading...");

//Clear variables
Set(varButtonName,"");Set(varResult,"");Set(varTestType,"");ResetForm(SensitiveDataUpdateRequestForm);Set(varSensitiveDataUpdateType,Blank());Set(varContactRow,Blank());Set(varSensitiveDataUpdateRow,Blank());Set(varApprovalRequest,Blank());Set(varApproval,Blank());Set(varEnvUrl,'CustomPage|GetEnvironmentURL'.Run(User().EntraObjectId).environmenturl);Set(varCurrentUserRecord,LookUp(Users,'Azure AD Object ID'=User().EntraObjectId));

//Use in Model-driven app
Set(RecordId,Substitute(Substitute(Param("recordId"),"{",""),"}",""));

//Testing stand alone (use this to test page in designer)
Refresh('Sensitive Data Update Requests');
Set(RecordId,"0ace3f22-a852-f111-bec6-7ced8da27558");
Set(varTestType,"Sensitive Data Update Request");

//Load sensitive data request details (right hand form)
Switch(Coalesce(Param("entityName"),varTestType),
"Sensitive Data Update Request",
    Set(varSensitiveDataUpdateRow,LookUp('Sensitive Data Update Requests','Sensitive Data Request'=GUID(RecordId)));
    Set(varSensitiveDataUpdateType,varSensitiveDataUpdateRow.Type);
    ViewForm(SensitiveDataUpdateRequestForm)
);

Set(varMessage,"Verifying your eligibility");
If(IsBlank(varSensitiveDataUpdateRow),
//Check user is eligible to request
false,

    //Check user is eligible to RESPOND
    //Find power auotmate approval using 'Approval ID'
    Set(varApproval,LookUp(Approvals,Approval=GUID(varSensitiveDataUpdateRow.'First Approver Approval ID')));
    If(IsBlank(varApproval),
        Set(varLoading, false );Set(varMessage,"Approval Request not found");Set(varResult,"Error"),
        //Check approval is still in progress aka not cancelled or complete
        If(varApproval.'Status Reason'<>'Status Reason (Approvals)'.Pending,
            Set(varLoading, false );Set(varMessage,"This approval is "&varApproval.'Status Reason'&" and the sensitive data request is "&varSensitiveDataUpdateRow.'Status Reason');Set(varResult,"Error"),
                //Find approval request for specific user (aka user has been asisgned to approve this request)
                Set(varApprovalRequest,LookUp('Approval Requests',Approval.Approval=varApproval.Approval&&'Owning User'.User=varCurrentUserRecord.User&&Status='Status (Approval Requests)'.Active));

                If(IsBlank(varApprovalRequest),
                    Set(varLoading, false );Set(varMessage,"You are not eligible to approve this request, please contact one of the approvers below.");Set(varResult,"Error"),
                    //Passed all validations, continue to approval section
                    NewForm(FormApprovalResponse);
                    Set(varContactRow,varSensitiveDataUpdateRow.Contact);
                    Set(varLoading, false );Set(varMessage,"");Set(varResult,"")
                )
        )
    )
)
User feedback and experience controls
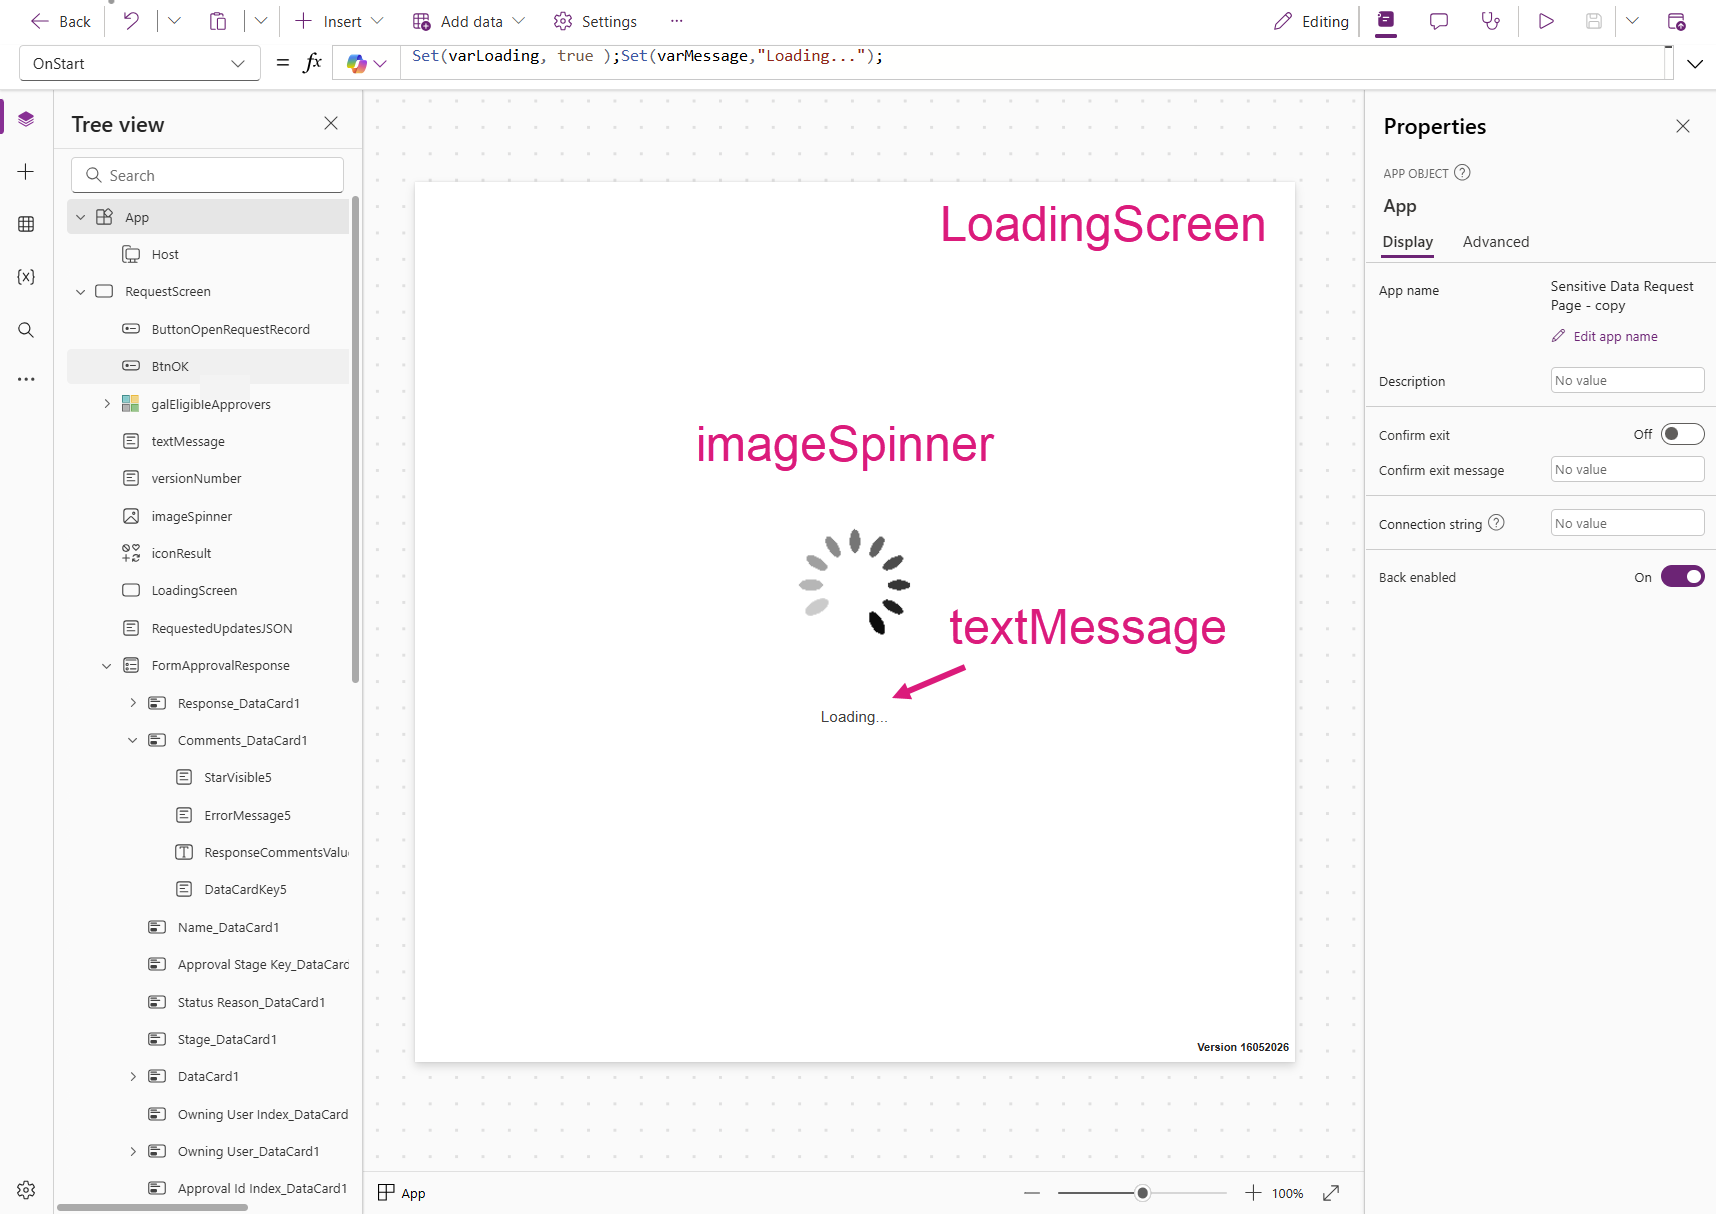
In the code above you can see that I update some variables based on the logic outcomes such as ‘not eligible to approve’ or ‘approval no longer in progress' so that we can use the same control to display the information to the user and create an informative user experience and easier error handling too.
varMessage - Controls the content of ‘textMessage’ to give detailed user feedback
varLoading - Controls show/hide of the ‘Loading Screen’ and ‘imageSpinner’
varResult - Controls the type of icons that shows in ‘iconResult’
The approval status is not eligible for response
It’s always good to add in some back up validation to ensure the approval wasn’t updated by someone else since the last time the data refreshed.
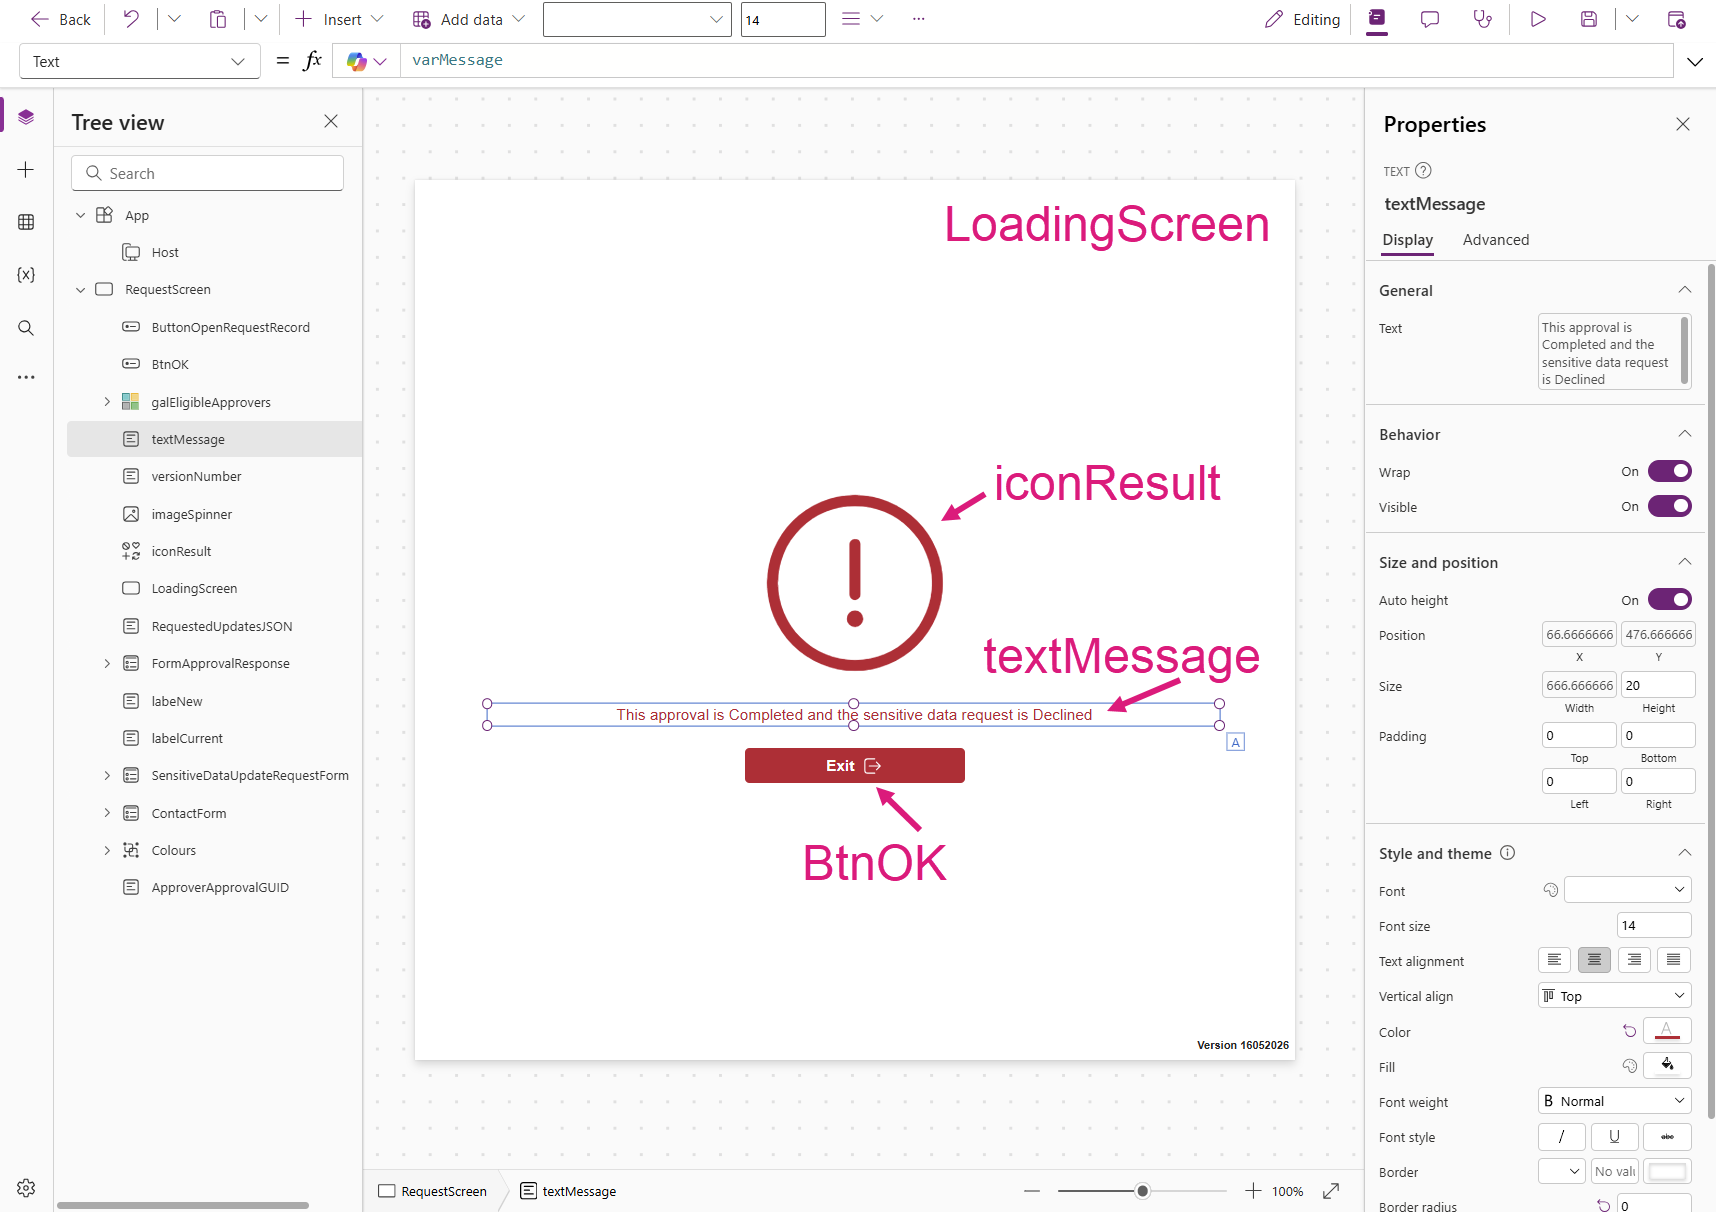
- iconResult:
    Control: Icon@0.0.7
    Properties:
      Icon: =Switch(varResult, "Success","Checkmark", "Error","ErrorCircle")
      IconColor: =Switch(varResult, "Success",SoftBlack.Fill, "Error",Red.Fill)
      Visible: =!IsBlank(varResult)
- BtnOK:
    Control: Button@0.0.45
    Properties:
      Icon: ="ArrowExit"
      Layout: ='ButtonCanvas.Layout'.IconAfter
      OnSelect: =Back()
      Text: ="Exit"
      Visible: =!IsBlank(varResult)
Who is eligible to approve?
We can use the ‘Approval Request’ data to get information about which users are eligible to approve, in the case where the signed in user is not eligible. This data is reading directly from the Power Automate approval data so no duplication or out of sync data required.
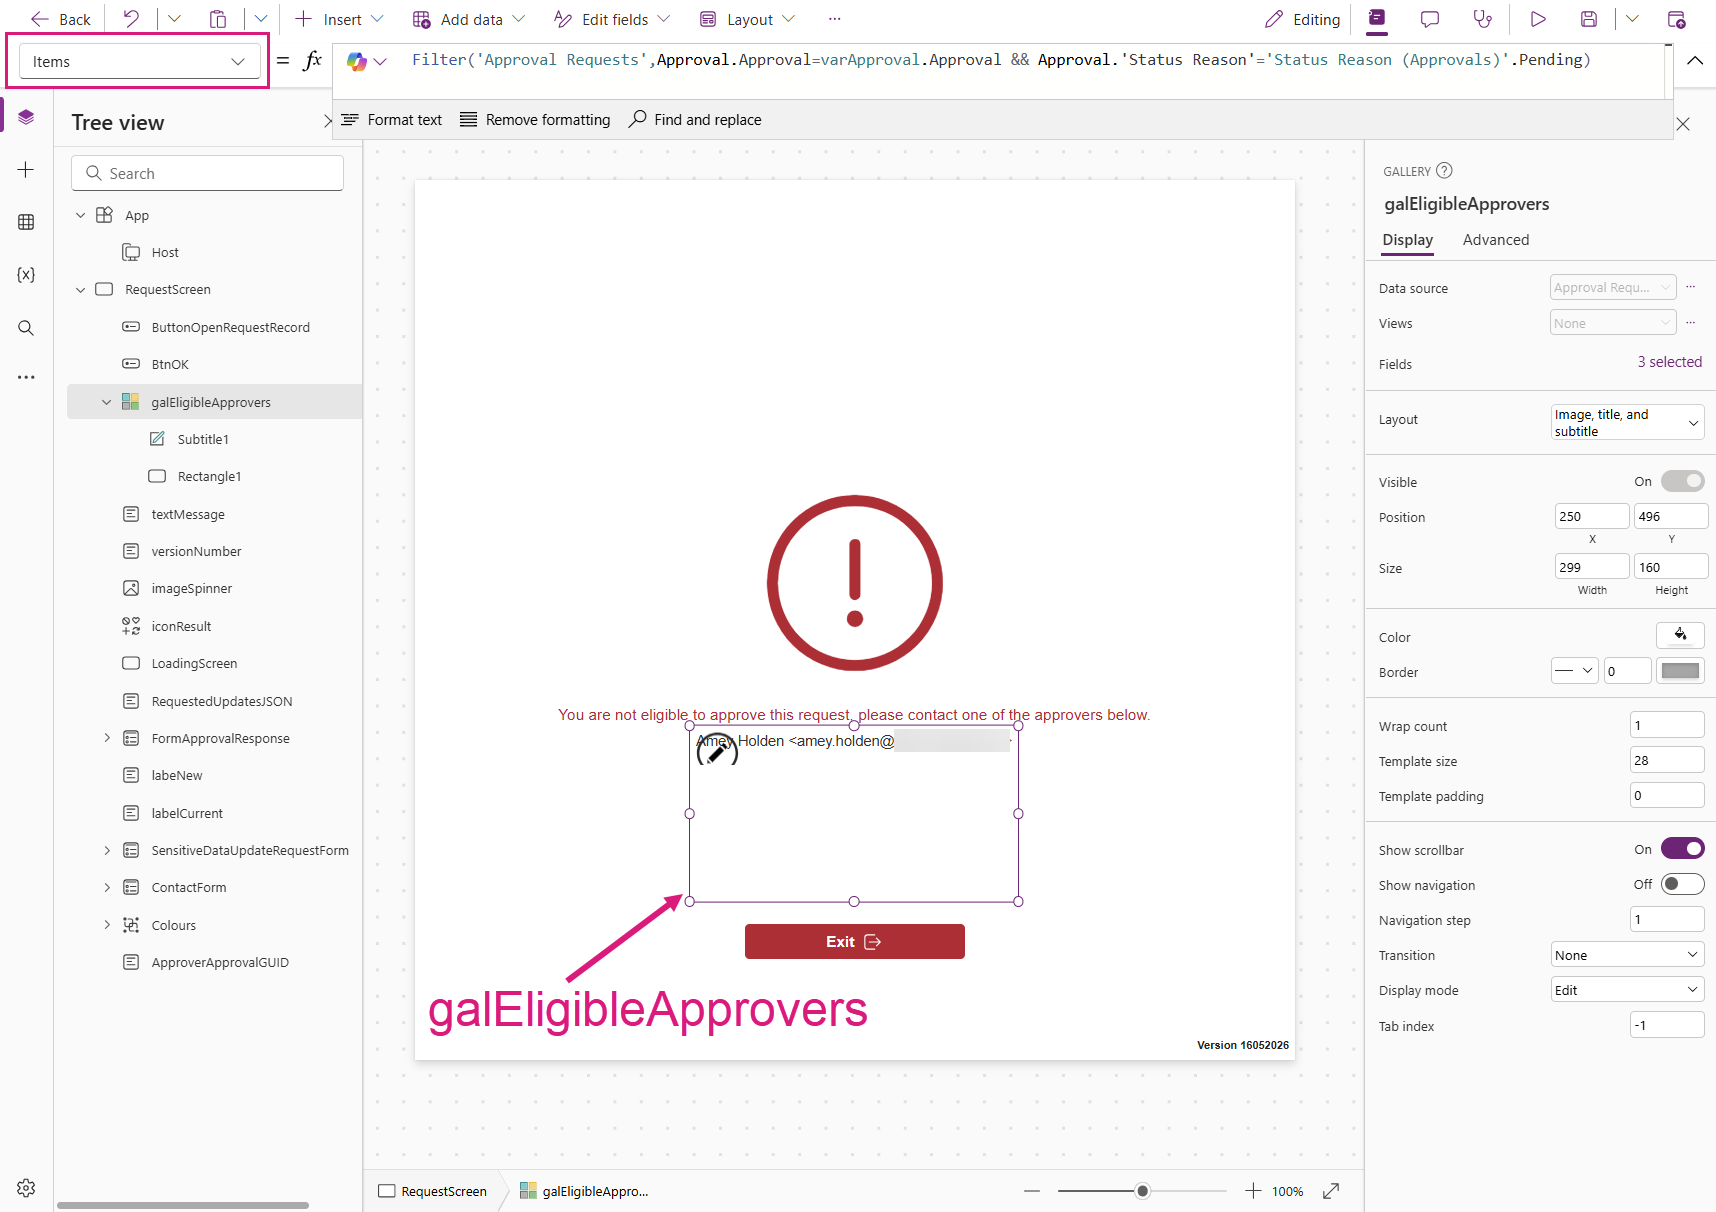
- galEligibleApprovers:
    Control: Gallery@2.15.0
    Variant: BrowseLayout_Vertical_TwoTextOneImageVariant_pcfCore
    Properties:
      Items: =Filter('Approval Requests',Approval.Approval=varApproval.Approval && Approval.'Status Reason'='Status Reason (Approvals)'.Pending)
      Visible: =IsBlank(varApprovalRequest) && !IsBlank(varSensitiveDataUpdateRow) && Self.AllItemsCount>0
    Children:
      - Subtitle1:
          Control: FluentV8/Label@1.8.6
          Properties:
            Text: =If(!IsBlank(ThisItem),ThisItem.'Owning User'.'Full Name' &" <" & ThisItem.'Owning User'.'Primary Email'&">")
Show Sensitive Data Request Information
In the OnStart we defined the request record which the approval request is related to, defined as ‘varSensitiveDataUpdateRow‘ and we just use a simple form control in ‘View’ mode to display the relevant information that can help the approver respond accordingly. I’m just using rows from the table to show this information, nothing fancy.
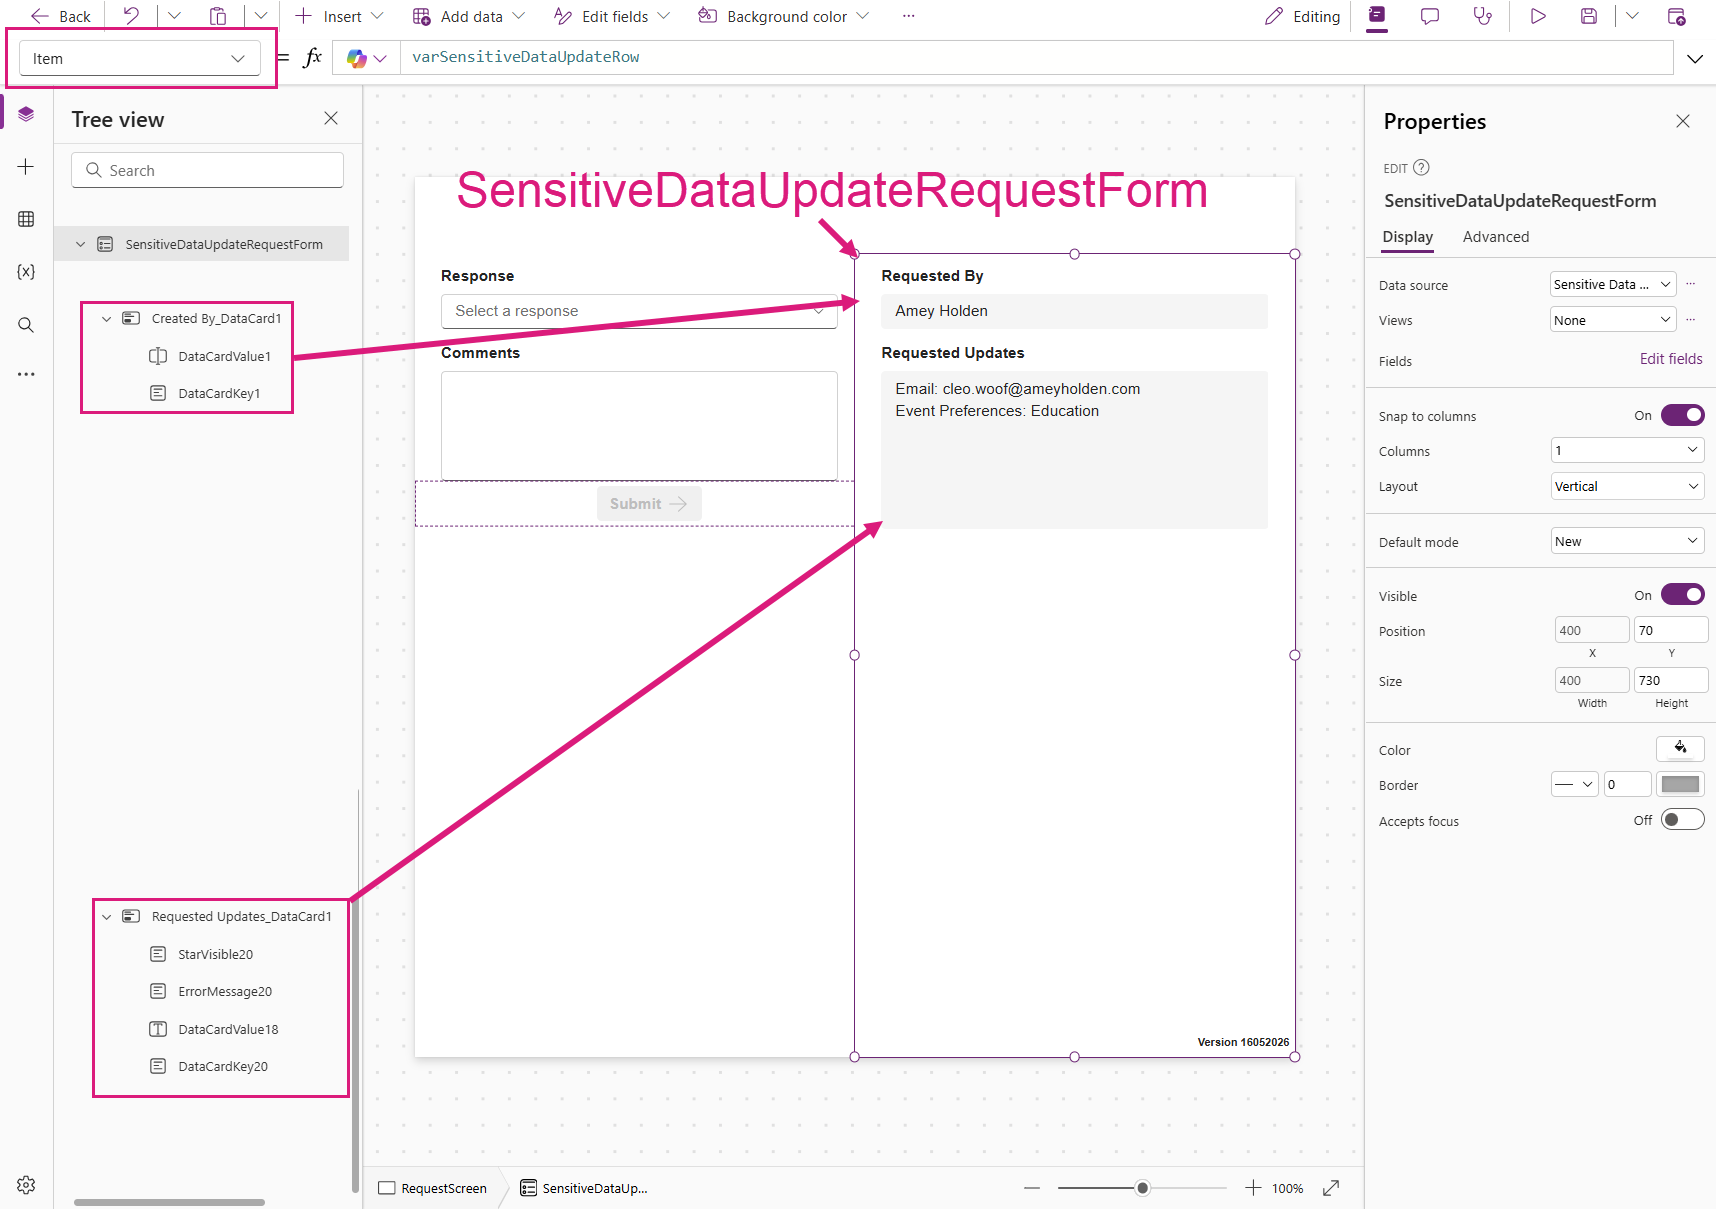
DataSource: ='Sensitive Data Update Requests'
Item: =varSensitiveDataUpdateRow
Respond to the Approval
A response to an approval is captured as an ‘Approval Response’ row in Dataverse with a specific set of values which I will show you below. Most are hidden as al the users needs to add is the response and comments but it is important to get all the hidden field values correct for the response to be correctly processed by the Power Automate approval.
The data submitted for the Approval Response should be:
Response: Text value of response chosen by approver which matches the ‘Response options’ you defined in your flow steps above.
Comments: Free text comments from approver whcih can be made mandatory by UI controls if you want to
Name: Text(ResponseValue.Selected.Value)& " - "& varSensitiveDataUpdateRow.'Record Name'
Approval Stage Key: Upper(varSensitiveDataUpdateRow.'First Approver Approval ID')&"_BASIC"
Status Reason: Saved
Stage: [@'Approval Stage'].Basic
Owning User Index: Upper(varCurrentUserRecord.User)
Approval Id Index: Upper(ApproverApprovalGUID.Text)
Stage Index: BASIC
Approval: LookUp(Approvals,Approval=GUID(ApproverApprovalGUID.Text))
Once the form is successfully submitted and the Approval Response is created (FormApprovalResponse-OnSuccess), we then need to push the status of the Approval and Approval response along accordingly.
Approval Response
Status: Inactive
Status Reason: Committed
Approval
Status Reason: Completed
Stage: Complete
Completed On: Now()
Result: Text value of response chosen by approver which matches the ‘Response options’ you defined in your flow steps above.
Status: Inactive
The result of this will be exactly the same as if the user opens the email and uses the ‘Approve’ or ‘Decline’ button from there.
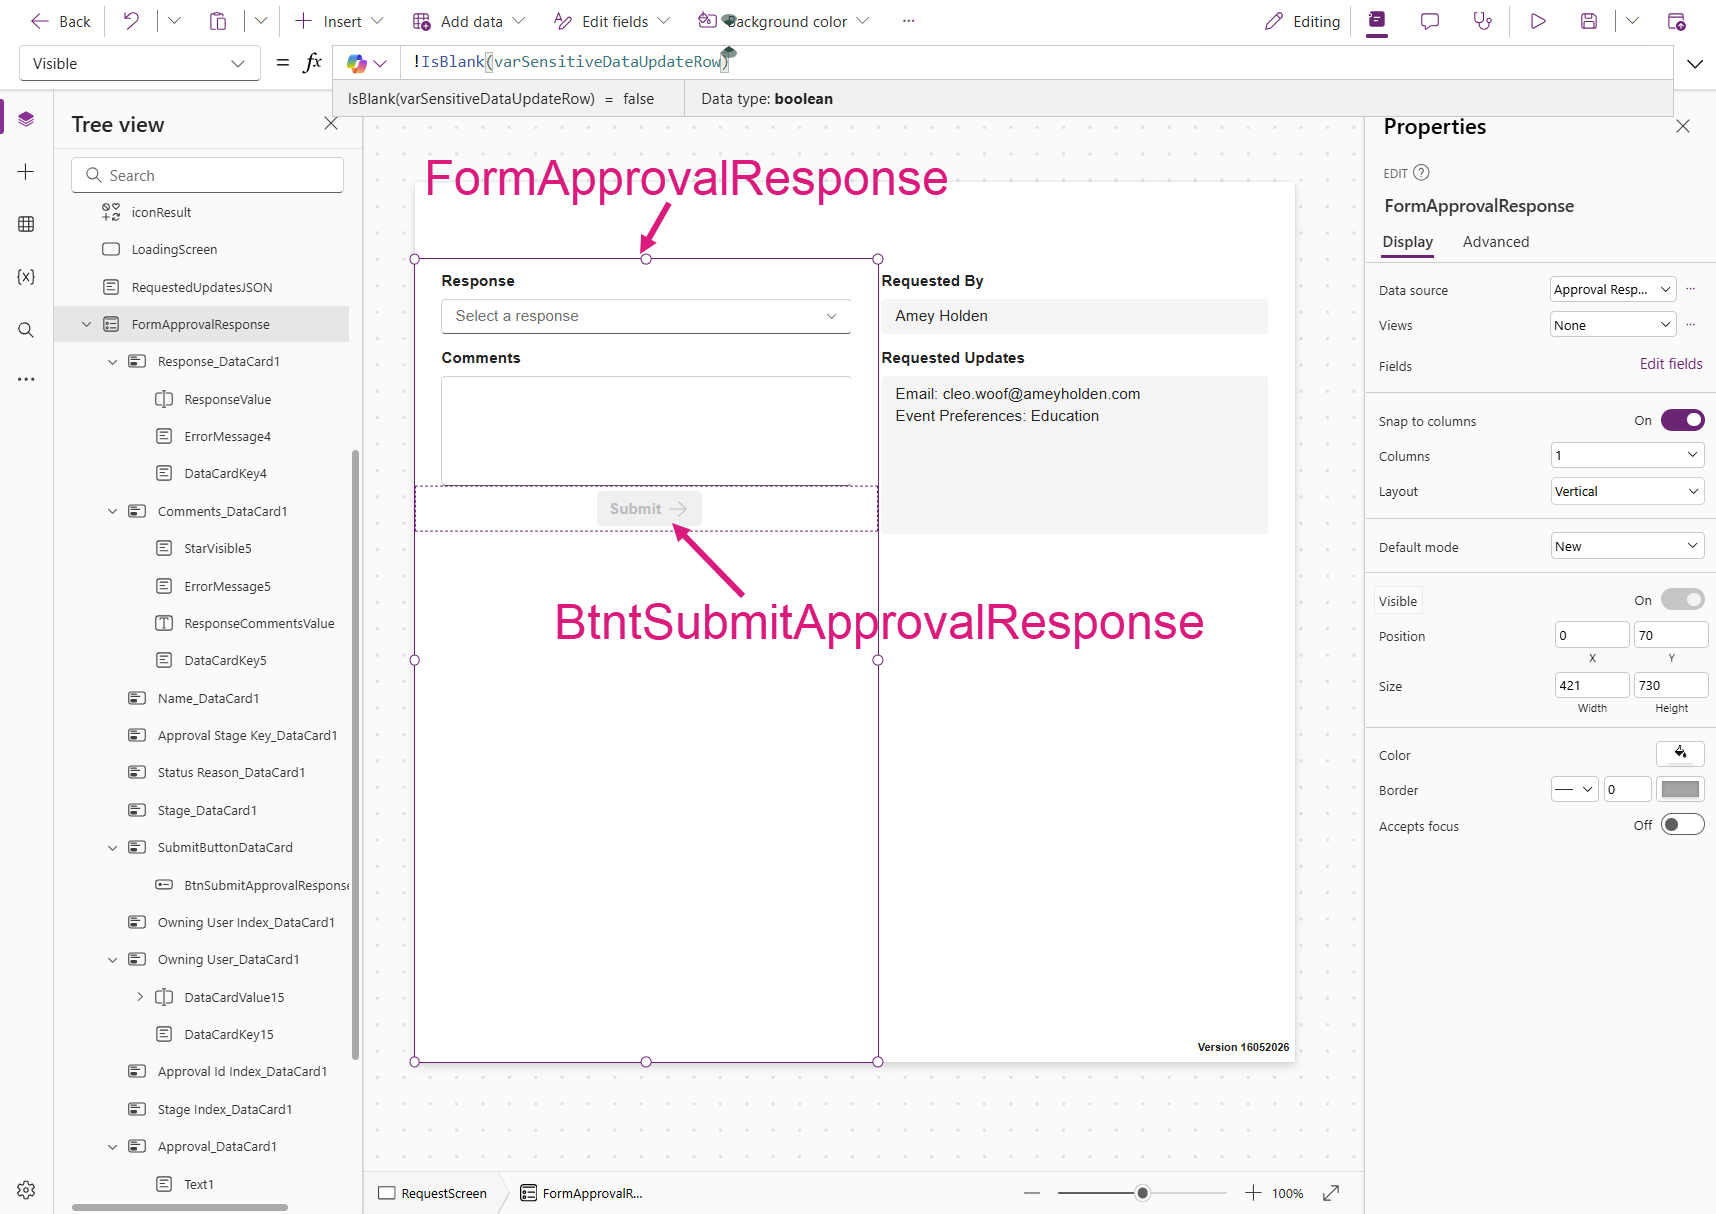
- FormApprovalResponse:
    Control: Form@2.4.4
    Layout: Vertical
    Properties:
      DataSource: ='Approval Responses'
      DefaultMode: =FormMode.New
      OnSuccess: |-
        =Patch('Approval Responses',FormApprovalResponse.LastSubmit,{Status:'Status (Approval Responses)'.Inactive,'Status Reason':'Status Reason (Approval Responses)'.Committed});Patch(Approvals,FormApprovalResponse.LastSubmit.Approval,{'Status Reason':'Status Reason (Approvals)'.Completed,Stage:'Approval Stage'.Complete,'Completed On':Now(),Result:FormApprovalResponse.LastSubmit.Response,Status:'Status (Approvals)'.Inactive});

        Set(varLoading,false);Set(varMessage,"Sensitive data update request has been "&FormApprovalResponse.LastSubmit.Response&"d");Set(varResult,"Success")
      Visible: =!IsBlank(varSensitiveDataUpdateRow)
      Width: =App.Width/2
    Children:
      - Response_DataCard1:
          Control: TypedDataCard@1.0.7
          Variant: TextualEdit
          Properties:
            DataField: ="msdyn_flow_approvalresponse_response"
            Update: =Text(ResponseValue.Selected.Value)
          Children:
            - ResponseValue:
                Control: ModernCombobox@1.1.0
                Properties:
                  DefaultSelectedItems: =Blank()
                  InputTextPlaceholder: ="Select a response"
                  ItemDisplayText: =ThisItem.Value
                  Items: =["Approve","Decline"]
      - Comments_DataCard1:
          Control: TypedDataCard@1.0.7
          Variant: TextualEdit
          Properties:
            DataField: ="msdyn_flow_approvalresponse_comments"
            Default: =ThisItem.Comments
            Update: =ResponseCommentsValue.Value
      - Name_DataCard1:
          Control: TypedDataCard@1.0.7
          Variant: TextualEdit
          Properties:
            DataField: ="msdyn_flow_approvalresponse_name"
            Update: =Text(ResponseValue.Selected.Value)& " - "& varSensitiveDataUpdateRow.'Record Name'
            Visible: =false
      - Approval Stage Key_DataCard1:
          Control: TypedDataCard@1.0.7
          Variant: TextualEdit
          Properties:
            DataField: ="msdyn_flow_approvalresponse_approvalstagekey"
            Update: =Upper(ApproverApprovalGUID.Text)&"_BASIC"
            Visible: =false
      - Status Reason_DataCard1:
          Control: TypedDataCard@1.0.7
          Variant: ComboBoxOptionSetSingleEdit
          Properties:
            DataField: ="statuscode"
            Update: ='Status Reason (Approval Responses)'.Saved
            Visible: =false
      - Stage_DataCard1:
          Control: TypedDataCard@1.0.7
          Variant: ComboBoxOptionSetSingleEdit
          Properties:
            DataField: ="msdyn_flow_approvalresponse_stage"
            Update: =[@'Approval Stage'].Basic
            Visible: =false
      - Owning User Index_DataCard1:
          Control: TypedDataCard@1.0.7
          Variant: TextualEdit
          Properties:
            DataField: ="msdyn_flow_approvalresponseidx_owninguserid"
            Update: =Upper(varCurrentUserRecord.User)
            Visible: =false
      - Approval Id Index_DataCard1:
          Control: TypedDataCard@1.0.7
          Variant: TextualEdit
          Properties:
            DataField: ="msdyn_flow_approvalresponseidx_approvalid"
            DisplayName: =DataSourceInfo([@'Approval Responses'],DataSourceInfo.DisplayName,'msdyn_flow_approvalresponseidx_approvalid')
            Update: =Upper(ApproverApprovalGUID.Text)
      - Stage Index_DataCard1:
          Control: TypedDataCard@1.0.7
          Variant: TextualEdit
          Properties:
            DataField: ="msdyn_flow_approvalresponseidx_stage"
            Update: ="BASIC"
            Visible: =false
      - Approval_DataCard1:
          Control: TypedDataCard@1.0.7
          Variant: ComboBoxEdit
          Properties:
            DataField: ="msdyn_flow_approvalresponse_approval"
            Update: =LookUp(Approvals,Approval=GUID(ApproverApprovalGUID.Text))
            Visible: =false
      - SubmitButtonDataCard:
          Control: TypedDataCard@1.0.7
          Variant: BlankCard
          Children:
            - BtnSubmitApprovalResponse:
                Control: Button@0.0.45
                Properties:
                  DisplayMode: =If(IsBlank(ResponseValue.Selected.Value) || (IsBlank(ResponseCommentsValue.Value) && ResponseValue.Selected.Value="Decline") || IsBlank(Approval_DataCard1.Update) || IsBlank(ApproverApprovalGUID.Text) ,DisplayMode.Disabled,DisplayMode.Edit)
                  Icon: ="ArrowRight"
                  Layout: ='ButtonCanvas.Layout'.IconAfter
                  OnSelect: =Set(varLoading,true);Set(varMessage,"Submitting response, please wait...");SubmitForm(FormApprovalResponse)
                  Text: ="Submit"
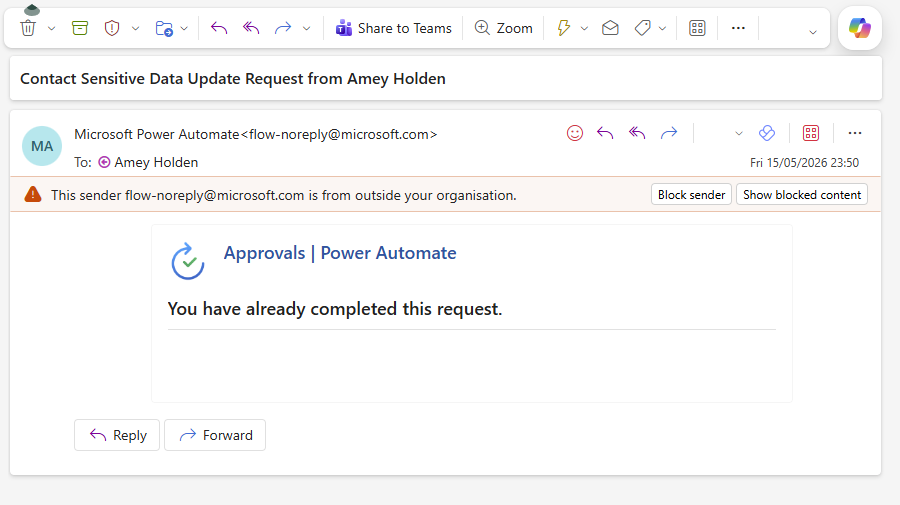
Power Automate Approvals Can Be Super Sophisticated!
So now you know that the way a Power Automate approval works is by creating or updating rows in Dataverse and how you can take them to a whole new level of sophisticated and fancy! In my next post I will show you how you can use and automated Power Automate to captures the approval response, user and comments to feed back in to your model driven app focused processes. Without using the ‘Wait for an approval’ action.
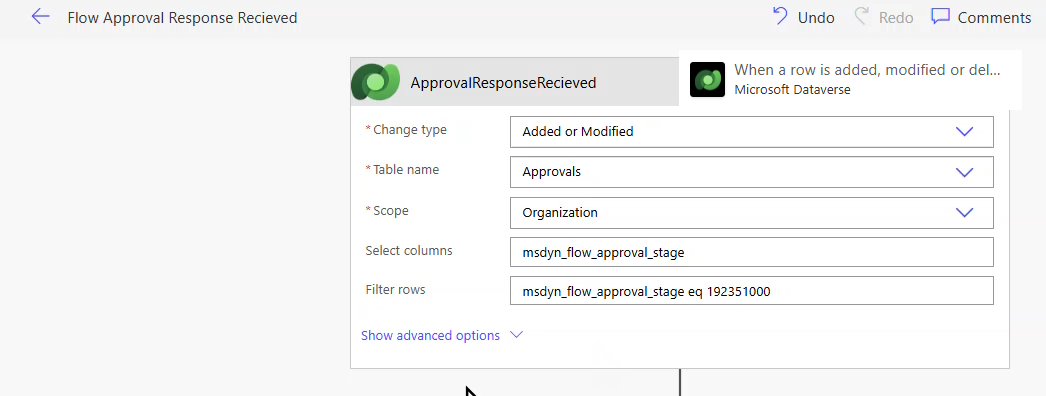
And here’s a clue for the curious and impatient!
Hit me with any questions or comments and find more Custom Pages love over here.